background image

Model LR-26C, LR-623, LR-28A, & LR-2355 Hoist Installation and Operation Manual 
Stock No. 036268 
Page 22 of 27 
 

"OPERATION OF BODY PROP"


WARNING: 

Being under a raised body can result in serious injury or death should the body 
unexpectedly descend.  

Never

 position yourself or allow others to position themselves 

under a 

loaded

 body.  

Always

 prop the 

unloaded

 body up using the body prop or body 

props supplied.  

Remember,

 body props are to be used only on an 

unloaded

 body.  

When two props are provided, both props must be used. 

 
Below is a step-by-step procedure for using the body prop. 
 
1. 

Raise body to sufficient height and shut off all power. 

 
2. 

Grasp prop handle at arms length and rotate prop upwards. 

 
3. 

Swing prop up to vertical position and push down until prop locks in line with support bracket 
on the body. 

 
4. 

Using inside-the-cab controls, lower body slowly until prop contacts prop cup. 

 
CAUTION: 

Do not power hoist down while on prop. 

 
5. 

To lower prop for normal operation, "reverse" the procedure of the above four steps. 


Summary of Contents for Rugby LR-2355

Page 1: ...o Be Filled In By Installer Hoist Serial Pump Installation and Operation Manual In Service Date Dealer Address City State ZIP Dealer Phone Number Use this manual ONLY if installing or operating a model LR 26C LR 623 LR 28A or LR 2355 hoist This manual should be kept in the glove compartment of the truck for reference when needed Original Revision January 18 2007 Current Revision C August 14 2007 ...

Page 2: ...supplied by TBEI Rugby Several hoist parameters are given in the following table these parameters are given as a general guide To ensure component compatibility consult TBEI Rugby HOIST MODEL LR 26C LR 623 LR 28A LR 2355 MAXIMUM HYDRAULIC FLOW RATE GPM 9 GPM 18 GPM MAXIMUM PRESSURE FOR RAISING PORTION OF DUMP CYCLE PSI 3200 PSI 3200 PSI MAXIMUM PRESSURE FOR LOWERING PORTION OF DUMP CYCLE PSI 1000 ...

Page 3: ...dy props are to be used only on an unloaded body When two props are provided both props must be used WARNING Malfunctioning equipment can cause property damage injury or death Always have faulty equipment repaired before continuing its use Consult the manufacturer if required WARNING Overloading of a body can cause vehicle or body component damage or an accident which may cause injury or death Nev...

Page 4: ... Hoist Installation and Operation Manual Stock No 036268 Page 4 of 27 0 3352 67 1 5 02817 1 5 9 56 02817 1 5 5 1 FIGURE 1 IMPORTANT NR stands for Not Recommended Contact TBEI Rugby Engineering before using in an application listed as NR ...

Page 5: ... 30 18 4 TONS 16 5 TONS 14 9 TONS 14 24 NR 14 8 TONS 13 4 TONS 14 12 NR 12 3 TONS 11 2 TONS 15 48 23 7 TONS 21 2 TONS 19 2 TONS 15 42 20 8 TONS 18 5 TONS 16 8 TONS 15 36 NR 16 5 TONS 14 9 TONS 16 48 NR 18 5 TONS 16 8 TONS 16 42 NR 16 5 TONS 14 9 TONS LR 26C REVERSE STANDARD M DUMP ANGLE M 102 25 40 104 25 91 25 45 93 25 82 50 50 84 50 DUMP CLASS 50 CONVERSION CLASS E 7 13 Mounting Height 6 long be...

Page 6: ...25 TONS 22 TONS 20 TONS 16 18 15 TONS 13 TONS 12 TONS 16 24 16 TONS 14 TONS 13 TONS 16 42 22 TONS 19 TONS 18 TONS 18 18 13 TONS 11 TONS 10 TONS 18 30 15 TONS 13 TONS 12 TONS 18 42 18 TONS 16 TONS 14 TONS LR 623 REVERSE STANDARD M DUMP ANGLE M 117 75 40 119 00 105 25 45 106 50 95 25 50 96 50 DUMP CLASS 50 CONVERSION CLASS F 8 13 Mounting Height 7 long beams recommended Capacities are based on the f...

Page 7: ...TONS 16 36 21 1 TONS 18 9 TONS 17 2 TONS 17 48 23 4 TONS 21 0 TONS 19 2 TONS 17 42 21 1 TONS 18 9 TONS 17 2 TONS 17 36 19 2 TONS 17 1 TONS 15 7 TONS 18 48 21 1 TONS 18 9 TONS 17 2 TONS 18 42 19 2 TONS 17 1 TONS 15 7 TONS LR 28A REVERSE STANDARD M DUMP ANGLE M 144 40 146 129 45 131 118 50 120 DUMP CLASS 60 CONVERSION CLASS F 8 13 Mounting Height 7 long beams recommended Capacities are based on the ...

Page 8: ...8 TONS 19 36 18 TONS 17 TONS 15 TONS 19 40 20 TONS 18 TONS 16 TONS 20 24 15 TONS 14 TONS 12 TONS 20 30 16 TONS 15 TONS 13 TONS 20 36 17 TONS 15 TONS 14 TONS 20 42 18 TONS 17 TONS 15 TONS LR 2355 REVERSE STANDARD M DUMP ANGLE M 115 40 117 102 45 105 93 50 95 DUMP CLASS 60 CONVERSION CLASS G 8 13 Mounting Height 7 long beams recommended Capacities are based on the following 1 Water level non diminis...

Page 9: ... immediately behind a truck cross member approximately 32 behind the center of the rear axle on single axle trucks Refer to Figure 1 and the charts for the specific hoist model you are installing NOTE If a distance of 38 is exceeded between the rear hinge and the center of the rear axle additional reinforcement of the truck frame will be required 2 Referring to Figure 2 cut a notch as shown ...

Page 10: ...5 5 029 0 17 0 17 1 5 1 1 7 6 5 72 92 17 5 5 1 7 1 2 67 1 5266 0 0 5 127 29 6 78 6 6 25 5 2 67 6 287 2 67 326 7 21 1 567 5 6 2 7 7 6 1 6 3 2 52660 0 56 6 2 1 5 25 8675 7 21 385326 6 21 6 5 76 9 1 5 029 1 7 85 6 25 8675 7 21 385326 6 2 67 326 7 21 1 0 2 7 2 67 326 7 21 25 11 1 2 7 0 17 1 6 2 1 0 16 216 72 2 5220 25 7 2 67 72 527 7 5 85 1 7 127 2 7 2 67 0867 167 68 7 7 7 29 6 78 6 6 6 5 5 5 5 6 3266...

Page 11: ...left and to square the hoist with the truck frame This hoist is designed to rest on the truck frame as shown in Figure 1 A small portion of the hoist extends below the truck frame level The hoist may have to be moved forward or rearward to avoid obstructions below the frame level 5 Slide a lock collar onto each lifting shaft Slide a lifting shaft with collar into each end of the hoist lifting tube...

Page 12: ...LR 26C Similarly a LR 623 LR 28A or LR 2355 requires 8 1 8 of clearance 9 Position the body with the long beams just long beams if they are separate from the body onto the truck frame NOTE A clearance of at least 2 is required between the truck cab and the closest point on the truck body 10 Position the rear hinge brackets against the long beams Once in position weld the rear hinge brackets to the...

Page 13: ...saddle tube is slid as far rearward as possible see Figure 4 Weld the lifting shaft angles to secure the shaft to the long beam as shown in Figure 7 With the shaft secured slide the lock collars against the hoist lifting tube and lock them there by tightening the setscrew see Figure 5 and 7 Torque the setscrew to 24 ft lb 7 1 6 7 68 66 0 6758 785 11 21 6 7 2 67 6 2 67 72 2 77 0 17 7 25 6758 785 11...

Page 14: ...hoist WARNING Installing or operating this hoist without first understanding the proper installation and operation procedures can lead to serious injury or death Always read and understand fully all installation and operation manuals before installing or operating this equipment NOTE Before operating the hoist read the OPERATION section of this manual WARNING If it is necessary to work on the hois...

Page 15: ...on yourself or allow others to position themselves under a loaded body Always prop the unloaded body up using the body prop s supplied Remember body props are to be used only on an unloaded body When two props are provided both props must be used WARNING Do not use body prop to support a loaded body WARNING Do not perform maintenance under a raised body without first blocking the empty body up wit...

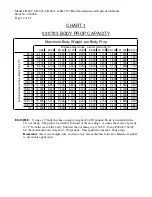
Page 16: ...E 9 4 On the left side of Chart 1 pick the P value for your application On the top of the same chart pick the X value for your application Below the X value and to the right of the P value is listed an amount of weight This represents the maximum weight that the body can weigh and be supported by only one body prop If the body weights more than the amount listed 2 body props will be required Conta...

Page 17: ...00 2 700 2 400 102 107 12 100 8 900 7 000 5 800 4 900 4 200 3 700 3 200 2 900 2 600 108 115 12 700 9 400 7 400 6 100 5 100 4 400 3 900 3 400 3 100 2 800 114 119 13 400 9 900 7 800 6 400 5 400 4 700 4 100 3 600 3 200 2 900 120 125 14 000 10 400 8 200 6 700 5 700 4 900 4 300 3 800 3 400 3 100 126 131 14 700 10 900 8 600 7 100 6 000 5 200 4 500 4 000 3 600 3 300 132 137 15 300 11 400 9 000 7 400 6 30...

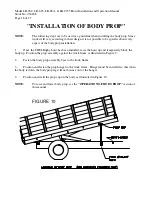
Page 18: ...e TBEI Rugby hoist has been installed raise the hoist up and temporarily block the body up Position the prop assembly against the truck frame as illustrated in Figure 9 2 Fasten the body prop assembly base to the truck frame 3 Position and fasten the prop hanger to the truck frame Hanger must be installed so that when the body is down the body prop leg will not bounce out of the hanger 4 Position ...

Page 19: ...ld be positioned as shown in Figure 11 The part number of the DANGER decal is 03 6039 FIGURE 11 WARNING Missing or damaged decals can cause incorrect or unsafe operation of the hoist which can cause accidents which may cause serious injury or death If any decals are missing or damaged they must be replaced To obtain replacement decals contact your TBEI Rugby dealer or call 1 701 776 5722 or 1 800 ...

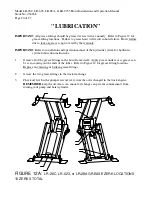
Page 20: ...lic system for hydraulic system lubrication instructions 1 Grease all of the grease fittings in the hoist frame itself Apply grease until excess grease can be seen coming out the ends of the tubes Refer to Figure 12 for grease fitting locations Replace any missing or broken grease fittings 2 Grease the two grease fittings in the truck rear hinge 3 Check oil level in the pump reservoir every time t...

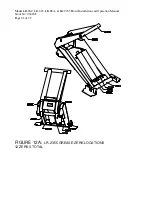
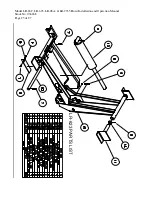
Page 21: ...Model LR 26C LR 623 LR 28A LR 2355 Hoist Installation and Operation Manual Stock No 036268 Page 21 of 27 FIGURE 12A LR 2355 GREASE ZERK LOCATIONS 12 ZERKS TOTAL ...

Page 22: ...member body props are to be used only on an unloaded body When two props are provided both props must be used Below is a step by step procedure for using the body prop 1 Raise body to sufficient height and shut off all power 2 Grasp prop handle at arms length and rotate prop upwards 3 Swing prop up to vertical position and push down until prop locks in line with support bracket on the body 4 Using...

Page 23: ...nto an area where an upset load might fall 3 Controls must be in a safe location and operator must remain at controls during the dumping operation Controls must be permanently located in truck cab or another location where it is not possible to be under body during dumping operation 4 Never leave body raised or partly raised while the truck is unattended or while performing maintenance or service ...

Page 24: ... and Operation Manual Stock No 036268 Page 24 of 27 5 3 576 67 7 9 7 0 3 57 6 5 37 21 47 6 5 5 3 7 6 5 5 3 7 6 7 6 5 645 3 1 187 5 67 3 7 187 1 2 1 5 67 6 5 2 3 7 277 5 3 1 3 7 77 1 5 6 7 5 250 1 02817 1 1 1 5 3 1 6 7 5 7 1 6 7 6 2 5 1 1 5 52 1 5 0 0 17 5 ...

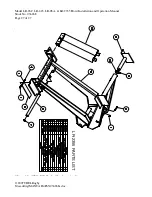
Page 25: ...Model LR 26C LR 623 LR 28A LR 2355 Hoist Installation and Operation Manual Stock No 036268 Page 25 of 27 LR 623 PARTS LIST ...

Page 26: ... and Operation Manual Stock No 036268 Page 26 of 27 5 3 576 67 7 9 7 0 3 57 6 5 37 21 47 6 5 5 3 7 6 5 5 3 7 6 7 6 5 645 3 1 187 5 67 3 7 187 1 2 1 5 67 6 5 2 3 7 277 5 3 1 3 7 77 1 5 6 7 5 250 1 02817 1 1 1 5 3 1 6 7 5 5 0 0 17 5 7 1 6 7 6 2 5 1 1 5 52 1 ...

Page 27: ...Model LR 26C LR 623 LR 28A LR 2355 Hoist Installation and Operation Manual Stock No 036268 Page 27 of 27 LR 2355 PARTS LIST 2007 TBEI Rugby S acaddwg MANUALS P65 036268c doc ...

Reviews: