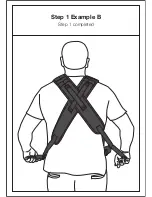
Step 1 Example B
Step 1 completed
REQUIREMENTS
Minimum requirements: 8 lb (3.5 kg) and 21 in (53 cm).
Maximum weight: 33 lbs (15 kg)
WASHING INSTRUCTIONS
Spot clean carrier with mild diluted detergent.
Do not use chlorine bleach or fabric softener. NEVER IRON!
Improper care will void any and all warranties.
SAFETY APPROVAL
Tactical Baby Gear Baby Carrier meets the safety requirements for
baby carriers (ASTM F2236-13).
IMPORTANT!
Baby must face you until he or she can hold head upright.
Premature infants, infants with respiratory problems, and infants
under 4 months are at greatest risk of suffocation.
Never use a soft carrier when balance or mobility is impaired
because of exercise, drowsiness, or medical conditions.
Avoid dressing your child too warmly.
Never wear a soft carrier while driving or being a passenger in a
motor vehicle.
Never use a soft carrier while engaging in activities such as cooking,
and cleaning which involve a heat source or exposure to chemicals.
The baby carrier is NOT suitable for use during sports or other leisure
activities.
Check to assure all buckles, snaps, straps, and adjustments are
secure before each use.
Check for ripped seams, torn straps or fabric and damaged fasteners
before each use.
Read all instructions before assembling and using
the soft carrier.
Keep instructions for future use.
Summary of Contents for BABY CARRIER
Page 1: ......
Page 2: ......
Page 5: ...Step 1 A Place shoulder straps overhead and securely onto shoulders...
Page 6: ...Step 1 B Place shoulder straps overhead and securely onto shoulders...
Page 7: ...Step 1 Example A Step 1 completed...
Page 8: ...Step 1 Example B Step 1 completed...
Page 10: ...Step 2 Example A Step 2 completed...
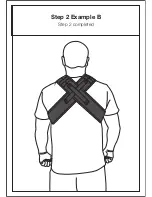
Page 11: ...Step 2 Example B Step 2 completed...
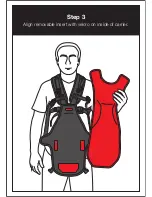
Page 12: ...Step 3 Align removable insert with velcro on inside of carrier...
Page 13: ...Step 3 Example A Step 3 Align velcro...
Page 14: ...Step 3 Example B Step 3 completed...
Page 15: ...Step 4 Buckle left or right side of the 1 buckles...
Page 16: ...Step 5 Holding baby securely against your chest guide one leg through the side you buckled...
Page 18: ...Step 6 While supporting baby with your arm buckle the other side s 1 buckle...
Page 19: ...Step 7 Continue to support baby s back as you buckle upper 1 buckles on left and right sides...
Page 21: ...Step 9 While supporting baby adjust left and right 1 support straps as needed...
Page 23: ...Step 10 Example A Adjusting straps...
Page 24: ...Step 11 Infants may require additional leg strap to reduce size of leg opening...
Page 25: ...Step 11 Example A Infants may require additional leg strap to reduce size of leg opening...
Page 26: ...Step 11 Example B Infants may require additional leg strap to reduce size of leg opening...
Page 27: ......


