background image

13

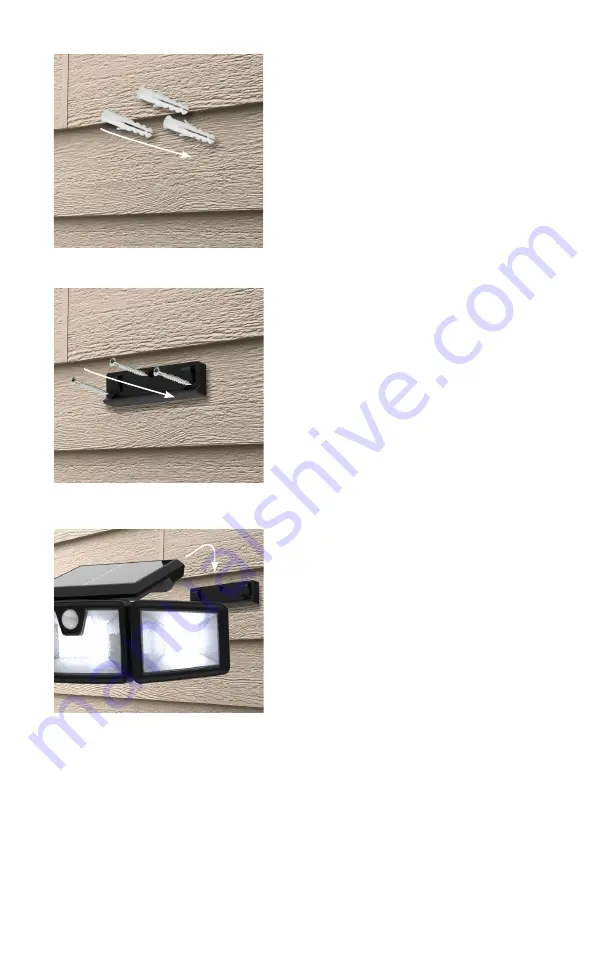
STEP 2

Fix the Expansion anchors into 

the wall. 

STEP 3

Put the screws through the 

wall bracket, and twist into the 

expansion anchors. 

STEP 4

Place the solar panel on the 

wall bracket. 

The installation is complete. 

Once the motion light is installed, the side lamp heads can be 

adjusted independently in a variety of ways for optimal lighting 

coverage.

Summary of Contents for RaLights 3H

Page 1: ...1 RaLights 3H USER MANUAL...

Page 2: ...3 CONT ENT Introduction Package Includes Specifications Safety information The advantages of RaLights 3H 3 useful modes Installation Care maintenance Product Warranty 4 4 5 6 7 10 12 14 15...

Page 3: ...nsor and unique rotatable 355 features We hope you enjoy our solar lighting solution To ensure proper operation of this solar light kindly read the instructions thoroughly prior to installation PACK A...

Page 4: ...ttage Delay time after detection Sensor Detection angle Modes Installation Type Material 216 pcs each one rotates up and down at 90 and turns back up to 155 up to 2200lm up to 40ft 3 7V 2200mah IP65 2...

Page 5: ...e longer it gets sunshine the longer it can illuminate We recommend a mounting height of 7 8 ft Please lay out all the components prior to installation and check against the part list section in this...

Page 6: ...for brighter and more saturated light with up to 2200 lm You can see view the light covered area easily at night THE LARGEST LIGHT COVERAGE AREA A unique feature of our 3head Solar Sensor Lights is th...

Page 7: ...table design of 355 and an independently adjustable solar panel of 180 Left and Right side head spotlights can be rotated to any angle up and down at 90 and turned back up to 155 All features listed a...

Page 8: ...nsor lights can also withstand all kinds of severe weather conditions Our lights are water resistant heat resistant and frost resistant Built to withstand rain and other extreme weather conditions The...

Page 9: ...k of the Solar Light Device to the 1st position to activate the Sensor s Bright Light mode AT FIRST The lamp remains off at night until the sensor detects nearby movement THEN At the detection of any...

Page 10: ...ar Light keeps the dim light ON all night and then turns OFF when there is sunlight This mode lasts for up to 12 hours at night after the lamp has been fully charged for 7 8 hours in sunlight DOUBLE S...

Page 11: ...xperienced Before installation ensure that your solar panel will be placed in a location that will optimize its exposure to the sun Be aware that objects such as trees or property that overhang may im...

Page 12: ...rough the wall bracket and twist into the expansion anchors STEP 4 Place the solar panel on the wall bracket The installation is complete Once the motion light is installed the side lamp heads can be...

Page 13: ...me technique to clean the lenses of the motion lights Never allow any abrasive material to come in contact with the solar panel The internal light sensor ensures that the movement sensor will not acti...

Page 14: ...overed by our warranty 1 Purchases from non authorized sellers or distributors 2 Damage resulting from fire moisture improper use physical shock or other damage occurring after purchasing the lamp 3 I...

Page 15: ...Questions Contact us at support tbi pro com 1 800 674 92 29 Mon Fri 8 00 20 00 GMT 6 www TBI STORE com...

Reviews: