6
7
Mounting the Power
Base
1. Remove the top plate from the
P
ower
B
ase by gently prying it up until
you can squeeze and release the springs from the slots and set the
top plate aside.
2. Lower the
P
ower
Base
into the cutout so that the keypad is towards
the front of the countertop. Center the unit within the cutout.
Be very
careful not to crease the rubber sealing gasket as you slide the
power unit into place.
Replace the Top Plate and Key Pad
1. Align the top plate with the
P
ower
B
ase.
2. Squeeze the tension springs on the top plate until they slide smoothly into
the slots at each end of the
P
ower
B
ase.
3. Gently press the top plate into position.
4.
Plug in the Power Base.
4
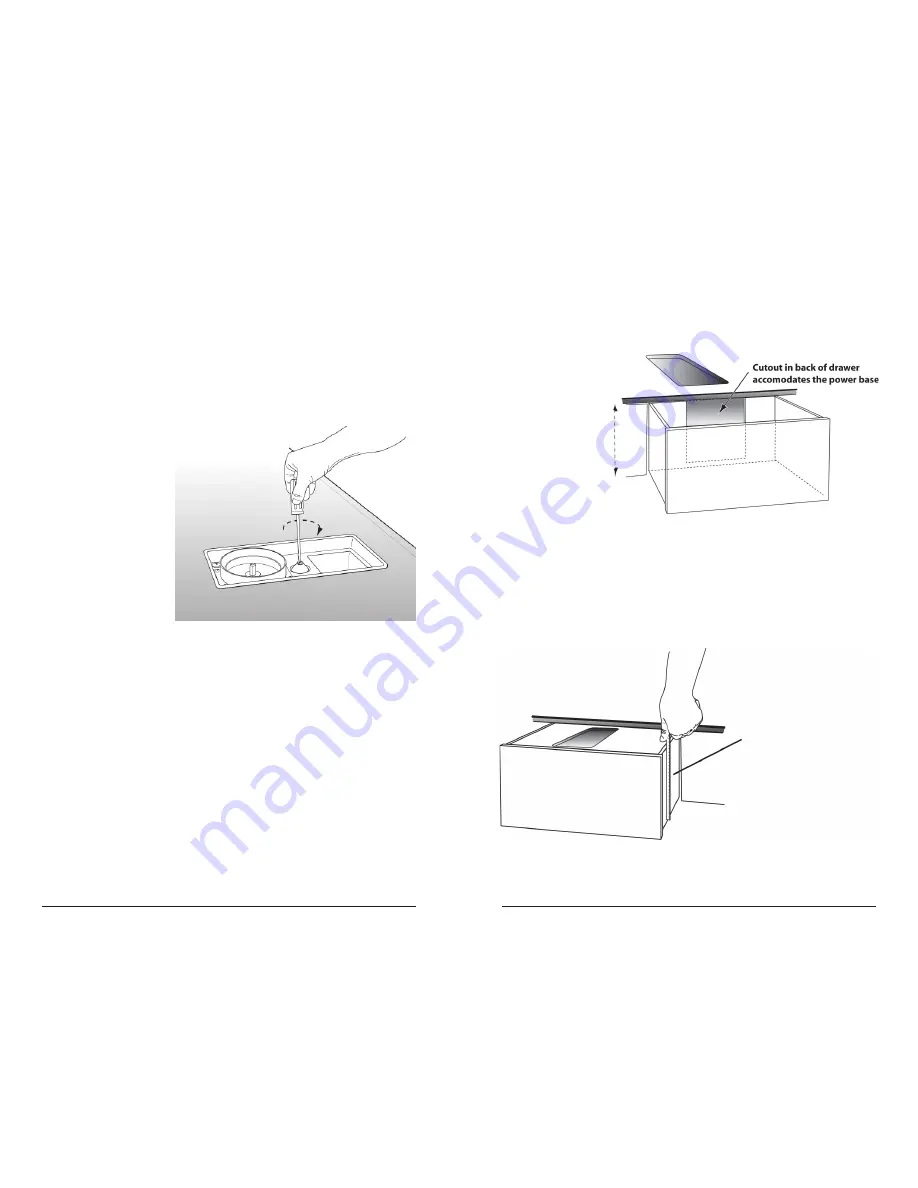
. Using a flat blade
screwdriver, turn the
central mounting screw
clockwise. The clamp
bracket beneath the
counter will extend to
secure the unit tight
against the countertop.
Do not over tighten the
screw!
Installation above a drawer
The Power
B
ase can be installed above a drawer if required. Check that the
drawer is deep enough to clear the power base before cutting. If necessary, make
a cutout in the back of the drawer as shown so that it will clear the
P
ower
B
ase
when the drawer is opened.
Installation inside a drawer
The
P
ower
B
ase can also be installed inside a deep drawer so that the keypad
is flush with the top of the drawer as shown. Consult with your installer to make
sure that the drawer has the minimum necessary dimensions and airflow and that
a suitable insert can be placed into the top of the drawer to support the weight of
the
P
ower
B
ase. The drawer must extend at least 16” inches past the counter top.
CAUTION
Make sure that the power cord has space to move freely without snagging
when the drawer is opened and closed.
For more installation information visit the www.TCCkitchencenter.com web site
Measure depth of drawer.
Must be at least 8" from
top of drawer to base
At least 8" clearance
needed from bottom of
counter to base
3. For use outdoors, make a liquid silicone ring (gasket) approximately
210mm x 330mm under the stainless steel cover base flange using
a tube of liquid silicone sealent, completely sealing the outer
flange area from rain leakage
*For Outdoor Use: [BBQ Islands, outdoor kitchens,
boat kitchen galleys, etc.]
When used for outdoor installation, install the Kitchen Center
stainless steel weatherproof cover [contact your local KC dealer]
between the outdoor countertop and Power Base flange.
For all outdoor use installations, follow the GROUNDING
INSTRUCTIONS and use of EXTENSION CORDS [see
page15 and figure 73.1 of this owners manual]
7
Summary of Contents for Kitchen Center
Page 9: ......


