background image

38

Problems / Solutions

No steam is generated.

The frother nozzle does not dispense water.

• The machine has not yet heated up.

• Frother nozzle and/or steam wand is clogged.

Too little or no coffee comes out, 

and the capsule cannot be removed.

• In rare cases, the capsules are not correctly perforated 

by the machine. The capsule holder is then temporarily

blocked.

Wait for about 2 minutes and then try to remove the

capsule again.

The steam and espresso buttons flash but

nothing else appears to happen.

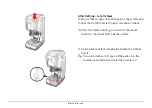
• The machine is cooling down from the steam production

temperature to the lower coffee brewing temperature. 

To reduce the time this process takes to 20 seconds,

proceed as described in the section ”Frothing milk” in 

”After frothing – let off steam”.

Not possible to change the quantity of water.

• The water quantity must not go below the minimum of 

25 ml. Refer to ”Adjusting the strength of the coffee”.

All buttons are flashing.

• All buttons flash before first-time use. This is not an error.

Proceed as described in the separately enclosed instruc-

tions “Initial operation”. 

• A malfunction has occurred. Switch the machine off and

then on again. 

• Ventilate the machine — refer to ”Rinsing with water after

a long period of non-use”.

Summary of Contents for Cafissimo CLASSIC

Page 1: ...Original instructions for use and guarantee for Cafissimo CLASSIC Find it only at Tchibo Welcome to ...

Page 2: ...ilter coffee Just press a button and your Cafissimo CLASSIC will do the rest Our team of experts have optimally harmonized the machine and capsules so that your coffee develops its full aroma For anyone who enjoys drinking cappuccino and latte macchiato the Cafissimo CLASSIC is equipped with a milk frothing steam nozzle of Barista quality This means that in next to no time you can delight both you...

Page 3: ...each type of coffee is prepared at the correct pressure Individually programmable beverage size Brew however strong a cup you like according to your personal taste Energy saving with a descaling reminder We are there for you To show you that we are completely convinced of the quality of our products we grant you a full 40 month guarantee for the machine page 10 page 19 page 35 page 41 ...

Page 4: ...f non use 16 Brewing coffee 19 Adjusting the strength of the coffee 19 Adjusting the strength for the current brewing procedure without saving the setting 19 Setting the strength permanently saving the setting 19 Restoring the factory settings 20 Frothing milk 20 Tips for a perfect milk froth 20 Dispensing steam 23 Frothing milk 24 After frothing let off steam 26 Brewing and frothing temperatures ...

Page 5: ...ng the water tank 34 Cleaning the casing 35 Descaling 35 How often must the machine be descaled 35 Descaling agent 37 Problems Solutions 39 Technical specifications 40 Declaration of Conformity 40 Disposal 41 Guarantee At a glance Water tank Steam wand Steam knob for steam and hot water Frother nozzle Capsule holder Stop lever metal bracket Drip tray with grid Hinged tray for small cups Red floate...

Page 6: ...is heating up cooling down or preparing a beverage Permanently lit buttons indicate that the machine is ready for use The steam button can light up or flash in white or red all others in white You can find an overview on the right Indicator light water tank empty or machine needs to be descaled Steam On Off Lights up in red steam Lights up in white hot water Steam is required for frothing milk You...

Page 7: ...ilk froth Machine is ready to dispense steam for milk frothing The machine is cooling down from steam production temperature to lower coffee brewing temperature Start up is being carried out Water indicator light flashes evenly Water needs to be replenished Water indicator light flashes 3 times briefly every 3 seconds Machine needs to be descaled or or Water level decreases to below MINimum during...

Page 8: ...eam valve is open water tank empty button not yet pressed Descaling programme waiting for the rinsing phase to start capsule holder is not fitted stop lever is not pressed down steam valve is open water tank empty button not yet pressed Descaling programme cleaning phase rinsing phase Cleaning phase progress bar from right to left Rinsing phase progress bar from left to right Error ...

Page 9: ...ooling down is completed 1 short acoustic signal 5 seconds after coffee has been brewed 1 long acoustic signal Automatic switch off after 2 hours of non use 1 short acoustic signal Water level decreases to below MIN mark during use 1 short acoustic signal Descaling programme refill the tank with water 1 long acoustic signal Descaling is completed 2 long acoustic signals ...

Page 10: ...rom our permanent product range These limited choice selections are available from us several times a year Capsules can be purchased from Tchibo The Cafissimo aroma capsules The unique three pressure level system The Cafissimo CLASSIC has a unique three pressure level system meaning that it is optimally designed to brew your favourite type of coffee This individual brewing pressure allows the resp...

Page 11: ...ry caused by electricity This symbol warns you of the danger of injury The coffee machine has been devised for the following uses Brewing filter coffee caffè crema and espresso with Tchibo capsules Frothing milk Dispensing hot water It has been designed for use in households or for similar applications such as in shops offices or other areas of work in agricultural buildings by customers in hotels...

Page 12: ... with water jets Take care not to place it near water jets where it could be sprayed or splashed with water Never touch the mains plug with damp hands Do not use the machine outdoors Never leave the machine to operate unattended Only connect the machine to a properly installed grounded wall socket Its mains voltage must comply with the technical specifications of the machine The mains cord must no...

Page 13: ...e as soon as the machine indicates that this is necessary There is one sharp point in the capsule holder and one in the capsule holder retainer Both these points pierce through the capsule from the bottom and the top while it is being inserted Never touch these sharp points If you want to move the machine hold it by the outer casing Allow the machine to cool down before moving it Place the machine...

Page 14: ...nitial operation IMPORTANT Before you can use the machine water must be pumped into the piping system The separately enclosed leaflet explains how you should proceed Initial operation Before first time use ...

Page 15: ... stop the procedure Full aroma Insert a capsule only when you require it The capsule is pierced as it is inserted If it is not then used imme diately the aroma will fade Espresso tastes best when served in a preheated cup Also read the section Hot water to preheat cups Residues of coffee grounds and capsule bases There are two features particular to this system A small residue of coffee grounds al...

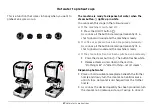
Page 16: ...nd If the indicator light Water tank empty flashes fill water into the tank 2 Insert a capsule into the capsule holder The capsule must be intact do not pierce it and do not remove the lid 3 The stop lever must be folded up Slide the capsule holder into the machine and press the stop lever down as far as it will go While the machine heats up a few drops of water may drip from the capsule holder Th...

Page 17: ...on you press depends on the capsule you have inserted For example if you have inserted a yellow capsule you must press the button with the yellow cup caffè crema After you have pressed a button it will begin to flash and preparation will start As soon as preparation has been completed the buttons will light up permanently A signal will sound approximately 5 seconds after the brewing process has en...

Page 18: ...sule holder to the front out of the machine If necessary hold a dish underneath to catch possible drips 3 Empty out the capsule holder by turning it upside down over a rubbish bin The used capsule will fall out After use 1 If you do not wish to brew any further cups of coffee press the On Off button to switch off the machine 2 Clean the capsule holder as described in the section Cleaning 3 Reinser...

Page 19: ...ne is bought filter coffee 125 ml caffè crema 125 ml espresso 40 ml You can adjust the beverage quantity in the range of 30 300 ml 1 Proceed as you would do for brewing coffee insert a capsule press the stop lever down place a cup under neath 2 As soon as all the buttons remain permanently lit press the corresponding coffee selection button depending on the capsule inserted and keep the button pre...

Page 20: ...th the milk WARNING risk of scalding due to hot water or steam Never expose any part of the body to the steam or hot water jet Do not touch any hot parts of the machine such as the steam wand or the metal parts of the frother nozzle Only use the steam froth functions when a suitable receptacle has been placed beneath the steam nozzle Only take hold of the frother nozzle by the black upper end The ...

Page 21: ...switch the machine on 2 Press the button with the steam symbol The button flashes red and the machine heats up to produce steam As soon as the button lights up permanently in red a short signal will sound and the machine is ready for use 40 105 sec ...

Page 22: ...ce point A small quantity of water will be discharged 5 As soon as the water jet runs dry and only steam emanates turn the steam knob clockwise as far it will go to close it The machine is then ready for frothing milk Do not be alarmed The steam is emitted under pressure To begin with the steam may be emitted in short bursts This is normal and harmless ...

Page 23: ...e steam nozzle is deeply immersed in the milk 8 Slowly turn the steam knob anticlockwise beyond the resistance point Make circling movements with the receptacle making sure that the steam nozzle is always below the surface of the milk 9 When sufficient froth has developed turn the steam knob clockwise to close it The milk froth is now ready to use ...

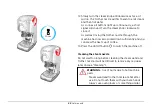
Page 24: ...rinse the frother nozzle through proceed as follows 10 Press the steam button to switch off the steam function The steam button flashes white 11 Hold a heat resistant receptacle beneath the frother nozzle To avoid splashes first pour a little water into the receptacle and immerse the frother nozzle in it Tip ...

Page 25: ...er nozzle through the machine has now also cooled down sufficiently and you can brew the next cup of coffee 13 Press the On Off button to switch the machine off Cleaning the steam nozzle Do not wait too long before cleaning the steam wand and frother nozzle lt will be difficult to remove any residues later on see Cleaning WARNING risk of burns due to hot machine parts Steam wand and frother nozzle...

Page 26: ...ing milk emitting steam lights up in red ready for frothing milk flashes white cooling down for brewing coffee or for dispensing hot water lights up in white ready for brewing coffee or dispensing water Have you accidentally pressed the steam button If the steam button has been pressed accidentally simply press it again to switch it off However the machine may already have reached a high temperatu...

Page 27: ...presso has been prepared previously As soon as all the buttons remain permanently lit a short signal will sound and the machine is ready c If the steam function has been switched on previously Press the steam button The button flashes white Release steam as described in the section Frothing milk in After frothing let off steam Dispensing hot water Place or hold a suitable receptacle beneath the fr...

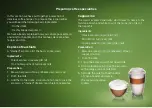
Page 28: ... full cream milk Cocoa powder to decorate if desired Preparation 1 Brew an espresso into a preheated coffee or cappuccino cup 2 Froth the milk 3 Fill up the espresso with hot liquid milk 4 Using a tablespoon top up the espresso with a large scoop of milk froth 5 Sprinkle the milk froth with a little of cocoa powder and serve the cappuccino imme diately Espresso Macchiato A stained espresso for the...

Page 29: ...automatically create the layered effect Serve with a long handled spoon to stir Alternatively Put 20 30 ml caramel syrup into the glass Froth the milk in a separate container and add milk and froth to the syrup Then continue from step 3 Coffee Mocha The American version of chocolate coffee Ingredients 1 black espresso capsule 40 ml 100 to 120 ml full cream milk 20 to 30 ml chocolate syrup Cocoa po...

Page 30: ...ill be trapped in the system In rare cases air can also have entered the system while milk was being frothed In this case the next coffee that is brewed will be very strong because too little water flows through In these cases the machine must be ventilated or rinsed with water Proceed as follows 1 Fill cold water into the water tank up to the MAXimum mark 2 Press the On Off button ...

Page 31: ... far as it will go The water stops being dispensed Pour the water away The machine is ready for use again WARNING risk of scalds due to hot water splashes or steam The machine begins heating as soon as it has been switched on If you proceed slowly the water may already be hot Automatic switch off The machine features an automatic switch off function It will switch off automatically if none of the ...

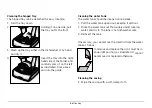
Page 32: ... jet Clean it only as described in the following instructions Cleaning the capsule holder The capsule holder is made up of two parts and must be taken apart before being cleaned 1 Turn the upper part of the capsule holder anticlockwise as far as it will go Pull it upwards 2 Rinse both parts with warm water and a little mild washing up liquid Rinse them thoroughly with clear water and dry them well...

Page 33: ...eldom happens clean the opening with the help of a pin or similar implement 4 Reassemble the frother nozzle 5 Push the frother nozzle onto the steam wand as far as it will go Cleaning the floater drip tray and grid The floater drip tray and grid can be washed up by hand or cleaned in the dishwasher Put the floater into the cutlery basket 1 Clean the floater drip tray and grid and dry them 2 Put th...

Page 34: ...ated from above and into the guide Cleaning the water tank The water tank should be cleaned once a week 1 Pull the water tank up and out keeping it vertical 2 Rinse the water tank out thoroughly under running water and dry it The tank is not dishwasher safe 3 Reinsert the tank If necessary you can remove the small lid from the water tank as follows To remove and replace the lid it must be in an up...

Page 35: ...ny descaling agents made on the basis of formic acid Only use the specified descaling agents Other agents may damage materials in the appliance and or have no effect The machine must be cold when you start the descaling process Otherwise the descaling agent can cause damage Descaling Further indications of calcification starting the brewing process takes significantly longer than usual the brewing...

Page 36: ...ately 5 seconds and the descaling procedure will begin 6 The coffee selection buttons flash in a progress bar from right to left The pump transports the descaling solution into the boiler at regular intervals When the descaling procedure is completed a signal will sound and the caffè crema and espresso buttons will flash This procedure takes between 45 and 60 minutes Empty the receptacle and place...

Page 37: ...before first time use turn the steam knob clockwise as far as it will go to close it All buttons are flashing refer to page 38 All buttons are flashing The coffee does not taste good The coffee is too strong or too weak Wrong button has been pressed The colour of the capsule and button must match Refer to Brewing coffee step 5 The capsule has already been used Each capsule can only be used once Qu...

Page 38: ...chine is cooling down from the steam production temperature to the lower coffee brewing temperature To reduce the time this process takes to 20 seconds proceed as described in the section Frothing milk in After frothing let off steam Not possible to change the quantity of water The water quantity must not go below the minimum of 25 ml Refer to Adjusting the strength of the coffee All buttons are f...

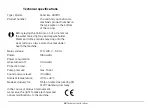
Page 39: ...s Protection class I Pump pressure max 15 bar Sound pressure level 70 dB A Ambient temperature 10 to 40 C Made exclusively for Tchibo GmbH Überseering 18 22297 Hamburg Germany In the course of product improvement we reserve the right to make technical and optical modifications to the machine Before laying the Cafissimo on its side remove the water tank drip tray and capsule holder Water and coffee...

Page 40: ...d with this symbol must not be disposed of along with household refuse You are legally obliged to dispose of old appliances separately from household refuse Information about where they can be deposited free of charge is available from your local authorities We herewith confirm compliance of the product with the following directives 2006 42 EC Machinery Directive 2004 108 EC Electromagnetic Compat...

Page 41: ...ect is found please contact our customer care service at the following e mail address service tchibo de Our customer consultants will be pleased to advise you on further procedure Damage due to improper use failure to decalcify as well as worn parts and consumables are not covered by the guarantee Please have the product number at hand in case of any queries This guarantee does not restrict statut...

Page 42: ...at the press of a button than coffee machine and capsules For that very special Cafissimo experience we offer you a range of accessories for example our capsule dispenser or our elegantly designed latte macchiatio glasses You can now really make the most of your coffee ...

Page 43: ...68314 GSMOHB 042015 D006F ...

Reviews: