background image

Section 5.0 Installation Guidelines 


HGA IOM 

38 


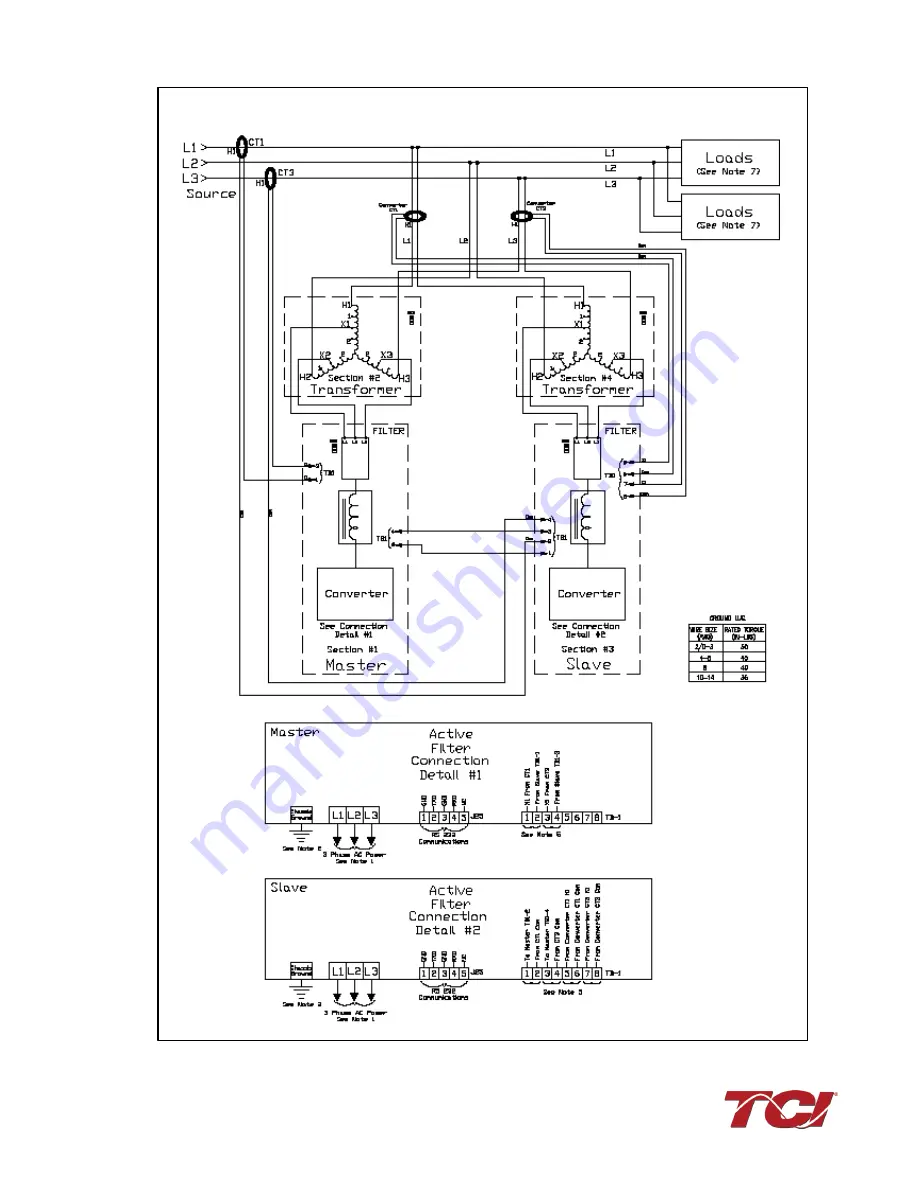
Figure 15:  HGA 600 V Two Unit Parallel Connection Diagram 


HGA MASTER / SLAVE CT PLACEMENT 

Summary of Contents for HGA HarmonicGuard Series

Page 1: ...llation Operation and Maintenance Manual TCI LLC W132 N10611 Grant Drive Germantown Wisconsin 53022 Phone 414 357 4480 Fax 414 357 4484 Helpline 800 824 8282 Web Site www transcoil com 2020 TCI LLC All rights reserved Product No 26030 Effective 06 12 20 Version P ...

Page 2: ... otherwise without the prior written permission of TCI LLC The information in this manual is subject to change without notice Every precaution has been taken in the preparation of this manual TCI LLC assumes no responsibility for errors or omissions Neither is any liability assumed for damages resulting from the use of the information contained in this publication ...

Page 3: ... Planning 15 Verify the Application 15 Product Description 15 Nameplate Data 17 HGA Part Numbering System 480 V Open and Type 1 20 HGA Part Numbering System 480 V Type 12 3R 21 HGA Part Numbering System 600 V 22 Communications Part Numbering 23 Floor Stand Options 23 Mounting an Open Chassis Unit 23 Open chassis unit cooling notes 24 Cooling Diagrams 24 UL Type 3R Unit Heating and Cooling Notes 24...

Page 4: ... Mounting 63 Wiring 63 Interface PCB Connections 64 HMI Display Connections 65 Initialization 68 HMI Installation Diagram 69 HMI Set Up Instructions 70 HMI Screens 78 Network Interface 100 8 0 Maintenance 104 Clock Battery Replacement 104 Software Field Upgrades 104 9 0 Troubleshooting 105 HarmonicGuard Active Filter Fault 105 Interface Module Problem 105 Fault Troubleshooting Notes 106 10 0 Appen...

Page 5: ...16 HMS Gateway Example 116 Required equipment 116 Setup 117 Programming 117 Write To HMI 119 12 0 Appendix C ModbusRTU Master 120 Introduction 120 Wiring and Configuration 120 13 0 Appendix D DeviceNet Gateway Option 125 Introduction 125 Wiring 125 Configuration 126 Operation 126 HMS Gateway Example 127 Hardware Requirements 127 Software Requirements 127 Setup 128 Establishing Correct Network Sett...

Page 6: ...R Enclosure 132 Introduction 133 HGA HMI Operation 134 15 0 Appendix F BACnet Gateway Option 135 Introduction 135 Wiring 135 Configuration 136 Register Map 137 HMS Gateway Example 137 16 0 Appendix G HMI Modbus RTU COM Change Instructions 140 ...

Page 7: ... Product Numbering Updated Watts Loss on Standard Product Ratings and Dimension Tables Updated Unit Dimensions on 600 V 07 27 17 L Updated information on Over Temperature Protection Added Fault Codes Update Drive Applied Connection Diagram Update Circuit Breaker Trip Rating Add Appendix H BACnet Gateway Option 12 20 17 M Updates to Part numbering system general formatting 04 22 19 N Updates to for...

Page 8: ...o not attempt any work on a powered HGA filter Warning The HGA filter and other connected equipment must be properly grounded Warning The HGA filter may receive power from two or more sources Three phase power is connected to the main input terminals of the HGA filter All of these sources of power must be disconnected before working on the HGA filter Warning After switching off the power always al...

Page 9: ...conds HMI will start on Home screen Load s have an integral 5 line reactance or equivalent DC bus choke Warning Hazardous Voltages are present when unit is energized Note Built In Sensor Wiring Error Detection The active filter has an automatic sensor wiring error detection algorithm built into the controls If a sensor wiring error is detected please reference the Sensor Error Auto Detection secti...

Page 10: ...en ensure PF Correction Enable and Harmonic Correction Enable buttons are OFF Blue If buttons are green press to toggle off Select the CT Ratio button and enter CT ratio to match the external current transformers wired to the unit Select the Back button Next select the VAR Output button and ensure the Local VAR Output Enable and Network VAR Output Enable are OFF Blue If buttons are green press to ...

Page 11: ...n press to toggle off Navigate back to Tech Setup screen Now select Save Settings Press Home to navigate to Home screen 3 Home screen check Compare Freq to expected line frequency Compare Voltage to expected line Voltage Current expected to be zero because unit is not running and CT inputs are shorted If status indicates a Fault press Stop button to reset condition ...

Page 12: ... Current expected to be zero if unit is not running and CT inputs are shorted Line Side Configured Unit Load Side Configured Unit 5 Phase rotation check Press Phase to Neutral Voltage Plot button Check that the current peaks follow the following sequence from left to right Phase A Green Phase B Blue Phase C Red Equipment is phase rotation sensitive if phase rotation is incorrect power down unit an...

Page 13: ...Select the VAR Output button and ensure the Local VAR Output Enable and Network VAR Output Enable are OFF Blue Select the Back buttons to go back to Tech Setup screen Select the Home button from navigation bar Select the Run button to start unit operation 7 Remove CT shorting bars Press Stop to turn off unit Disconnect power from cabinet Turn off the built in door breaker AND Turn off the upstream...

Page 14: ...perating in limit and or contributing to rather than correcting harmonics Note If using a Line Side master unit the screen title will say Line Status and if using a Load Side slave unit the screen title will say Load Status Also See notes under each screen 9 Current polarity 2 Navigate to Status screen Depending on unit configuration select either the Line or Load button Verify that the fields mat...

Page 15: ...tton is ON Green Select the CT Ratio button and confirm the configured CT ratio matches the external current transformers that are wired to the unit Select the Back button and then from Tech Setup screen select Run Stop Control Setup Select Auto Start Setup On this screen select the Auto Start Enable button and ensure the button is ON Green Navigate back to the Tech Setup screen and select the Sav...

Page 16: ...I HGA IOM 9 11 Final check Note If unit is configured for load side operation reference the User Manual for Load Side CT Placement diagram Navigate to the Status screen Navigate to Line Load status Note the corrected Voltage current power and THD Line Side Load Side ...

Page 17: ...condition physical injury or death Cautions are used to call attention to instructions that describe steps that must be taken to avoid conditions that can lead to a malfunction and possible equipment damage Warnings Readers are informed of situations that can result in serious physical injury and or serious damage to equipment with warning statements marked with the following symbols Warning Dange...

Page 18: ...t all power before working on the equipment Do not attempt any work on a powered HGA filter Warning The HGA filter and other connected equipment must be properly grounded Warning The HGA filter may receive power from two or more sources 3 phase power is connected to the main input terminals of the HGA filter All these sources of power must be disconnected before working on the HGA filter Warning A...

Page 19: ...name for a real time filter that mitigates harmonics while also maintaining near unity power factor An Active Harmonic Filter is any piece of equipment that actively monitors and changes the incoming AC line current HGA The term commonly used in place of the entire brand name of HarmonicGuard Active filter Active Harmonic Filter An active harmonic filter is a piece of equipment that reads the inco...

Page 20: ...to exceed 18 months from the date of shipment PF Guard HGP HGL HG7 HSD KRF Three 3 years from the date of shipment KCAP KTR Five 5 years from the date of shipment All Other Products One 1 year of useful service not to exceed 18 months from the date of shipment The foregoing limited warranty is TCI s sole warranty with respect to its products and TCI makes no other warranty representation or promis...

Page 21: ...epair or replacement of the TCI product The employees and sales agents of TCI are not authorized to make additional warranties about TCI s products TCI s employees and sales agents oral statements do not constitute warranties these shall not be relied upon by the Buyer and are not part of any contract for sale All warranties of TCI embodied in this writing and no other warranties are given beyond ...

Page 22: ...ion non sinusoidal waveform and displacement power factor relative to the AC bus Voltage These signals will result in the HGA injecting currents that will return the AC line current to near sinusoidal shape and at unity power factor Note that the CTs are located outside the HGA enclosure Component 2 is the HGA input circuit breaker optional This is provided to protect the HGA for destructive over ...

Page 23: ...nstallation Planning HGA IOM 16 Filter Configuration Figure 1 Typical Configuration of the HarmonicGuard Active Filter This drawing is for general reference only Use the drawings supplied with the unit for installation ...

Page 24: ...m Voltage The rated 3 phase line Voltage RMS Volts Hz The rated frequency 60 Hz Phase 3 3 Wire The HGA is designed for use with only 3 wire systems with balanced 3 phase Voltage source Drawing Outline and mounting dimension drawing number Schematic Schematic diagram drawing number Serial For unit tracking purposes Enclosure Type UL508 Open UL Type 1 UL508A UL Type 3R and UL Type 12 Enclosures Figu...

Page 25: ...viceNet BACnet Over Current Protection Molded case 65 kAIC and 100 kAIC circuit breakers Environmental Conditions Ambient Temperature Open Chassis UL Type 1 and UL Type 12 0 C 32 F to 40 C 104 F Derating above 40 C 104 F UL Type 3R 20 C 4 F to 40 C 104 F Derating above 40 C Relative Humidity 95 non condensing Operating Altitude Up to 1000m 3 300 ft without derating Up to 3000m 9 900 ft with derati...

Page 26: ...Section 4 0 Pre installation Planning HGA IOM 19 Figure 3 Altitude and Ambient Temperature Derating ...

Page 27: ... 4 identifies the significance of each character in the HarmonicGuard Active filter part number An example of a completed part number would be ALC100A01H0010 This designates an enclosed HarmonicGuard Active filter that is rated for 100 amps 480 Volts and has an HMI Interface Module Package Figure 4 HarmonicGuard Active Part Number Encoding Note 208 V and 240 V product versions are documented as 48...

Page 28: ...ifies the significance of each character in the HarmonicGuard Active filter part number An example of a completed part number would be H5150A12H0110 This designates an enclosed HarmonicGuard Active filter that is rated for 150 amps 480 Volts and has an HMI Interface Module Package Figure 5 HarmonicGuard Active Part Number Encoding Note 208 V and 240 V product versions are documented as 480 V in pr...

Page 29: ...UL Type 1 or UL Type 3R Figure 6 identifies the significance of each character in the HarmonicGuard Active filter part number An example of a completed part number would be H5039C033H0110 This designates an enclosed HarmonicGuard Active filter that is rated for 39 amps 600 Volts and has an HMI Interface Module Package Figure 6 HarmonicGuard Active Part Number Encoding ...

Page 30: ...th a floor stand Table 2 Floor Stand Options Voltage Floor Stand Part Number Frame Amp Rating 480 V HGAF01D1A D1 50A 100A 480 V HGAF01E1 E1 150A 480 V HGAF01F1 F1 200A 250A 480 V HGAF01E2 E2 300A 480 V HGAF01G1 G1 300 Narrow 350 600 V HGAF01D1A D1 39A 78A 600 V HGAF01E1 E1 110A 600 V HGAF01F1 F1 150A 185A 600 V HGAF01E2 E2 220A 600 V HGAF01G1 G1 220 Narrow 260 Note 208 V and 240 V product versions...

Page 31: ...ams are approximate and in inches Cooling Diagrams Please reference TCI s website for a list of cooling diagram drawings for the HGA open chassis units They are available for download at https transcoil com products hga 5 active harmonic filter hga drawings Paper copies of the cooling diagrams are in the literature kit that is included with all open chassis units UL Type 3R Unit Heating and Coolin...

Page 32: ...s dirt or loose hardware Select a Suitable Location Locating the HarmonicGuard Active filter in a suitable environment will help ensure proper performance and a normal operating life Refer to the environmental specifications listed in Table 1 marked on the unit s nameplate and or noted on the drawings furnished with the unit Warning Unless specifically labeled as approved for such use this equipme...

Page 33: ... 50 5 7 CU AL 200A 150A 6 AWG 250 MCM 375 42 4 CU AL 250A 185A 6 AWG 250 MCM 375 42 4 CU AL 300A 220A 3 AWG 500 MCM 375 42 4 CU AL 350A 260A 2 4 AWG 600 MCM 500 57 CU AL 400A 300A 2 4 AWG 600 MCM 500 57 CU AL 500A 370A 2 4 AWG 600 MCM 500 57 CU AL 600A 450A 3 2 AWG 600 MCM 500 57 CU AL 700A 520A 3 2 AWG 600 MCM 500 57 CU AL Note Wire size range listed is for lug as per lug manufacturer Follow NEC ...

Page 34: ...4 AWG 300 MCM 200 22 6 CU AL 250A 185A ABB 65 100 kA 2 3 0 250 MCM 274 31 CU AL 300A 220A ABB 65 100 kA 2 3 0 250 MCM 274 31 CU AL 350A 260A ABB 65 100 kA 2 3 0 500 MCM 274 31 CU AL 400A 300A ABB 65 100 kA N A N A N A 500A 370A ABB 65 100 kA N A N A N A Note Wire size range listed is for lug as per lug manufacturer Follow NEC guidelines for sizing ampacity of power conductors Table 7 Power Termina...

Page 35: ...lter Size Control Connections 480 V 600 V Wire Size Torque In Lbs Nm Wire Type 300A 220A 2 6 AWG 350 MCM 500 57 CU AL 350A 260A 2 6 AWG 350 MCM 500 57 CU AL 400A 300A 2 2 AWG 600 MCM 500 57 CU AL 500A 370A 2 2 AWG 600 MCM 500 57 CU AL Note Wire size range listed is for lug as per lug manufacturer Follow NEC guidelines for sizing ampacity of power conductors Table 12 Power Terminal Wire Size Capaci...

Page 36: ...ondary winding open can result in a high Voltage across the secondary terminals which may be dangerous to personnel or equipment Current Transformer Installation For accurate sensing of the load it is important that the load sensing current transformers are properly installed Warning All electrical installation and maintenance work on the HGA should be carried out by qualified electricians only Fa...

Page 37: ...de screwdriver Note CT operation can be verified via the HMI touchscreen feedback waveform plot screens Reference the HMI VLine ILine Waveform Plot Sub Screen for details Table 14 CT Range by Model Size Current Transformer Placement The exact CT placement is dependent on the HGA s configuration and size Please refer to the following current transformer diagrams for the installation that applies to...

Page 38: ...Section 5 0 Installation Guidelines HGA IOM 31 Figure 9 HGA 480 V Single Unit Line Side Bus Applied Connection Diagram LINE SIDE CT PLACEMENT ...

Page 39: ...Section 5 0 Installation Guidelines HGA IOM 32 Figure 10 HGA 480 V Single Unit Load Side Drive Applied Connection Diagram ...

Page 40: ...Section 5 0 Installation Guidelines HGA IOM 33 Figure 11 HGA 480 V Two Unit Parallel Connection Diagram ...

Page 41: ...he wires 60 Hz interference is a big concern because there is a lot of 60 Hz noise and it s the main frequency we are measuring Second because the wires are not twisted into pairs there is a greater risk of crosstalk between CTs if you run more than one pair of CT wires in the same cable If possible use twisted pair cabling when extending CT wires Notes 1 Wiring should be 75 C or higher insulated ...

Page 42: ...Section 5 0 Installation Guidelines HGA IOM 35 Figure 12 HGA 480 V Three Wide Parallel Unit Connection Diagram ...

Page 43: ...Section 5 0 Installation Guidelines HGA IOM 36 Figure 13 HGA 600 V Single Unit Line Side Bus Applied Connection Diagram HGA Line Side CT Placement ...

Page 44: ...Section 5 0 Installation Guidelines HGA IOM 37 Figure 14 HGA 600 V Single Unit Load Side Applied Connection Diagram Load Side CT Placement ...

Page 45: ...Section 5 0 Installation Guidelines HGA IOM 38 Figure 15 HGA 600 V Two Unit Parallel Connection Diagram HGA MASTER SLAVE CT PLACEMENT ...

Page 46: ...n must be made using a wire conductor 3 Customer is responsible for branch circuit protection 4 Terminal TB 1 and J25 wire range is 30 12 Awg tightening torque is 4 4 in lb 5 Nm 5 Operating current transformers with the secondary winding open can result in a high Voltage across the secondary terminals which may be dangerous to personnel or equipment 6 Current transformers should be centered around...

Page 47: ...Section 5 0 Installation Guidelines HGA IOM 40 Figure 16 HGA 480 V Main Tie Main Connection Diagram ...

Page 48: ...Section 5 0 Installation Guidelines HGA IOM 41 Figure 17 Current Transformer Diagram Round ...

Page 49: ...Section 5 0 Installation Guidelines HGA IOM 42 Figure 18 Current Transformer Diagram Rectangular ...

Page 50: ...o the ground of the premises wiring system The equipment grounding connection must conform to the requirements of the National Electrical Code NEC and or any other codes that apply to the installation site The ground connection must be made using a wire conductor Metallic conduit is not a suitable grounding conductor The integrity of all ground connections should be periodically checked ...

Page 51: ...ne end of the serial cable is plugged into the communications interface PCB on the CM module The other end of the communications cable is plugged into one or more power converters on the main active filter chassis The CM module is packed as a loose part in the shipping materials of the active filter open chassis panel along with the serial cable used to connect the CM module to the power converter...

Page 52: ...ion Guidelines HGA IOM 45 480 V 50A 100A 600 V 39A 78A 480 V 150A 600 V 220A 480 V 200A 250A 600 V 150A 185A 370A 480 V 300A 350A Figure 21 HGA Power Converter Module with Serial Connector J25 Highlighted in Red J25 J25 J25 ...

Page 53: ...ions cable will be at one of the active filter power converters The power converter at the end of the communications cable should be configured with the bus termination resistor in circuit or ON The bus termination resistor ON OFF DIP switch is located near the J25 serial cable header reference figure below Figure 22 Power Converter PCB Serial Cable Termination Resistor ON OFF Switch For single po...

Page 54: ...78A 110A 150A 185 V 480 V 400A 500A 600A 700A 600 V 220A 370A Figure 23 HGA Serial Cable Connection Diagram and Serial Bus Termination Switch Configuration Power Converter 1 PCB J25 CM Module PCB J2 Power Converter 2 PCB J25 Power Converter 1 PCB J25 CM Module PCB J2 SWITCH ON SWITCH OFF SWITCH ON ...

Page 55: ... for any foreign objects dirt metal filings wire whiskers and loose hardware Verify that any covers or guards that were removed during installation were reinstalled Ensure that the unit is properly grounded Check for properly tightened connections General Operation Warning Since the HGA is an active filter it is always operating whenever the power is applied Warning Only qualified electricians sho...

Page 56: ...f the enclosure whenever excess dirt has accumulated Check the integrity of all power ground and control wiring connections All electrical connections must be re torqued annually Warning Many electronic components located within the filter are sensitive to static electricity Voltages imperceptible to human touch can reduce the life and affect performance or destroy sensitive electronic devices Use...

Page 57: ...turer data sheet for additional precautions and storage instructions Reference Drawings There could be slight differences between your unit and the configurations shown in this manual It is recommended that you refer to the drawings provided with your specific equipment when conducting troubleshooting operations Reference schematics are also available online for download at transcoil com on the HG...

Page 58: ...xceed 225 Amps 250Amp 480 V 185A 600 V A max peak let through current of 55 kA in correspondence with a short circuit of 100 kA at 480 V and a max peak let through of 52kA for 65kA The trip current setpoint must not exceed 300 Amps 300Amp 480 V 220A 600 V A max peak let through current of 75 kA in correspondence with a short circuit of 100 kA at 480 V and a max peak let through of 52kA for 65kA Th...

Page 59: ...dary of the included 600 V 480 V K Rated Autotransformer Trip setpoints should be set following manufacturer instructions Table 16 Active Filter 65kAIC Circuit Breaker Manufacturer Part Number and Trip Ratings HGA Unit Rating ABB Option 0100 Allen Bradley Option 4000 Eaton Option 6000 LSIS 0200 480VAC 600VAC Amps MFG P N Amps MFG P N Amps MFG P N Amps MFG P N 45A 50A 39A 80A XT2HQ3080BFF000XXX 100...

Page 60: ...ain latched until the fault is reset manually via the local HMI installed in the unit The HMI display can be used to diagnose which fault has occurred using the Active Faults and Fault History screens Reference Table 32 Fault Codes for fault nomenclature Troubleshooting Failure to maintain the correct polarity of the current transformers CTs will cause an over current fault on power up The convert...

Page 61: ...proper electrostatic discharge ESD procedures when servicing the filter and its circuit boards Warning Only qualified electricians should carry out all electrical installation and maintenance work on the HGA Disconnect all sources of power to the HGA and connected equipment before working on the equipment Do not attempt any work on a powered HGA This HGA unit contains high Voltages and capacitors ...

Page 62: ...39 78 Amp 480 V 45 90 100 Amp Power Component Layout Look for opens or dead short readings With the red lead of your meter connected to the far right negative terminal of the capacitor bank measure with the black lead of the meter to each of the three output terminals bus bars the reading should be approximately 0 35Ω Reverse the meter leads and repeat measuring to each terminal This time a low re...

Page 63: ...Section 6 0 Filter Operation HGA IOM 56 Troubleshooting Flow Chart Figure 24 HGA System Troubleshooting Flowchart ...

Page 64: ...Section 6 0 Filter Operation HGA IOM 57 Power Component Layout Figure 25 600 V 39 78 Amp 480 V 45 90 100 Amp Power Component Layout ...

Page 65: ...ent Layout Figure 27 480 V 200 250 500 Amp 600 V 150 185 370 Amp Power Component Layout Output Terminal Bus Bars Dual SCR Module Dual SCR Module Dual IGBT Module Dual IGBT Module Bus Bars over Capacitors Electrolytic Bus Capacitors 6 Positive Terminal Capacitor Bank Negative Terminal Capacitor Bank ...

Page 66: ... open Failure to follow standard safety procedures may result in death or serious injury Do not attempt any work on a powered filter converter The HGA contains high Voltages and capacitors Wait at least five minutes after disconnecting power from the converter before you attempt servicing Check for zero Voltage between all terminals to the converter Be aware everything ahead of the circuit breaker...

Page 67: ...resentative You can contact TCI directly at 1 800 824 8282 Select Customer Service or Technical Support and have your HarmonicGuard Active filter nameplate information and any drawings available Outline and Mounting Dimension Drawings Installation drawings are available online for download at http www transcoil com on the HGA active filter product page The installation diagrams show the overall en...

Page 68: ...rface PCB translates status and commands data between the power converter controls and the HMI Display The interface PCB also contains the 24V Relay I O for basic status monitoring and run stop control of the HarmonicGuard Active filter The HMI Display is a 6 color Touchscreen display containing a series of status screens that provide the user with a convenient way to monitor the operation of the ...

Page 69: ...the installation location will not be exposed to excessive vibration corrosive or combustible airborne contaminants excessive dirt or liquids Select a mounting area that will allow adequate cooling air Make sure that all wiring conforms to the requirements of the National Electrical Code NEC and or other applicable electrical codes Ground the HMI display by using the grounding terminal Not only do...

Page 70: ...nic components located within the Interface Module and HMI are sensitive to static electricity Voltages imperceptible to human touch can reduce the life and affect performance or destroy sensitive electronic devices Use proper electrostatic discharge ESD procedures when servicing the Interface Module and HMI Wiring Note Some of the following sections only apply if the Interface Module is not facto...

Page 71: ...PCB these connections are shown in Table 18 Four outputs are available on the Interface PCB The relay start command input connection on J22 of the interface PCB allows a contact closure to send a run command to the HarmonicGuard Active filter The relay start command input will only be acknowledged if the Relay Run Stop Enable is set to Enabled on the HMI Display setup screen Pressing stop locally ...

Page 72: ...Nm 28 14 Awg 2 Common 3 Normally Open Note Form C relay contacts are gold plated with a load rating of 2 0A 250VAC HMI Display Connections Note The following section describes the default ModbusRTU network connection available on the base model If an optional advanced network Communications Gateway is included in the Interface Module see the appendix for the specific Communications Gateway configu...

Page 73: ...cations Gateway is included in the Interface Module see The Appendixes for the specific Communications Gateway wiring details If the optional network Communications Gateway is present the integrated ModbusRTU interface on the HMI Display will not be available When configured the Communications Gateway will occupy the ModbusRTU COM2 3 DB9 connector on the back of the HMI Display HMI Screen Elements...

Page 74: ...Displays Display fields will appear flat Numerical displays are read only Numerical Entry Fields Numerical Entry fields appear indented Selecting them will open a keypad for numerical entry Navigation Bar The Navigation Bar allows for easy navigation between the five major HMI screens The Navigation Bar appears on all HMI screens Title Bar The Title Bar contains the current system time screen sele...

Page 75: ... HMI Display will light see Figure 33 After a five second boot up sequence the Home Screen will be displayed If the home screen is not displayed and power is available to the HMI Display see Section 8 0 Troubleshooting for diagnosing common problems Indicator Navigation Bar Title Bar Numerical Display HMI Display Power LED ...

Page 76: ...Section 7 0 HMI Introduction HGA IOM 69 HMI Installation Diagram ...

Page 77: ...MI will start on Home screen Load s have an integral 5 line reactance or equivalent DC bus choke Warning Hazardous Voltages are present when unit is energized Note Built In Sensor Wiring Error Detection The active filter has an automatic sensor wiring error detection algorithm built into the controls If a sensor wiring error is detected please reference the Sensor Error Auto Detection section Note...

Page 78: ...tion Enable and Harmonic Correction Enable buttons are OFF Blue If buttons are green press to toggle off Select the CT Ratio button and enter CT ratio to match the external current transformers wired to the unit Select the Back button Next select the VAR Output button and ensure the Local VAR Output Enable and Network VAR Output Enable are OFF Blue If buttons are green press to toggle off Select t...

Page 79: ...off Navigate back to Tech Setup screen Now select Save Settings Press Home to navigate to Home screen 3 Home screen check Compare Freq to expected line frequency Compare Voltage to expected line Voltage Current expected to be zero because unit is not running and CT inputs are shorted If status indicates a Fault press Stop button to reset condition ...

Page 80: ...o be zero if unit is not running and CT inputs are shorted Line Side Configured Unit Load Side Configured Unit 5 Phase rotation check Press Phase to Neutral Voltage Plot button Check that the current peaks follow the following sequence from left to right Phase A Green Phase B Blue Phase C Red Equipment is phase rotation sensitive if phase rotation is incorrect power down unit and rewire to adjust ...

Page 81: ...put button and ensure the Local VAR Output Enable and Network VAR Output Enable are OFF Blue Select the Back buttons to go back to Tech Setup screen Select the Home button from navigation bar Select the Run button to start unit operation 7 Remove CT shorting bars Press Stop to turn off unit Disconnect power from cabinet Turn off the built in door breaker AND Turn off the upstream feeder breaker Op...

Page 82: ...nd or contributing to rather than correcting harmonics Note If using a Line Side master unit the screen title will say Line Status and if using a Load Side slave unit the screen title will say Load Status Also See notes under each screen 9 Current polarity 2 Navigate to Status screen Depending on unit configuration select either the Line or Load button Verify that the fields match expected values ...

Page 83: ...lect the CT Ratio button and confirm the configured CT ratio matches the external current transformers that are wired to the unit Select the Back button and then from Tech Setup screen select Run Stop Control Setup Select Auto Start Setup On this screen select the Auto Start Enable button and ensure the button is ON Green Navigate back to the Tech Setup screen and select the Save Settings button N...

Page 84: ...al check Note If unit is configured for load side operation reference the User Manual for Load Side CT Placement diagram Navigate to the Status screen Navigate to Line Load status Note the corrected Voltage current power and THD Line Side Load Side ...

Page 85: ...monitor continually displays At Capacity a second filter may be required to handle the load Please contact TCI for assistance Run Stop Button Runs and stops the HarmonicGuard Active filter System State Indicator located immediately below stop button When the HarmonicGuard Active filter is in a stop mode the Status light will turn red and display Stopped When the converter is running the status lig...

Page 86: ...d button and the Line Load Current Plot text changes to show Line or Load status Figure 36 Status Screen Table 23 Status Screen Elements Screen Element Description Line Load Button Use this button to get to the Line Load Status Sub Screen Volts Display Displays the current utility phase to phase line Voltage in Volts RMS Current Display Displays the current line load phase current in Amps RMS Powe...

Page 87: ...lay At Capacity When the converter is at capacity the Relay K4 J12 Connector and J11 Contacts used for a remote indicator will also be energized If the monitor continually displays At Capacity a second filter may be required to handle the load Please contact TCI for assistance Run Enable Summary Displays the current state of all enables that affect the running of the HarmonicGuard Active filter If...

Page 88: ... the HMI Stop button is pressed locally on the HMI the unit enters a Run Inhibit state and will show a Run Inhibit Active message on the Run Enable Summary Screen center right When the Run Inhibit is Active the unit will not be allowed to start remotely via a Network start Remote relay start or Auto start command The Run Inhibit is cleared by pressing the HMI Run button locally on the HMI display ...

Page 89: ... to green if enabled If enabled the HarmonicGuard Active filter can be remotely turned on with a contact closure Remote Network Changes to green if enabled If enabled the HarmonicGuard Active filter can be remotely stopped started with a contact closure When the contact is closed the unit will run and when opened the unit will stop When enabled and the option is active the field to the right will ...

Page 90: ...Line Load Status Sub Screen The Line Load Status Sub Screen shows more specific information regarding the source or Load Voltage Current Power Power Factor and THD measurements Figure 41 Line Status Sub Screen Figure 42 Load Status Sub Screen ...

Page 91: ...e Total Harmonic Distortion of the utility Line current in a percentage This THD display is the uncorrected THD of the Line taken when the HarmonicGuard Active filter was not running Note For load side configured units I THD Reference and I TDD displays are not available Note If secondary CT current is less than 1A THID and THID Ref will be unavailable I TDD Display Displays the Total Demand Disto...

Page 92: ...tate this plot can be used to check for the following Proper Line Voltage phase rotation Proper Line Load Current phase rotation Proper Line Voltage and Line Load Current relative polarity and phase Missing Open Circuit System Current CT Feedback If the HarmonicGuard Active filter performance is degraded the VLine ILine waveform plot should be examined to determine if any system connection errors ...

Page 93: ...nt The table below shows what the VLine ILine Waveform Plot Sub Screen would look like with various connection errors present in the system Table 28 VLine ILine Waveform Plot Screen Examples when Typical Connection Errors Present in System VLine ILine Waveform Plot Sub Screen with Rectifier Load Connection Error Description Connection Error Resolution Phase rotation is Incorrect Phase A leads Phas...

Page 94: ...Phase C system CT current feedback and recheck plot Phase A current red is opposite polarity of Phase A Voltage green and Phase C current yellow is opposite polarity of Phase C Voltage blue To correct re install both Phase A and Phase C system CTs with polarity arrow in opposite direction OR swap positive and negative connections of each CT at HGA filter terminal block then recheck plot Historical...

Page 95: ...een This signal is sampled every 3 seconds and historical data is maintained for 2 hours Converter Current Button Opens the HarmonicGuard Active filter RMS current historical trend graph screen This signal is sampled every 3 seconds and 2 hours of historical data is maintained Current THD Button Opens the line load Total Harmonic Distortion historical trend graph screen This signal is sampled ever...

Page 96: ...e and time the right most sample displayed on the screen was taken Left Timestamp Indicates the date and time the left most sample displayed on the screen was taken Scroll Bar Allows the user to scroll through all sample points available in the trend plot data buffer Trend Plot Display The historical graph of the value being sampled over time Fault Screen This button takes the user to the Active F...

Page 97: ... the fault conditions have cleared Once cleared a fault will still be viewable in the fault history log Fault Trip Entry Display When a fault occurs the fault screen will display information about the fault including the from left to right across the screen Fault bit mask number Fault timestamp Fault code Fault description History Button This button will take the user to the Fault History sub scre...

Page 98: ...to Under temperature Phase B 4270 Non critical Auto Under temperature Phase C 4500 Non critical Auto Exhaust Over Temperature 7000 Non critical Auto Calibration Fault 7010 Non critical Auto Communications Fault 7050 Critical Manual Auto start Restart Limit Exceeded Unit N Faulted Non critical Auto Fault location indication Fault originated in Unit N where N is in the range 1 to 8 For factory confi...

Page 99: ...story Timestamp HH MM MM DD YYYY Time and date the fault entry was logged Fault Code Four digit code Fault code See Table 32 Fault Description Text A short text description of the fault Setup Screen Note Some set up screens are password protected to prevent changes that could damage the filter When the user presses the Setup button a screen will appear where the Date Time Language and Screen Brigh...

Page 100: ... to Tech Setup screen Outline to follow Factory Setup This button is password protected and used during the factory and TCI technician setup only Tech Setup Screen To continue to the Tech Setup page select the Tech Setup button and enter the Tech Password 08252014 Next a splash screen will appear saying The Filter is about to stop Choosing Next will stop the filter and take the user to the Tech Se...

Page 101: ... user will be sent back at the Basic Setup screen Save Settings This button will save the current working settings to non volatile memory that persist when power is removed from the unit To save the current settings choose Yes on the confirmation screen or choose No to cancel and go back to the Basic Setup The settings will not be saved if No is chosen Tech Setup The password protected Tech Setup ...

Page 102: ...ans that for 1000A of primary current there are 5A of current in the CT secondary winding connected to the active filter See user manual Table 4 4 for the allowable CT range for an active filter unit type VAR Output The VAR Output button opens a sub screen that allows enabling the VAR output operation mode User can enable either local or network mode and can manually enter in the desired output KV...

Page 103: ...s button opens the power save feature sub screen The power save feature allows the unit to turn off its internal power converter if the system line current THID and or Power factor drops below a set threshold The line current Amp threshold depends on the system CTs installed with the active filter For example a power save threshold set to 10 with 1000 5 CTs installed would result in the filter tur...

Page 104: ...rt option is disabled Select time frequency Allows user to select the time allowed between faults before auto start option is disabled Disable Auto Start Limit The disable auto start limit button will disable the frequency limit or the number of allowed unit auto starts after a fault is detected Start Delay The start delay is the time in seconds the active filter will wait after a power up or afte...

Page 105: ...PCB HMI Revision Display Displays the software revision of the HMI Display application code Current Limit Displays the configured corrective current limit in Amps RMS for the unit The current limit will typically match the unit capacity unless the unit has been derated for a specific application such as high altitude or elevated ambient temperature Sensor Wiring Error Auto Detection Sub Screen Som...

Page 106: ...iring error If a user attempts to operate the unit while a sensor wiring error is still present by pressing the Run or Stop buttons the screen will reappear Table 41 Sensor Wiring Error Code Table Error Code Error Suggested Corrective Action 0 No Error No corrective action required 1 Self Test In Progress No correction action required Typically the self test will complete and auto clear in less th...

Page 107: ...able in Table 42 and Table 43 All input and output registers are two bytes in size and formatted as 16 bit signed integers For the base address of the input and output data sections please reference the connection sections in this manual specific to the configured protocol For the integrated ModbusRTU network interface reference the HMI Display Connection section If an option Communications Gatewa...

Page 108: ...TION 11 Output 16 position bit mapped value bit0 Power Converter 1 Fault leftmost position Bit1 Power Converter 2 Fault Bit3 Power Converter 3 Fault System fault location indicator bits Each bit represents wither a fault was detected in a power converter A value of binary 1 indicates the assigned power converter detected a fault and a value of 0 indicates the assigned power converter did not detec...

Page 109: ...100 Present injection current capacity of active filter in units of percent of max capacity CT_RATIO 24 Output XXXX 5 where XXXX is the primary turns count of the CT 1000 1000 5 CT Range 100 to 10000 Line or Load Current Transformer CT turns ratio SYS_IN_T_LIMIT 25 Output 0 Unit not in thermal limit 1 Unit in thermal limit Indicator that unit is in thermal limit current foldback Active filter corr...

Page 110: ...tive filter The network command input will only be acknowledged if the Network Run Stop Enable is set to ENABLED on the HMI Display setup screen If the stop button is pressed locally on the HMI Display the unit will be put into an inhibit state and not respond to network run commands until either the run button is pressed on the HMI display or the unit is power cycled Once the run button is presse...

Page 111: ...d remove the old battery Dispose or recycle the old battery in accordance with any applicable national state provincial and local requirements Install new battery and close battery cover Replacement Battery Type 3V Lithium CR2032 x Quantity 1 Figure 58 HMI Display Battery Location Software Field Upgrades In the event the HMI Display application software needs to be upgraded the USB host port on th...

Page 112: ...pacitors Wait at least five minutes after disconnecting power from the filter before attempting to service the conditioner Check for zero Voltage between all terminals on the capacitors Also check for zero Voltage between all phases of the input and output lines All maintenance and troubleshooting must be done by a qualified electrician Failure to follow standard safety procedures may result in de...

Page 113: ...o reactivate touch anywhere on the screen If the HMI Display shows a COM 1 Station 1 Communication Error across the bottom of the screen check the serial cable between HMI Display COM1 and Interface PCB J1 If the HMI Display shows a NO COM indication on the system state indicator or a 7010 Communications Fault in the fault screen check the serial cable between Interface PCB J2 and the HarmonicGuar...

Page 114: ...n Transformer isolated Ethernet interface TCP IP Settings Web Browser Based Configuration Baud Rate 10 100 MBit auto detect Protocol Conformance Fully compliant Ethernet IP gateway ODVA File Number E 090 10070 See HMS website www hms se for Conformance Test Results Note The optional network Communications Gateway part number and hardware is identical for the Ethernet IP interface and the Modbus TC...

Page 115: ...Ethernet network then open a web browser window and type in the default IP address of the gateway and press enter The Communications Gateway configuration page should load Figure 62 EtherNet IP Gateway Configuration Page Table 47 Gateway Default Settings Setting Default Value IP Address 192 168 0 1 Gateway 255 255 255 0 Subnet 255 255 255 0 DHCP Off Pin Number Description 1 TD 2 TD 3 RD 6 RD 4 5 7...

Page 116: ...t and output data available over the network interface reference Section 7 0 HMI Introduction in this user manual Operation The Communication Gateway has six LED indicators that show the current status of the Ethernet IP and sub network communications The meanings of the LED indicators are described below Table 48 EtherNet IP Gateway LED Diagram Gateway Front View LED Number Indication Meaning 1 M...

Page 117: ... router LAN via RJ45 cable The network setup is displayed below Figure 63 Anybus Gateway Network Setup with PLC Example Programming Once all the connections are set the PLC is programmed with the required configuration The PLC and the Anybus are first established on the RSLinx network The Ethernet Driver option is selected in RSLinx to find the PLC and the Gateway by typing the IP addresses for th...

Page 118: ...HGA IOM 111 Figure 64 Ladder Logic Diagram Data file MG 12 is a message file containing 2 elements 0 and 1 The Message Structure settings are shown in Figure 63 write command and Figure 64 read command Figure 65 Message Structure Write Command Settings ...

Page 119: ...ely The Anybus gateway configuration is programmed for 16 bit I O registers 1 PLC word 2 bytes 1 Anybus 16 bit I O register As there are 8 registers in total the Size in Bytes Receive will equal 16 2 bytes for each PLC word The above steps set the PLC settings to successfully communicate and exchange data with the Anybus gateway The program can now be downloaded on to the PLC and set to run ...

Page 120: ...ection 10 100 MBit twisted pair RJ45 Connection Galvanic Isolation Transformer isolated Ethernet interface TCP IP Settings Web Browser Based Configuration Baud Rate 10 100 MBit auto detect Protocol Conformance Fully compliant Modbus TCP IP gateway See HMS website www hms se for Conformance Test Results Note The optional network Communications Gateway part number and hardware is identical for the E...

Page 121: ...twork that the Anybus module is connected Next open the IPConfig tool Select Scan and the device should be present on the screen with the default IP address shown below To change this to a desired IP address simply select it right click and go to Configuration Here the new address and network information can be entered The gateway can also be connected to the Ethernet network and then open a web b...

Page 122: ...Serial Modbus TCP IP Gateway User Manual available on the HMS website www hms se Register Map and Address Offsets For a description of the input and output data registers available over the network interface reference Section 6 in this user manual For the Modbus TCP interface the HGA output status data registers from the HGA which contain unit status Voltage current etc are in Modbus register spac...

Page 123: ...nnection s Established Online No Connection Established Duplicate IP Address Connection s Timed Out Self Test in Progress 3 Link Off Green No Link Connected to Ethernet Network 4 Activity Off Flashing Green No Ethernet Activity Receiving Transmitting Packets 5 Subnet Status Flashing Green Green Red Running Transaction Error Detected Running Transaction error timeout 6 Device Status Off Flashing Gr...

Page 124: ...m a router LAN Connect the PC to the router LAN via RJ45 Ethernet cable The network setup is displayed below Figure 69 Network Setup with PC Example Programming Once all connections are set the Modbus TCP master is ready for communication In the example the Modbus TCP master is Simply Modbus Figure 70 Simply Modbus Screen 1 2 3 4 5 7 8 9 10 ...

Page 125: ...t register as 0 and No of Regs to 8 4 Set the minus offset at 0 5 Set the function code to 4 6 Uncheck the High Byte Low Byte Check box 7 Click SEND 8 The HMI data will appear on the table in the upper right side of the Simply Modbus application For register map definitions please reference the network interface reference Section 7 in this user manual for data format and scaling To receive data co...

Page 126: ...run if the network run command enable is enabled If the network run command enable is off disabled the network run command will be ignored Sending 0 in the same command will stop the unit The changes can be observed in the main window Note HGA unit will only respond to network run command if the network run command enable is enabled via the HGA unit s HMI setup screen See setup screen documentatio...

Page 127: ...U interface is COM3 The COM3 serial connection header is shared with the COM2 port The COM2 COM3 port is located on the back of the HMI display Figure 72 Modbus RTU Connection The hardware pinout for the HMI COM3 port and the default settings are shown below Table 53 HMI COM3 Port Pinout and Default Settings COM2 3 DB9 Pin Signal Name Signal Type 1 no connect 2 no connect 3 no connect 4 D RS 485 B...

Page 128: ...gned COM port number for the RS 485 to USB converter using the computer device manager control panel o The converter used in this example typically enumerates between the range of COM5 to COM20 on a standard laptop computer running the Microsoft windows operating system Configure the computer COM port settings to match the default settings used by the HGA HMI COM3 port listed above baud parity sto...

Page 129: ... to Write Data to the HGA Unit In order to start stop the unit first the Network Start Enable parameter must be enabled on the HMI manually o Navigate to the Tech Setup page and then select the Run Stop Control Setup button o Select the Network Start En button It will turn green and say Network Start Next select the WRITE button on the screen shown above The screen below will be shown Configure th...

Page 130: ... Appendix C ModbusRTU Master HGA IOM 123 Select 1 in the field Values to Write to turn the unit ON or 0 to turn the unit OFF Verify via the HMI that the unit is receiving commands by going to the screen shown below ...

Page 131: ...tom of the screen choosing the blue Converter button and selecting Run Enable Summary The figure above displays the unit with the Remote Network enabled and the converter in the Off state The status indicator of the Remote Network in the Present Command column will echo the start stop command from the Simply Modbus ModbusRTU master Network Run Command Status ...

Page 132: ... Anybus Communicator Product Line Anybus Communicator AB7007 Table 55 DeviceNet Communications Gateway Key Features Features Description Profile Support I O Slave messaging Bit strobe Polling Cyclic COS Explicit Messaging Connection Multi drop to up to 31 nodes Galvanic Isolation Standard for both bus side and serial side Application Interface RS232 RS422 RS485 Baud Rate 125 250 500 Kbit s Protoco...

Page 133: ... assigned the gateway can be connected to the DeviceNet network by using RSNetworks for DeviceNet devices The EDS file for the DeviceNet Communications Gateway is available via TCI technical support direct dial 414 357 4541 email tech support transcoil com or from the TCI website http www transcoil com Support htm For advanced configuration options reference the HMS Anybus Communicator Serial Devi...

Page 134: ... powered not online Green Link OK online connected Green flashing Online not connected Red Critical link failure Red flashing Connection timeout 2 Module Status Off No power to device Green Device operational Green flashing Data size bigger than configured Red Unrecoverable fault Red flashing Minor fault 3 Not Used n a n a 4 Not Used n a n a 5 Subnet Statusa Off Power off Green Running Green flash...

Page 135: ...ces The baud rate and node address for the three network devices can be set as following 1 Anybus Gateway The gateway is equipped with 8 switches as described in the appendix DeviceNet network section These switches can be manipulated as descried to match network baud rate and provided the gateway with a distinct node address 2 1770 KFD The network settings and node address for the KFD are set in ...

Page 136: ...s selected in the Configure Drivers screen drop down menu Once the PLC is found it can be used in RSLogix to program the DeviceNet scanner and establish a ladder diagram for the LED status display Like the PLC RSNetworx uses the 1770KFD network to changes properties on the Devices found on the DeviceNet network RSNetworx In RSNetworx the first step is to open tools and follow the EDS wizard option...

Page 137: ...9 DeviceNet Scanner Once selected the DeviceNet Scanner should move to spot 1 in the left panel of the window given that no other I O modules are attached to the PLC Click on the ReadI O option The program will try to read the IO profile of the DeviceNet scanner once found a message box confirming the same will appear In the IOConfiguration screen click on the Adv Config option present on the bott...

Page 138: ...Section 13 0 Appendix D DeviceNet Gateway Option HGA IOM 131 Figure 80 Ladder Diagram Observing HMI Status ...

Page 139: ...ot attempt any work on a powered HGA filter Warning The HGA filter and other connected equipment must be properly grounded Warning The HGA filter may receive power from two or more sources 3 phase power is connected to the main input terminals of the HGA filter All these sources of power must be disconnected before working on the HGA filter Warning After switching off the power always allow 5 minu...

Page 140: ...xterior diagnostic port to connect to an optional portable HMI Figure 81 3R Indicator Lights Table 57 HGA 3R Indicator Lights HGA 3R Indicator Light Description Power On Indicates if the HGA filter has input power available Run Indicates if the HGA filter is currently running or in the idle state Stop Turn the key to the stop position to turn off the HGA unit power converter If the HGA unit is fau...

Page 141: ... HGA IOM 134 HGA HMI Operation Connect the HGA HMI connection port to the HMI diagnostic port using the 9 pin serial cable provided When the HGA HMI unit boots up follow the Quick Start guide appropriate for your HGA model Figure 82 HGA HMI and Connection Cord ...

Page 142: ...munications Gateway Key Features Feature Description Connection 10 100 MBit twisted pair RJ45 Connection Galvanic Isolation Transformer isolated Ethernet interface TCP IP Settings Web Browser Based Configuration Baud Rate 10 100 MBit auto detect Protocol Conformance Conforms to ASHARE 125 2004 Annex J B ASC Profile Wiring Connection of the HarmonicGuard Active filter Interface Module to the end us...

Page 143: ... load Open the Configure tab Table 59 Gateway Default Settings Setting Default Value IP Address 192 168 0 1 Gateway 255 255 255 0 Subnet 255 255 255 0 Figure 84 BACnet Gateway Configuration Page If Java is not installed follow the link at the bottom of the Configure Page to install it The default user name and password are both admin The IP Address can now be modified and saved Reboot the gateway ...

Page 144: ...dd Device search This is the green plus 1 In the new window click Add in the BACnet IP over Udp section The gateway will appear as the serial number of the HGA unit 2 Select the gateway to display the available properties 3 Right click on ANALOG_INPUT 1 and click Subscribe Note that the name of the property changes to SYS_RUNNING 4 Subscribe to ANALOG_OUTPUT 32 SYS_NW_START_IN 5 While keeping SYS_...

Page 145: ...us RTU COM Change Instructions HGA IOM 138 Note HGA unit will only respond to network run command if the network run command enable is enabled via the HGA unit s HMI setup screen See setup screen documentation in HMI Set 1 3 4 5 6 7 2 ...

Page 146: ...dix G HMI Modbus RTU COM Change Instructions HGA IOM 139 Up Instructions on page 70 for information on how to enable the network run command The network run command enable can only be enabled via the HMI on the HGA unit ...

Page 147: ...ument is intended to explain the process for changing those settings once TCI has been contacted NOTE The text displayed on the Network screen will not change as it is static 1 Go back to the Tech Setup screen and select HMI System Menu 2 Select System Settings in the top left corner Using the arrows scroll to the COM Port tab 3 Tap the screen and it will turn blue and a new set up commands will s...

Page 148: ...611 Grant Drive Germantown Wisconsin 53022 Phone 414 357 4480 Fax 414 357 4484 Helpline 800 TCI 8282 Web Site http www transcoil com 2020 TCI LLC All rights reserved Publication No 26030 Effective 06 12 2020 Version P ...

Reviews: