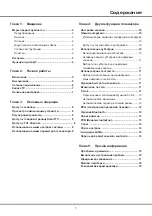
background image

10

Модуль 

CAM

 может предоставлять разные цифровые 

услуги в зависимости от выбранного вами оператора 

и услуг (например, коммерческого телевидения). 

Для получения подробной информации об 

услугах и условиях их использования свяжитесь с 

телеоператором.

Использование функции стандартный 

интерфейс

ПРЕДУПРЕЖДЕНИЕ! Перед установкой модуля 

CAM выключите телевизор. Обязательно 

соблюдайте следующие инструкции. 

Неправильная установка модуля CAM может 

привести к поломке модуля и телевизора. 
1. 

Следуя инструкциям, напечатанным на модуле 

CAM, аккуратно вставьте модуль в разъем 

стандартного интерфейса телевизора.

2. 

Вставьте модуль до упора.

3. 

Включите телевизор и дождитесь, пока 

интерфейс не будет активирован. Это может 

занять несколько минут.

Примечание:

 Не вынимайте модуль CAM из 

разъема. Удаление модуля может 

деактивировать цифровые 

службы.

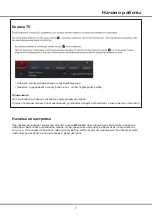
Доступ к услугам общего интерфейса

После установки и активации модуля CAM нажмите 

кнопку   на пульте ДУ, выберите 

Channel > 

Common Interface

 и нажмите 

OK

/►, чтобы войти 

в меню.


Настройки меню доступны только в том 

случае, если модуль CAM правильно установлен и 

активирован. Содержание, появляющееся на экране, 

зависит от телевизионной компании.

Примечание: 

Данная функция доступна только 

для цифровых источников сигнала.

Использование субтитров

Вы можете использовать субтитры для всех 

телевизионных каналов. Субтитры передаются 

через телетекст или канал цифрового вещания 

DVB-T/DVB-T2/DVB-C/DVB-S/DVB-S2.


При наличии 

цифрового вещания вы можете выбрать удобный 

язык субтитров.

Примечание:

 Некоторые опции доступны только 

в том случае, если для параметра 

Subtitle

 выбрано значение 

On

Включение/выключение субтитров

1. 

Нажмите кнопку   на пульте ДУ, выберите 

команды 

Channel

 > Subtitle

, а затем нажмите 

кнопку 

OK

/► для входа.

2.

Выберите опцию 

Subtitle

, и нажмите 

OK

 для 

переключения между режимами включено и 

выключено.   

Настройка каналов

В данном разделе описывается, как искать и 

сохранять каналы автоматически. Это может быть 

сделано в любом из перечисленных ниже случаев:


-

вы получили сообщение, что нет каналов в 

режиме 

TV;


-

вы хотите обновить список каналов.

1. 

В режиме TV нажмите кнопку   на пульте ДУ и 

выберите меню 

Channel

 > Channel scan

. Для 

входа в этот режим нажмите кнопку 

OK

/►.

2. 

Телевизор настроит каналы и расположит их в 

соответствии с порядком трансляции, который 

принят в вашей стране или в вашем регионе. С 

помощью кнопок ▲/▼ выберите опцию 

Country/

Region

, а затем нажмите кнопку 

OK

/► для 

подтверждения. Введите пароль по умолчанию 

1234

 или свой пароль, если вы изменили его в 

меню 

System > Lock

. С помощью кнопок ▲/▼ 

выберите страну или регион, а затем нажмите 

кнопку 

OK

 для подтверждения.

3. 

С помощью кнопок ▲/▼ выберите опцию 

Automatic search

, а затем нажмите кнопку 

OK

/► 

для подтверждения.

4. 

С помощью кнопок ▲/▼ выберите 

T

uner mode

а затем выберите 

Cable

Antenna

 или 

Satellite


кнопками ◄/►. (

Примечание:

 Опция Satellite 

доступна только на некоторых моделях.

)

5. 

С помощью кнопок ▲/▼ выберите другие опции и 

используйте кнопки ◄/► для настройки.

6. 

После завершения настройки выберите команду 

Search

 кнопкой ▼, а затем нажмите кнопку 

ОK

чтобы начать поиск каналов.

7. 

Поиск каналов может занять несколько минут. 

После автоматического поиска все каналы 

будут размещены в определенном порядке. 

Если вы хотите скрыть или переместить какие-

либо каналы, нажмите кнопку   на пульте ДУ, 

выберите команды 

Channel > Channel organizer


и нажмите 

OK

/► для входа.

Примечание:

 Если система поиска каналов 

обнаруживает только аналоговые 

каналы, возможно, это происходит 

из-за слабого сигнала. Гарантия 

производителя на такие случаи не 

распространяется. Изготовители 

не несут ответственности за 

отсутствие вещания или низкое 

качество вещания.

Общий интерфейс

(* недоступно в некоторых моделях)

Зашифрованные цифровые телеканалы можно 

декодировать с помощью модуля условного доступа 

(CAM), предоставляемого оператором цифрового 

телевидения вместе с картой.

Глава 4

Другие функции телевизора

Summary of Contents for 43P615

Page 1: ...43P615 50P615 55P615 65P615...

Page 2: ...sing Subtitles 9 Enabling Subtitle Languages on Digital TV Channels 9 Selecting a Subtitle Type on Digital TV Channels 9 Turning On Off Subtitles 9 Using Teletext 10 Selecting Decoding Page Language 1...

Page 3: ...ar the TV screen Do not impact the TV screen with hard pressure as this may damage the TV screen severely Power and Plug Unplug the set under the following conditions If the set will not be used for a...

Page 4: ...ecorders camcorders decoders satellite receivers DVD players or games consoles Digital audio out Optical socket This socket can be used to connect a compatible digital audio receiver Headphone socket...

Page 5: ...ear on the screen The remote control s Notes 1 appearance 2 The remote control type may be changed without notice please refer to the remote control attached Google and Android TV are trademarks of Go...

Page 6: ...able is connected to the television please only connect the power cable to the mains socket Your TV set should only be connected to an AC supply It must not be connected to a DC supply If the plug is...

Page 7: ...t cable long enough to reach your TV A router or modem with an available Ethernet port A high speed Internet connection An Ethernet LAN port on the back of the TV 2 Connect your Ethernet cable to the...

Page 8: ...multi function menu appears by pressing button on the TV set More information Press to move the highlight to the next function selection Note You can follow the on screen guide to operate Figures and...

Page 9: ...functions or settings 3 Press to return to the homepage 4 To exit the homepage press on the remote control to display the source list and then press and OK to select your desired input source Note Si...

Page 10: ...se the menu Selecting a Subtitle Type on Digital TV Channels Installing Channels This section describes how to search and store channels automatically This may be done in any of the cases below you ar...

Page 11: ...ected language 3 Press to close the menu Using Teletext Selecting Decoding Page Language 1 Press on the remote control select Channel Teletext Decoding page language and press to enter 2 Press to sele...

Page 12: ...nearby Bluetooth devices automatically 3 Select an available device press OK and follow the guides on the screen to connect it Note Bluetooth technology if available in your TV uses access points rout...

Page 13: ...ion expires Note and color buttons on the virtual remote control keyboard 5 In recording the PVR mini pane will also show on the screen to indicate the recording progress 6 To watch the recorded progr...

Page 14: ...ed with your TV Check if the language setting is correct Check if Google server is available and stable 1 Fail to link to the network Check if your TV is connected with the network Reboot your TV if a...

Page 15: ...equency interference This interference produces moving ripples or diagonal streaks and in some case loss of contrast in the picture Find out and remove the radio interference source To bring you bette...

Page 16: ...lied including but not limited to warranties of merchantability accuracy of quiet enjoyment and non infringement of third party rights Manufacturer does not guarantee the accuracy validity timeliness...

Page 17: ...s away from grease and organic solvents to avoid damage especially during the assembly process During installation lay some soft materials below the screen to avoid scratch and damage to the screen Wh...

Page 18: ...lby Dolby Audio and the double D symbol are trademarks of Dolby Laboratories Figures and illustrations in this User Manual are provided for reference only and may differ from actual product are tradem...

Page 19: ...43P615 50P615 55P615 65P615...

Page 20: ...2 2 2 2 2 2 3 4 2 5 5 6 TV 7 7 3 8 8 8 Smart TV 8 TCL Channel 8 8 9 4 10 10 10 10 10 10 11 11 11 11 11 11 11 T Link 11 T Link 12 12 12 EPG 12 Bluetooth 12 13 PVR 13 T cast 14 14 14 14 5 15 16 17 18 1...

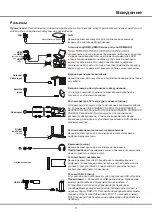
Page 21: ...2 1 N TCL 5...

Page 22: ...Antenna Cable input Router Modem USB 2 0 Satellite input Common interface Digital audio out Optical HDMI or HDMI Service port or HDMI ARC V L R V L R V L R AV adapter HDD AV AV VIDEO AUDIO L IN AUDIO...

Page 23: ...4 Introduction 1 2 3 1 2 3 4 Google TCL Channel Smart TV OK Google P Netflix HD YouTube 2 1 3 Google Android TV Google LLC Google 1 Google Google...

Page 24: ...5 1 AAA 2 3 ANTENNA IN 75 VHF UHF CABLE IN 4 2...

Page 25: ...Ethernet Ethernet Ethernet LAN 2 Ethernet 3 Network Internet 1 2 Network Internet Network Internet 1 Smart TV 2 Settings OK 3 Network Internet OK Router Modem Internet LAN port Modem Internet Wireles...

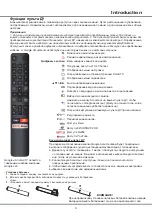
Page 26: ...7 TV 2 Welcome...

Page 27: ...OK OK OK P P LIST OK Inputs OK OK Smart TV Apps Smart TV 3 8 1 Smart TV 2 OK 3 4 OK Smart TV TCL Channel VOD 1 TCL Channel TCL Channel 2 TCL Channel 1 Smart TV 2 Settings OK 3 OK 4...

Page 28: ...9 1 2 OK 3 OK 4 Settings OK LED Motion clear...

Page 29: ...T DVB T2 DVB C DVB S DVB S2 Subtitle On 1 Channel Subtitle OK 2 Subtitle OK TV 1 TV Channel Channel scan OK 2 Country Region OK 1234 System Lock OK 3 Automatic search OK 4 Tuner mode Cable Antenna Sa...

Page 30: ...Internet Networked standby OK Settings Device Preferences Power Instant power on T Link CEC HDMI CEC 3 1 Channel Subtitle Digital subtitle language 1st OK 2 OK 3 Digital subtitle language 2nd OK 4 OK...

Page 31: ...g 3 EPG Bluetooth Bluetooth Bluetooth 1 Settings Remotes Accessories OK 2 Add accessory OK Bluetooth 3 OK Bluetooth 2 4 Wi Fi Bluetooth T Link 1 System T Link OK 2 T Link OK 3 CEC DVD OK CEC OK CEC EP...

Page 32: ...0 USB PVR USB 1 PVR 2 OK Record 3 Settings 4 OK RC901V 5 PVR 6 PVR Time Shift On Settings Channel Time Shift OK USB USB Time Shift OK 1 2 3 Time Shift OK 4 RC901V OK USB USB 1 PVR PVR list OK USB USB...

Page 33: ...14 2 Factory data reset OK Erase everything OK 3 4 OK 1234 PIN OK 5 Initial setup Netflix 1234 0423 USB T cast T Cast QR T Cast 1 Settings Device Preferences Reset OK...

Page 34: ...15 6 7 8 9 USB 10 USB 11 nScreen 12 Google 1 Ethernet 2 USB a A b c d 3 4 USB 5 1 2 5...

Page 35: ...16 1 2 3 4 1 2 3 4 1 2 3 1 2 1 2 1 2 3 4 1 1 2 65P615 1 3 1 4 1 5 1 6 2 7 1 8 1 9 MINI JACK 1...

Page 36: ...17 SmartTV SmartTV SmartTV...

Page 37: ...18...

Page 38: ...16 9 DVB C T T2 S S2 50P615 50 270 cd m2 3840x2160 178 178 16 9 DVB C T T2 S S2 55P615 55 270 cd m2 3840x2160 178 178 16 9 DVB C T T2 S S2 9 5 2 65P615 65 300 cd m2 3840x2160 178 178 16 9 DVB C T T2 S...

Page 39: ...5 15150 69 5 40 75 100 1 15150 69 5 40 TCL http tcl com ru...

Page 40: ...72 RT51WS XAPAH HDMI HDMI Licensing Administrator Inc Dolby Laboratories Dolby Dolby Audio D Dolby Laboratories...

Reviews: