background image

2

Introduction

Chapter 1

Precautions

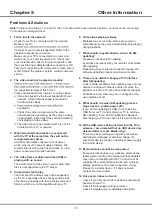
Read all of the instructions before operating the set. 

Keep these instructions well for future use.

Warning

Never place a television set in an unstable location. A 

television set may fall, causing serious personal injury 

or death. Many injuries, particularly to children, can be 

avoided by taking simple precautions such as:


-

Using cabinets or stands recommended by the 

manufacturer of the television set.


-

Only using furniture that can safely support the 

television set.


-

Ensuring the television set is not overhanging the 

edge of the supporting furniture.


-

Not placing the television set on tall furniture 

(for example, cupboards or bookcases)


without 

anchoring both the furniture and the television set to 

a suitable support.


-

Not placing the television set on cloth or other 

materials that may be located between the television 

set and supporting furniture.


-

Educating children about the dangers of climbing on 

furniture to reach the television set or its controls.

This symbol indicates that high voltage is 

present inside. It is dangerous to make any 

kind of contact with any internal part of this 

product.

N

This symbol indicates that the fuse may 

be in the neutral, and that the mains shall 

be disconnected to deenergize the phase 

conductors.

If an outside antenna or cable system is connected to 

the product, be sure the antenna or cable system is 

grounded by a skilled person so as to provide some 

protection against voltage surges and built-up static 

charges.
If your existing television set is being retained and 

relocated, the same considerations as above should be 

applied.

Product

•  Do not block or cover the ventilation openings on the 

back cover. 

•  Do not push objects of any kind into this unit through 

the cabinet slots as they could touch the current 

electric shock, or damage to the unit.

•  Do not attempt to open the cabinet as this may cause 

damage. There are no parts inside you can service by 

• 

may scratch or mar the TV screen.

•  Do not impact the TV screen with hard pressure as 

this may damage the TV screen severely.

Power and Plug

•  Unplug the set under the following conditions:


-

If the set will not be used for a long period of time.


-

If the power cord or the power outlet/plug is 

damaged.


-

Follow the instructions to install and adjust the 

product. Adjust those controls that are covered in 

these operating instructions as improper adjustment 

of other controls may result in damage. If this 

happens, unplug the set and refer to the service 

personnel.


-

If the set is subject to impact or has been dropped 

and the cabinet has been damaged.

•  Where the mains plug or an appliance coupler is used 

as disconnect device, the disconnect device shall 

remain readily operable.
(*Where an all-pole mains switch is used as the 

disconnect device, the switch shall remain readily 

operable.)

Power Cord and Signal Cable

•  Do not allow anything to rest on or roll over the power 

cord and the signal cable.

•  Protect the power cord and the signal cable from 

being trampled.

•  Do not overload the power cord or the power outlet.
•  Do not expose the power cord and the signal cable to 

moisture. 

Use Environment

•  Do not place the set on an unstable cart, stand, or 

table.

•  Place the set on a place that allows good ventilation.
•  Do not use the set near damp, and cold areas. 
•  Do not expose the set to excessive heat such as direct 

such as lighted candles, should be placed on the 

apparatus.

•  Do not expose the set to dripping or splashing and 

placed on the apparatus.

•  Do not use the set in dusty environments.
•  Operating Temperature: 5°C to 35°C (41°F to 95°F)

Operating Humidity: 20% to 80%, non-condensing
Storage Temperature: -15°C to 45°C (5°F to 113°F)
Storage Humidity: 10% to 90%, non-condensing

Cleaning

•  Dust the set by wiping the screen and the cabinet with 

a soft, clean cloth or some special liquid cleaner.

•  Do not apply excessive force to the screen when 

cleaning.

•  Do not use water or other chemical cleaner to clean 

the screen as this may damage the surface of the TV 

screen.

All other safety instructions about our TV sets are 

also applicable here. (

Note

Certain TV model is not 

designed to be mounted to the wall.

)

Summary of Contents for 43P615

Page 1: ...43P615 50P615 55P615 65P615...

Page 2: ...sing Subtitles 9 Enabling Subtitle Languages on Digital TV Channels 9 Selecting a Subtitle Type on Digital TV Channels 9 Turning On Off Subtitles 9 Using Teletext 10 Selecting Decoding Page Language 1...

Page 3: ...ar the TV screen Do not impact the TV screen with hard pressure as this may damage the TV screen severely Power and Plug Unplug the set under the following conditions If the set will not be used for a...

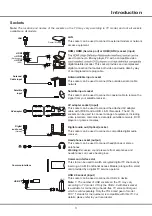
Page 4: ...ecorders camcorders decoders satellite receivers DVD players or games consoles Digital audio out Optical socket This socket can be used to connect a compatible digital audio receiver Headphone socket...

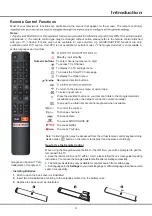
Page 5: ...ear on the screen The remote control s Notes 1 appearance 2 The remote control type may be changed without notice please refer to the remote control attached Google and Android TV are trademarks of Go...

Page 6: ...able is connected to the television please only connect the power cable to the mains socket Your TV set should only be connected to an AC supply It must not be connected to a DC supply If the plug is...

Page 7: ...t cable long enough to reach your TV A router or modem with an available Ethernet port A high speed Internet connection An Ethernet LAN port on the back of the TV 2 Connect your Ethernet cable to the...

Page 8: ...multi function menu appears by pressing button on the TV set More information Press to move the highlight to the next function selection Note You can follow the on screen guide to operate Figures and...

Page 9: ...functions or settings 3 Press to return to the homepage 4 To exit the homepage press on the remote control to display the source list and then press and OK to select your desired input source Note Si...

Page 10: ...se the menu Selecting a Subtitle Type on Digital TV Channels Installing Channels This section describes how to search and store channels automatically This may be done in any of the cases below you ar...

Page 11: ...ected language 3 Press to close the menu Using Teletext Selecting Decoding Page Language 1 Press on the remote control select Channel Teletext Decoding page language and press to enter 2 Press to sele...

Page 12: ...nearby Bluetooth devices automatically 3 Select an available device press OK and follow the guides on the screen to connect it Note Bluetooth technology if available in your TV uses access points rout...

Page 13: ...ion expires Note and color buttons on the virtual remote control keyboard 5 In recording the PVR mini pane will also show on the screen to indicate the recording progress 6 To watch the recorded progr...

Page 14: ...ed with your TV Check if the language setting is correct Check if Google server is available and stable 1 Fail to link to the network Check if your TV is connected with the network Reboot your TV if a...

Page 15: ...equency interference This interference produces moving ripples or diagonal streaks and in some case loss of contrast in the picture Find out and remove the radio interference source To bring you bette...

Page 16: ...lied including but not limited to warranties of merchantability accuracy of quiet enjoyment and non infringement of third party rights Manufacturer does not guarantee the accuracy validity timeliness...

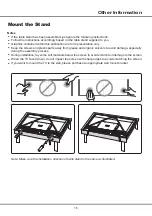
Page 17: ...s away from grease and organic solvents to avoid damage especially during the assembly process During installation lay some soft materials below the screen to avoid scratch and damage to the screen Wh...

Page 18: ...lby Dolby Audio and the double D symbol are trademarks of Dolby Laboratories Figures and illustrations in this User Manual are provided for reference only and may differ from actual product are tradem...

Page 19: ...43P615 50P615 55P615 65P615...

Page 20: ...2 2 2 2 2 2 3 4 2 5 5 6 TV 7 7 3 8 8 8 Smart TV 8 TCL Channel 8 8 9 4 10 10 10 10 10 10 11 11 11 11 11 11 11 T Link 11 T Link 12 12 12 EPG 12 Bluetooth 12 13 PVR 13 T cast 14 14 14 14 5 15 16 17 18 1...

Page 21: ...2 1 N TCL 5...

Page 22: ...Antenna Cable input Router Modem USB 2 0 Satellite input Common interface Digital audio out Optical HDMI or HDMI Service port or HDMI ARC V L R V L R V L R AV adapter HDD AV AV VIDEO AUDIO L IN AUDIO...

Page 23: ...4 Introduction 1 2 3 1 2 3 4 Google TCL Channel Smart TV OK Google P Netflix HD YouTube 2 1 3 Google Android TV Google LLC Google 1 Google Google...

Page 24: ...5 1 AAA 2 3 ANTENNA IN 75 VHF UHF CABLE IN 4 2...

Page 25: ...Ethernet Ethernet Ethernet LAN 2 Ethernet 3 Network Internet 1 2 Network Internet Network Internet 1 Smart TV 2 Settings OK 3 Network Internet OK Router Modem Internet LAN port Modem Internet Wireles...

Page 26: ...7 TV 2 Welcome...

Page 27: ...OK OK OK P P LIST OK Inputs OK OK Smart TV Apps Smart TV 3 8 1 Smart TV 2 OK 3 4 OK Smart TV TCL Channel VOD 1 TCL Channel TCL Channel 2 TCL Channel 1 Smart TV 2 Settings OK 3 OK 4...

Page 28: ...9 1 2 OK 3 OK 4 Settings OK LED Motion clear...

Page 29: ...T DVB T2 DVB C DVB S DVB S2 Subtitle On 1 Channel Subtitle OK 2 Subtitle OK TV 1 TV Channel Channel scan OK 2 Country Region OK 1234 System Lock OK 3 Automatic search OK 4 Tuner mode Cable Antenna Sa...

Page 30: ...Internet Networked standby OK Settings Device Preferences Power Instant power on T Link CEC HDMI CEC 3 1 Channel Subtitle Digital subtitle language 1st OK 2 OK 3 Digital subtitle language 2nd OK 4 OK...

Page 31: ...g 3 EPG Bluetooth Bluetooth Bluetooth 1 Settings Remotes Accessories OK 2 Add accessory OK Bluetooth 3 OK Bluetooth 2 4 Wi Fi Bluetooth T Link 1 System T Link OK 2 T Link OK 3 CEC DVD OK CEC OK CEC EP...

Page 32: ...0 USB PVR USB 1 PVR 2 OK Record 3 Settings 4 OK RC901V 5 PVR 6 PVR Time Shift On Settings Channel Time Shift OK USB USB Time Shift OK 1 2 3 Time Shift OK 4 RC901V OK USB USB 1 PVR PVR list OK USB USB...

Page 33: ...14 2 Factory data reset OK Erase everything OK 3 4 OK 1234 PIN OK 5 Initial setup Netflix 1234 0423 USB T cast T Cast QR T Cast 1 Settings Device Preferences Reset OK...

Page 34: ...15 6 7 8 9 USB 10 USB 11 nScreen 12 Google 1 Ethernet 2 USB a A b c d 3 4 USB 5 1 2 5...

Page 35: ...16 1 2 3 4 1 2 3 4 1 2 3 1 2 1 2 1 2 3 4 1 1 2 65P615 1 3 1 4 1 5 1 6 2 7 1 8 1 9 MINI JACK 1...

Page 36: ...17 SmartTV SmartTV SmartTV...

Page 37: ...18...

Page 38: ...16 9 DVB C T T2 S S2 50P615 50 270 cd m2 3840x2160 178 178 16 9 DVB C T T2 S S2 55P615 55 270 cd m2 3840x2160 178 178 16 9 DVB C T T2 S S2 9 5 2 65P615 65 300 cd m2 3840x2160 178 178 16 9 DVB C T T2 S...

Page 39: ...5 15150 69 5 40 75 100 1 15150 69 5 40 TCL http tcl com ru...

Page 40: ...72 RT51WS XAPAH HDMI HDMI Licensing Administrator Inc Dolby Laboratories Dolby Dolby Audio D Dolby Laboratories...

Reviews: