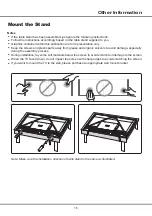
background image

12

• 

Выберите один или несколько типов, 

которые вы хотите выделить в списке типов, 

и нажмите 

OK

, чтобы сделать выбор или 

отменить его. У выбранного типа появится 

галочка справа.


-

Индивидуальное расписание: 

С помощью


кнопок ▲/▼ выберите программу, нажмите


кнопку


КРАСНУЮ

, чтобы составить


расписание,


нажмите


OK


для подтверждения, а


затем


используйте кнопки ▲/▼ для выбора параметров


S

ch

edule reminder

 или


S

ch

edule recordin

g

.


-

Выберите дату:

 Нажмите 

ЗЕЛЕНУЮ

 кнопку, 

чтобы выбрать дату.


-

Список расписаний:

 Нажмите 

ЖЕЛТУЮ


кнопку, чтобы просмотреть список расписаний.

Примечание:

для доступа к цветным кнопкам 

необходимо сначала нажать кнопку 


 для вызова виртуальной клавиатуры. 

3.


Нажмите   для выхода из EPG.

Функция Bluetooth

(* недоступно в некоторых моделях)

Bluetooth

®

 - 

это технология беспроводного обмена 

данными между разнообразными устройствами на 

небольшом расстоянии. Вы можете подключить к 

телевизору аудиоустройство, мышь или клавиатуру с 

поддержкой Bluetooth.

1. 

Нажмите кнопку   на пульте дистанционного 

управления для отображения главной страницы, 

используйте ▲/◄/► для выбора 


(Settings) 

> Remotes & Accessories

 и нажмите 

OK

 для 

подтверждения.

2. 

Выберите пункт 

Add accessory

 и нажмите кнопку 

OK

 для подтверждения. Телевизор автоматически 

выполнит поиск ближайших устройств Bluetooth.

3.


Выберите доступное устройство, нажмите 

OK

 и следуйте инструкциям на экране, чтобы 

подключить его.

Примечание:

 В блоке Bluetooth 

(

если таковой 

имеется в телевизоре) 

используется частота 2

,

4 ГГц, 

поэтому близость к точкам 

доступа 

W

i-Fi, маршрутизаторам 

или микроволновым печам может 

неблагоприятно влиять на 

потоковую передачу аудиосигналов. 

Если аудиосигналы принимаются 

с перебоями, перезапустите 

устройство Bluetooth для поиска 

частоты, менее подверженной 

действию помех. Если проблему не 

удается устранить этим способом

,


приблизьте устройство к телевизору 

или увеличьте расстояние между 

телевизором и источником помех

.

Подключение и отключение функции T

-

Link

1. 

Нажмите кнопку   на пульте ДУ, выберите 

команды 

System > T-Link

, а затем нажмите 

кнопку 

OK

/►.

2. 

Выберите 

T-Link,

а затем нажмите 

OK

 для выбора 

опций Вкл или Выкл.


3.


Нажмите  , чтобы закрыть меню.

Автоматическое включение

Данная функция позволяет автоматически включать 

телевизор при включении устройства

 CEC 

(например, 

DVD-плеера) с помощью отдельного пульта 

управления. Выберите 

OK

, чтобы включить данную 

функцию.

Автоматический переход в спящий режим

Данная функция позволяет автоматически 

переводить все устройства CEC в режим ожидания 

при выключении телевизора с помощью пульта ДУ. 

Выберите OK, чтобы включить данную функцию.

Примечание:

 Функции CEC зависят от 

подключенных устройств и 

не исключено, что некоторые 

устройства не смогут корректно 

взаимодействовать с телевизором. 

В случае возникновения проблем с 

каким-либо из подобных устройств 

за дополнительной информацией 

обращайтесь к руководству 

пользователя или к производителю 

устройства.

EPG


(

электронная программа передач)

EPG - это электронная программа передач 

цифрового телевидения. Вы можете перемещаться 

по списку, выбирать и просматривать программы.

1. 

На пульте ДУ нажмите  , выберите 

Channel 

> EPG

 и нажмите 

OK

/►, чтобы войти,появится 

 меню 

Programme Guide

,которое предоставляет 


 информацию о текущей и следующих передачах 

на каждом канале. 

Выбирайте различные передачи с помощью 

кнопок ▲/▼/◄/► на пульте ДУ.

2. 

Для просмотра EPG используйте 

соответствующие кнопки, показанные в нижней 

части экрана.


-

Фильтр программ: 

Фильтр цифровых передач.

• 

Нажмите кнопку   для отображения списка 

типов программ.

• 

Выбирайте различные типы программ с 

помощью кнопок ▲/▼ на пульте ДУ.

Другие функции телевизора

Summary of Contents for 43P615

Page 1: ...43P615 50P615 55P615 65P615...

Page 2: ...sing Subtitles 9 Enabling Subtitle Languages on Digital TV Channels 9 Selecting a Subtitle Type on Digital TV Channels 9 Turning On Off Subtitles 9 Using Teletext 10 Selecting Decoding Page Language 1...

Page 3: ...ar the TV screen Do not impact the TV screen with hard pressure as this may damage the TV screen severely Power and Plug Unplug the set under the following conditions If the set will not be used for a...

Page 4: ...ecorders camcorders decoders satellite receivers DVD players or games consoles Digital audio out Optical socket This socket can be used to connect a compatible digital audio receiver Headphone socket...

Page 5: ...ear on the screen The remote control s Notes 1 appearance 2 The remote control type may be changed without notice please refer to the remote control attached Google and Android TV are trademarks of Go...

Page 6: ...able is connected to the television please only connect the power cable to the mains socket Your TV set should only be connected to an AC supply It must not be connected to a DC supply If the plug is...

Page 7: ...t cable long enough to reach your TV A router or modem with an available Ethernet port A high speed Internet connection An Ethernet LAN port on the back of the TV 2 Connect your Ethernet cable to the...

Page 8: ...multi function menu appears by pressing button on the TV set More information Press to move the highlight to the next function selection Note You can follow the on screen guide to operate Figures and...

Page 9: ...functions or settings 3 Press to return to the homepage 4 To exit the homepage press on the remote control to display the source list and then press and OK to select your desired input source Note Si...

Page 10: ...se the menu Selecting a Subtitle Type on Digital TV Channels Installing Channels This section describes how to search and store channels automatically This may be done in any of the cases below you ar...

Page 11: ...ected language 3 Press to close the menu Using Teletext Selecting Decoding Page Language 1 Press on the remote control select Channel Teletext Decoding page language and press to enter 2 Press to sele...

Page 12: ...nearby Bluetooth devices automatically 3 Select an available device press OK and follow the guides on the screen to connect it Note Bluetooth technology if available in your TV uses access points rout...

Page 13: ...ion expires Note and color buttons on the virtual remote control keyboard 5 In recording the PVR mini pane will also show on the screen to indicate the recording progress 6 To watch the recorded progr...

Page 14: ...ed with your TV Check if the language setting is correct Check if Google server is available and stable 1 Fail to link to the network Check if your TV is connected with the network Reboot your TV if a...

Page 15: ...equency interference This interference produces moving ripples or diagonal streaks and in some case loss of contrast in the picture Find out and remove the radio interference source To bring you bette...

Page 16: ...lied including but not limited to warranties of merchantability accuracy of quiet enjoyment and non infringement of third party rights Manufacturer does not guarantee the accuracy validity timeliness...

Page 17: ...s away from grease and organic solvents to avoid damage especially during the assembly process During installation lay some soft materials below the screen to avoid scratch and damage to the screen Wh...

Page 18: ...lby Dolby Audio and the double D symbol are trademarks of Dolby Laboratories Figures and illustrations in this User Manual are provided for reference only and may differ from actual product are tradem...

Page 19: ...43P615 50P615 55P615 65P615...

Page 20: ...2 2 2 2 2 2 3 4 2 5 5 6 TV 7 7 3 8 8 8 Smart TV 8 TCL Channel 8 8 9 4 10 10 10 10 10 10 11 11 11 11 11 11 11 T Link 11 T Link 12 12 12 EPG 12 Bluetooth 12 13 PVR 13 T cast 14 14 14 14 5 15 16 17 18 1...

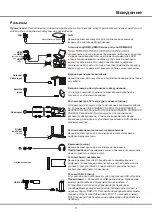
Page 21: ...2 1 N TCL 5...

Page 22: ...Antenna Cable input Router Modem USB 2 0 Satellite input Common interface Digital audio out Optical HDMI or HDMI Service port or HDMI ARC V L R V L R V L R AV adapter HDD AV AV VIDEO AUDIO L IN AUDIO...

Page 23: ...4 Introduction 1 2 3 1 2 3 4 Google TCL Channel Smart TV OK Google P Netflix HD YouTube 2 1 3 Google Android TV Google LLC Google 1 Google Google...

Page 24: ...5 1 AAA 2 3 ANTENNA IN 75 VHF UHF CABLE IN 4 2...

Page 25: ...Ethernet Ethernet Ethernet LAN 2 Ethernet 3 Network Internet 1 2 Network Internet Network Internet 1 Smart TV 2 Settings OK 3 Network Internet OK Router Modem Internet LAN port Modem Internet Wireles...

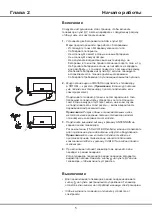
Page 26: ...7 TV 2 Welcome...

Page 27: ...OK OK OK P P LIST OK Inputs OK OK Smart TV Apps Smart TV 3 8 1 Smart TV 2 OK 3 4 OK Smart TV TCL Channel VOD 1 TCL Channel TCL Channel 2 TCL Channel 1 Smart TV 2 Settings OK 3 OK 4...

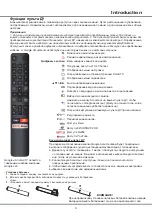
Page 28: ...9 1 2 OK 3 OK 4 Settings OK LED Motion clear...

Page 29: ...T DVB T2 DVB C DVB S DVB S2 Subtitle On 1 Channel Subtitle OK 2 Subtitle OK TV 1 TV Channel Channel scan OK 2 Country Region OK 1234 System Lock OK 3 Automatic search OK 4 Tuner mode Cable Antenna Sa...

Page 30: ...Internet Networked standby OK Settings Device Preferences Power Instant power on T Link CEC HDMI CEC 3 1 Channel Subtitle Digital subtitle language 1st OK 2 OK 3 Digital subtitle language 2nd OK 4 OK...

Page 31: ...g 3 EPG Bluetooth Bluetooth Bluetooth 1 Settings Remotes Accessories OK 2 Add accessory OK Bluetooth 3 OK Bluetooth 2 4 Wi Fi Bluetooth T Link 1 System T Link OK 2 T Link OK 3 CEC DVD OK CEC OK CEC EP...

Page 32: ...0 USB PVR USB 1 PVR 2 OK Record 3 Settings 4 OK RC901V 5 PVR 6 PVR Time Shift On Settings Channel Time Shift OK USB USB Time Shift OK 1 2 3 Time Shift OK 4 RC901V OK USB USB 1 PVR PVR list OK USB USB...

Page 33: ...14 2 Factory data reset OK Erase everything OK 3 4 OK 1234 PIN OK 5 Initial setup Netflix 1234 0423 USB T cast T Cast QR T Cast 1 Settings Device Preferences Reset OK...

Page 34: ...15 6 7 8 9 USB 10 USB 11 nScreen 12 Google 1 Ethernet 2 USB a A b c d 3 4 USB 5 1 2 5...

Page 35: ...16 1 2 3 4 1 2 3 4 1 2 3 1 2 1 2 1 2 3 4 1 1 2 65P615 1 3 1 4 1 5 1 6 2 7 1 8 1 9 MINI JACK 1...

Page 36: ...17 SmartTV SmartTV SmartTV...

Page 37: ...18...

Page 38: ...16 9 DVB C T T2 S S2 50P615 50 270 cd m2 3840x2160 178 178 16 9 DVB C T T2 S S2 55P615 55 270 cd m2 3840x2160 178 178 16 9 DVB C T T2 S S2 9 5 2 65P615 65 300 cd m2 3840x2160 178 178 16 9 DVB C T T2 S...

Page 39: ...5 15150 69 5 40 75 100 1 15150 69 5 40 TCL http tcl com ru...

Page 40: ...72 RT51WS XAPAH HDMI HDMI Licensing Administrator Inc Dolby Laboratories Dolby Dolby Audio D Dolby Laboratories...

Reviews: