background image

9

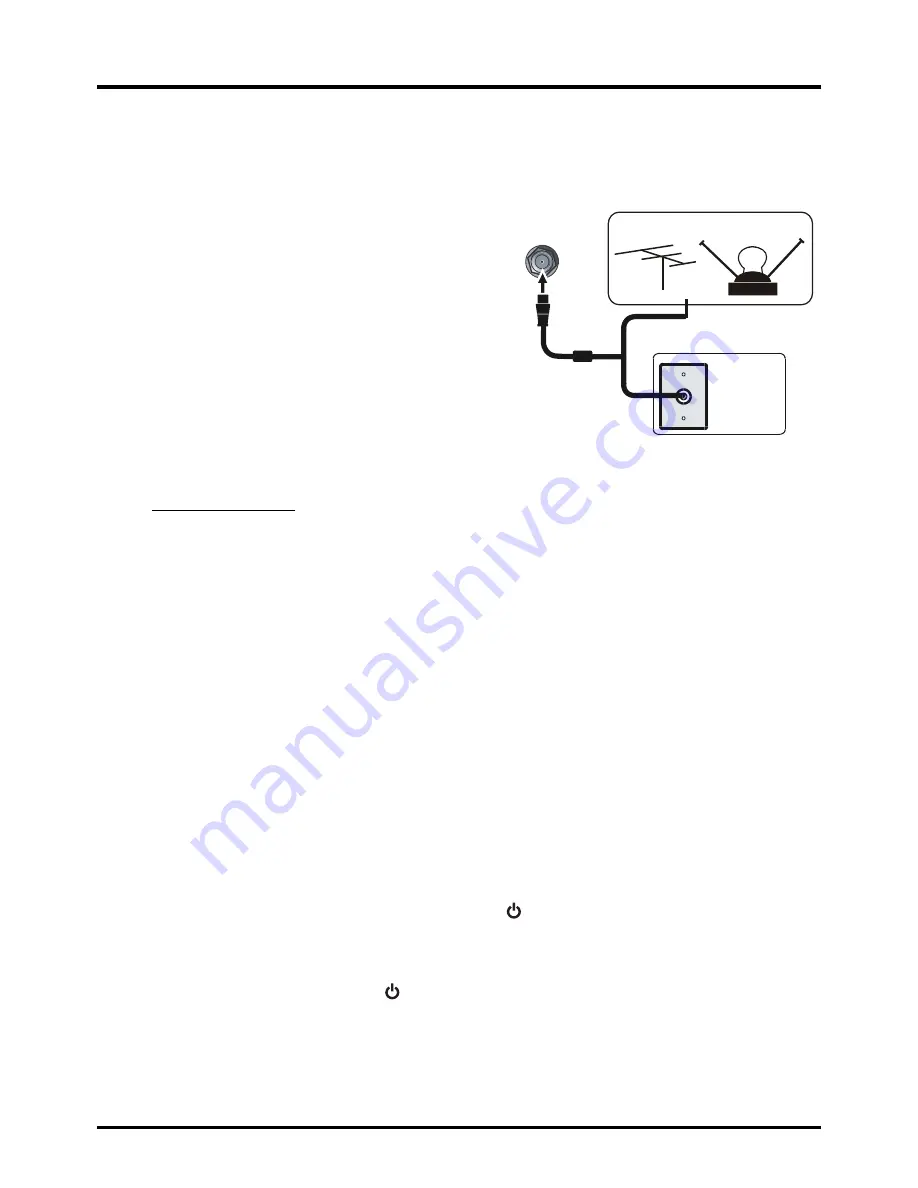
ANT/CABLE

/SAT IN

O u t d o o r o r  i n d o o r  A n t e n n a 

C a b l e  Bo x ,

(  Wa l l  O u t l e t )

R F C o a x i a l 

W i r e 

( 7 5 o h m )

O r

O r

Connections and Setup

Obtain the Signal

The  first  step  in  connecting  your  TV  is  obtaining  the  signal.  The  back  panel  of  your  TV  allows  you  to  receive  
analog  and/or  digital  channels  by  using  the  

HDMI

 or 

ANT/CABLE/SAT

  connections.  To  obtain  the  best  

quality,  use  the  

HDMI

  connection.

Connect  the  outside  ariel  to  the  

ANT/CABLE/SAT IN


connection  on  the  back  of  the  TV  to  receive  off-­air  channels.    
Use  an  

HDMI

  connection  to  display  the  best  picture  and  

sound  quality  for  satellite  and  cable
•   If  you  have  a  set-­top  box,  you  may  need  to  call  your  

cable  company  or  satellite  service  provider.  They  may  
recommend  special  cables  to  allow  you  to  view  digital  
channels.

•   The  aerial  socket  (75  OHM  -­  VHF  /  UHF  /  cable)  can  be  

used  for  connecting  an  external  aerial  or  other  equipment  
fitted  with  a  modulator  (video  recorder,  satellite  receiver,  
etc.).  We  recommend  that  you  do  not  connect  other  
equipment  (video  recorder,  satellite  receiver,  etc.)  to  
your  TV  set  to  begin  with,  so  as  not  to  complicate  the  
set-­up  procedure  with  the  additional  steps  involved.  Connect  them  when  you  have  finished  setting  up  the  
channels.

•   Visit  www.antennaweb.org  for  help  in  deciding  what  type  of  antenna  to  use  in  order  to  receive  the  local  

digital  channels  available  to  you.  Enter  your  location,  and  the  program  will  list  local  analog  and  digital  
stations  available  using  your  antenna.

Switching On

Follow  the  instructions  on  this  page  on  how  to  switch  on  your  TV  set  and  use  the  remote  control  before  going  
on  to  following  pages  describing  how  to  use  the  channel  scan  procedure.
1.   Insert  two  AAA  batteries  in  the  remote  control.

Precautions  on  using  batteries:


-­ Only  use  the  battery  types  specified.


-­ Make  sure  you  use  the  correct  polarity.


-­ Do  not  mix  new  and  used  batteries.


-­ Do  not  use  rechargeable  batteries.


-­ Do  not  expose  batteries  to  excessive  heat  such  as  sunshine,  fire  or  the  like,  throw  them  in  a  fire,  

recharge  them  or  try  to  open  them,  as  this  could  cause  them  to  leak  or  explode.


-­ Remove  the  batteries  from  the  remote  control  if  you  are  not  using  it  for  a  long  period  of  time.

2.   Connect  the  power  cable  to  a  power  outlet.  (If  the  power  cable  is  not  connected  to  the  television,  please  

first  connect  the  power  cable  to  the  television.)  Your  TV  set  should  only  be  connected  to  an  AC  supply.  
It  must  not  be  connected  to  a  DC  supply.  If  the  plug  is  detached  from  the  cable,  do  not,  under  any  
circumstances,  connect  it  to  a  power  outlet,  as  there  is  a  risk  of  electric  shock.  

3.   When  powered  on,  if  the  TV  set  is  in  standby  mode,  press     on  the  remote  control  or  on  the  TV  set  to  

turn  on  the  TV.

Switching Off

To  put  the  TV  set  into  standby  mode,  press     on  the  remote  control  or  on  the  TV,  the  TV  set  remains  
powered  up,  but  with  low  energy  consumption.
To  disconnect  power  from  the  TV  set,  unplug  the  power  cord  from  the  power  outlet.

Summary of Contents for 48FD2700

Page 1: ...7 or 1 877 800 1269 in AK HI or Puerto Rico User s Guide For use with model 48FD2700 Figures and illustrations in this User s Guide are provided for reference only and may differ from actual product a...

Page 2: ...owed by the power symbol on this TV and your remote control puts the TV into a very low power standby mode but will not completely turn the power off In order to completely shut the power off you will...

Page 3: ...aratus during lightning storms or when unused for long periods of time 14 Refer all servicing to quali ed service personnel Servicing is required when the apparatus has been damaged in any way such as...

Page 4: ...8 9 9 9 10 11 12 12 12 12 12 12 12 12 12 12 12 12 13 13 13 13 13 13 13 13 13 14 14 14 14 15 16 17 17 17 17 ARC 17 18 19 21 21 23 Limited Warranty 22 Legal Statement of TCL 25...

Page 5: ......

Page 6: ...rings up the main 3 CH button Scans up down through the channel list In the menu system they act like the up down remote and adjust menu controls direction buttons on the 2 VOL button Increases decrea...

Page 7: ...HDMI 2 ARC IN ARC stands for Audio Receiver it can transmit the television audio to the power equipment HDMI 3 HDMI 1 RF IN HDMI 2 ARC SPDIF USB...

Page 8: ...e input source directly by pressing INPUT button Same connection to HDMI 1 HDMI 3 IN COMPONENT IN CMPT AUDIO VIDEO IN AV HDMI 1 DVI IN Component Video Connection Better Composite Video Connection Good...

Page 9: ...8...

Page 10: ...our location and the program will list local analog and digital stations available using your antenna Switching On Follow the instructions on this page on how to switch on your TV set and use the remo...

Page 11: ...ECO Save ECO Save...

Page 12: ...50 50 50 50 50 On...

Page 13: ...ECO Save ECO Save ECO Save 50 50 50 50 50 On...

Page 14: ......

Page 15: ...an hide channels in the Channel List Then when you press the CH or CH button the TV will skip the hidden channels You can still tune to these hidden channels by pressing the number of the channel on t...

Page 16: ...you receive a message that the channel is currently blocked Change the channel or to enter your password and temporarily deactivate the parental controls Broadcasters are not required to provide conte...

Page 17: ...by the broadcaster the new rating options would appear within this menu Reset RRT Reset to the default RRT setting Unrated The Unrated Ratings option lets you decide if programs that the V Chip recog...

Page 18: ...ARC This option can be selected default Off to decide whether support ARC function or not 1 Select Setting ARC press to select On 2 Press to select Audio Receiver press to select On to enter press 17...

Page 19: ...ent in 4 3 which does not ll your screen It depends on how the station or device connected to your TV is formatting the video If there are bars on the screen press the ZOOM button to try a different f...

Page 20: ...back of your TV three video cables or bundled component video cables red blue and green connect to the corresponding COMPONENT INPUT jacks on the back of your TV Check the antenna connections Make su...

Page 21: ...ing trouble sending video information to the TV Reconnect your device Reset the power by unplugging the power cord and plugging it back in If problems persist try connecting the Y Pb Pr jacks if they...

Page 22: ...21...

Page 23: ...Base Installation 22...

Page 24: ...ither be repaired at an Authorized TCL Service Center or directly exchanged for a new or refurbished remanufactured unit At the sole discretion of TTE television screen sizes 42 or larger will either...

Page 25: ...24...

Page 26: ...25...

Page 27: ...Part No 2 48FD27 E399A TTE Technology Inc 2455 Anselmo Drive Suite 101 Corona CA 92879...

Reviews: