


10
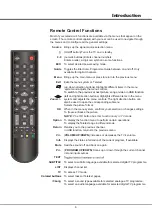
The menus for adjusting the picture are used to obtain
the best picture settings according to your preference,
the type of program you are watching and the ambient
lighting.
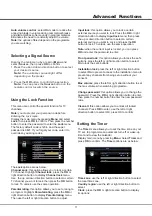
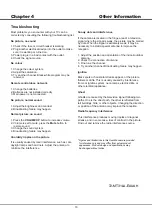
Display the main menu by pressing
Menu
and select
Picture
, then press the
OK
button to confirm. The
Picture
options are as below:
Note:
some options may be not available for certain
signal sources.
Picture preset:
use
the left or right direction button to
scroll through the picture preset settings:
Standard,
Dynamic, Studio, Personal, Movie
.
Brightness:
adjusts the brightness of the picture.
Contrast:
adjusts the difference between light and dark
areas of the picture.
Saturation:
adjusts the richness of colour.
Sharpness:
adjusts the crispness of the edges in the
picture.
Note:
this function is not available in VGA mode.
Back Light:
adjusts the backlight level of the screen.
Color temperature:
adjusts the color temperature of the
picture. Use the
left or right direction button to scroll
through the color settings:
Cool
for a more blue palette
of picture colors;
Normal
;
Customer,
and
Warm
for a
more red palette of picture colors.
Screen mode:
use the
left or right direction button to
select the picture size.
(
Note:
You are recommended to
use the full screen mode. Do not use the display mode
with black bars on both sides of the picture (such as 4:3)
for long time, otherwise the TV screen may be damaged
permanently.)
Auto format:
use the
left or right direction button to
select
On
and
Off
, when
On
selected, the picture will
display the picture according to HD Signal's format.
Note:
Auto format is available only in TV and AV mode.
Eco Settings:
press the
OK
or right direction button to
select energy saving mode: press the
left or right
direction button to select desired power saving mode to
achieve desired power saving effect. At this time the
Picture preset
option under
Picture
will be set to
Personal
synchronically. .
Advanced Settings:
press the
OK
or right direction
button to display its submenu.
Note:
this function is not available in Standard/Personal
mode.
Adjusting the Picture
Noise reduction:
this setting reduces picture
static
or
any type of interference. This feature is
especially useful for providing a clearer picture in
weak analog signal conditions. Press the
left or right
direction button to choose between these options:
Low/High/Auto
/Off/Middle
.
Note:
some options may appear in the next page of
Picture
menu, you can press the up or down direction
button to switch.
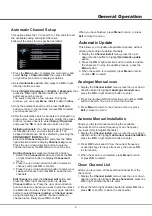
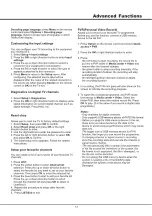
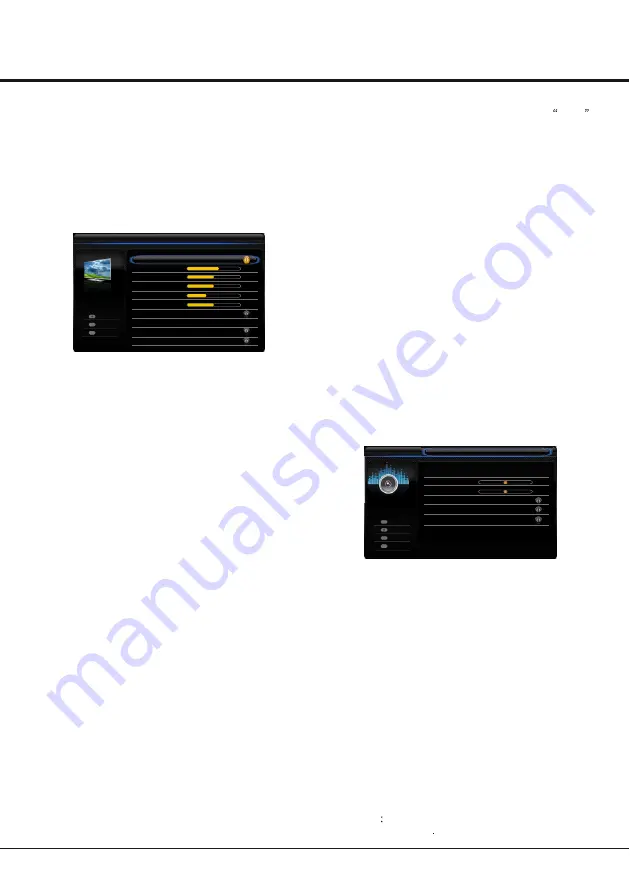
Display the main menu by press the
Menu
button and select
Sound
, then press the
OK
button to confirm. The
Sound
menu appears with the following options:
Sound preset:
press the
OK
or right direction button to
display its submenus:
- Sound preset:
use the
left or right direction button to
select a sound type from the list:
Off, Rock, Pop, Live,
Dance, Techno, Classic, Soft
and
Personal
.
- Frequency range:
use the up
or down direction button
to select the desired frequency range (
100Hz, 300Hz,
1KHz, 3KHz, 10KHz
), use the
left or right direction
button to adjust the level.
Balance:
use the
left or right direction button to balance the
sound between the left and right speakers.
Wide stereo:
use the
left or right direction button to switch
On
or
Off
.
Sound type
use the
left or right direction button to select a
sound type from the list
MPEG NR (Noise Reduction):
this feature allows you to
reduce visible interference caused by MPEG compression.
Dynamic Contrast:
turns on this option to adjust the
contrast automatically.
Film Mode:
optimizes the picture for watching film. Select
On
or
Off.
Gamma:
adjusts the middle level of luminance.
Reset:
this function allows you to reset all the picture
settings to the factory default settings.
Audio delay:
if the sound output does not match the
picture,use the left or right buttonto adjust the delay time to
synchronize the sound with the picture
White Balance:
adjusts the color temperature manually
when the Color Temperature mode is Customer.
Chapter 3
Advanced Functions
Adjusting the Sound
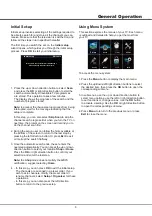
Picture
Picture preset
ECO
Brightness
Contrast
Saturation
Sharpness
Color Temperature
Back Light
Screen Mode
Auto Format
60
50
50
50
8
Cool
Cinerama
On
ECO Settings
Auto
Back
Exit
Select
Menu
Exit
CEC
Version Info
Sound
Sound preset
Balance
Wide stereo
0
0
Auto volume control
Audio delay
Sound type
On
Off
Stereo
......
Back
Exit
Select
Enter
Menu
Exit
OK
Summary of Contents for L32F1520
Page 14: ......


