background image

8

Начало работы

Сетевое подключение

Для работы всех функций телевизора требуется подключение к Интернету. За передачу 

данных может взиматься плата.

Для получения дополнительных сведений обратитесь к своему интернет-провайдеру.

Для получения доступа к Интернету необходимо высокоскоростное широкополосное подключение. 

Обратитесь к своему интернет-провайдеру. 

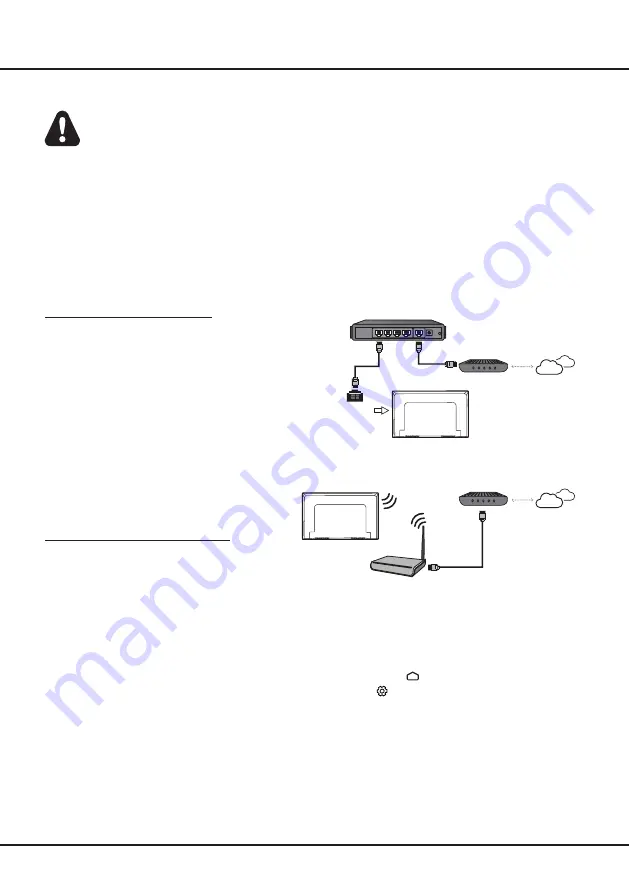
Телевизор можно подключить к домашней сети двумя способами:

• 

Проводное подключение - через разъем RJ45 (LAN) на задней панели.

• 

Беспроводное подключение – подключение к домашней беспроводной сети через встроенное устройство 

беспроводной связи.

Примечание:

  Указания, перечисленные ниже, касаются обычных способов подключения телевизора к 

проводной или беспроводной сети. Метод подключения зависит от фактической сетевой 

конфигурации. При возникновении каких-либо вопросов о вашей домашней сети обращайтесь 

к своему интернет-провайдеру.

Подключение к проводной сети

Проводное подключение:

1. 

Вам потребуется:

• 

Кабель Ethernet достаточной длины

• 

Маршрутизатор или модем со свободным 

разъемом Ethernet

• 

Высокоскоростное подключение к Интернету

• 

Разъем Ethernet (LAN) на задней панели 

телевизора

2. 

Подключите кабель Ethernet к маршрутизатору 

и к соответствующему разъему на задней 

панели телевизора.

3. 

Откройте меню 

Network

 для настройки 

телевизора.

Подключение к беспроводной сети

Беспроводное подключение: 

1. 

Вам потребуется:

• 

Маршрутизатор, поддерживающий передачу 

высокоскоростного беспроводного сигнала

• 

Высокоскоростное подключение к Интернету

2. 

Откройте меню 

Network

 для настройки телевизора.

Примечание:

 Чтобы войти в меню 

Network

, выполните следующие действия.

1.  Для отображения главной страницы Smart TV нажмите кнопку   на пульте ДУ.
2.  Используя кнопки ▲/◄/►, переместите курсор на значок 

 (Settings) 

в правом верхнем углу 

экрана, а затем нажмите 

OK

 для входа в меню настроек системы.

3.  С помощью кнопок ▲/▼ выберите 

Network

, а затем нажмите OK, чтобы войти в подменю. После 

этого следуйте инструкциям на экране, чтобы настроить параметры сети.

Router

Modem

Internet

LAN port

Modem

Internet

Wireless router

Маршрутизатор

Интернет

Интернет

Модем

Модем

Беспроводный маршрутизатор

Порт LAN

Summary of Contents for L32S60A

Page 1: ...S XRUBV 32S60A 2019 10 6 BOM H7 32F6NNW URNA1AA ELQ145380O TCL L32S60A RT41XS RU PREPARED BY ENG CHECKED BY CONFIRM BY RUSSIA TCL TV PE DN cn o ou email vasya liu tcl c om c 2019 10 08 14 16 30 08 00...

Page 2: ...s and illustrations in this User Manual are provided for reference only and may differ from actual product appearance Product design and specifications may be changed without notice OPERATION MANUAL L...

Page 3: ......

Page 4: ...d 10 Using System Settings Menu 10 Using TV Settings Menu 10 Chapter 4 Using More of Your TV Installing Channels 11 Common Interface 11 Using the Common Interface Function 11 1 1 s e c i v r e S e c a...

Page 5: ...If this happens unplug the set and refer to the service personnel If the set is subject to impact or has been dropped and the cabinet has been damaged Where the mains plug or an appliance coupler is...

Page 6: ...del ANTENNA CABLE IN socket input This socket can be used to connect the outside aerial or cable network AV IN adapter socket The AV IN adapter socket can be used to connect the attached AV adapter ca...

Page 7: ...after activating successfully b This voice search function is only available for content search from certain apps c Set languages in the TV settings to your local language or official language to enha...

Page 8: ...ection buttons OK To confirm an entry or selection To return to the previous menu or quit an App To select input source EXIT To exit the Settings menu LANG To select an audio language available for se...

Page 9: ...le to the mains socket Your TV set should only be connected to an AC supply It must not be connected to a DC supply If the plug is detached from the ca ble do not under any circumstances connect it to...

Page 10: ...Wired Network To connect to a wired network 1 Ensure you have An Ethernet cable long enough to reach your TV A router or modem with an available Ethernet port A high speed Internet connection An Ether...

Page 11: ...ay vary depending on the model Initial Setup The first time you switch the set on the Welcome screen appears which guides you through the initial setup process Follow the on screen instructions to fin...

Page 12: ...made without prior notice by the service provider 1 Press on the remote control to display the Smart TV homepage 2 Press and OK to enter the desired Apps functions or settings 3 Press to return to th...

Page 13: ...Installing Channels This section describes how to search and store channels automatically This may be done in any of the cases below you have skipped the channel installation step in the initial setu...

Page 14: ...current or next program playing on each channel Navigate through the different programs using the buttons on the remote control 3 Use the related buttons shown at the bottom of the screen to view EPG...

Page 15: ...button to view your schedule list 4 Press GUIDE or EXIT to exit EPG on the virtual remote control keyboard Bluetooth Function not available for some models Bluetooth is a wireless technology standard...

Page 16: ...stable 1 Fail to link to the network Check if your TV is connected with the network Reboot your TV Consult your internet service provider to confirm if access of your router is supported Refer to the...

Page 17: ...osition of the antenna may improve the reception Radio frequency interference This interference produces moving ripples or diagonal streaks and in some case loss of contrast in the picture Find out an...

Page 18: ...16 Other Information...

Page 19: ...validity timeliness legality or completeness of any content or service made available through this device and does not warrant that the device content or services will meet your requirements or that...

Page 20: ...L32S60A...

Page 21: ...2 1 3 3 3 3 3 3 3 3 4 5 5 5 6 6 2 7 7 8 9 9 3 10 10 10 Smart TV 10 10 10 11 4 12 12 12 12 12 12 12 13 13 13 13 13 13 T Link 13 T Link 13 13 14 EPG 14 Bluetooth 14 Netflix 14 14 5 15 16 17 19 18...

Page 22: ...3 1 TCL 5...

Page 23: ...HDMI SERVICE or HDMI ARC HDMI SERVICE HDMI ARC HDMI High Definition Multimedia Interface Blu ray DVD USB 2 0 HDD USB2 0 USB USB ANTENNA CABLE IN ANTENNA CABLE IN AV IN adapter V L R V L R V L R AV IN...

Page 24: ...5 a 1 OK b c settings 1 2 3 Smart TV OK P P Netflix 1 2 3 or...

Page 25: ...6 1 2 3 LIST P Smart TV OK EXIT LANG GUIDE TEXT SUBT ZOOM Netflix...

Page 26: ...7 2 1 AAA 2 3 ANTENNA IN 75 VHF UHF CABLE IN 4...

Page 27: ...8 RJ45 LAN 1 Ethernet Ethernet Ethernet LAN 2 Ethernet 3 Network 1 2 Network Network 1 Smart TV 2 Settings OK 3 Network OK Router Modem Internet LAN port Modem Internet Wireless router LAN...

Page 28: ...9 TV P P OK OK Welcome...

Page 29: ...10 3 P LIST LIST OK OK Inputs OK OK c Smart TV Apps Smart TV 1 Smart TV 2 OK 3 4 Inputs OK OK Smart TV Apps 1 2 OK 3 Google Cast 1 Smart TV...

Page 30: ...11 3 OK 4 5 Settings OK LED Motion clear 2 Settings OK 3 OK 4 1 2 OK...

Page 31: ...nel Subtitle OK 2 Subtitle OK On Off OK 3 1 Channel Subtitle Digital subtitle language 1st OK 2 OK TV 1 TV Channel Channel scan OK 2 Country Region OK 1234 System Lock OK 3 Automatic search OK 4 Tuner...

Page 32: ...C T Link 1 System T Link OK 2 T Link OK 3 On Off OK 4 CEC DVD On 3 Digital subtitle language 2nd OK 4 OK 5 1 Channel Subtitle Subtitle type OK 2 OK Hearing impaired 3 1 Channel Teletext Decoding page...

Page 33: ...ies Add accessory OK Bluetooth 3 OK Bluetooth 2 4 Wi Fi Bluetooth Bluetooth Bluetooth SIG TCL Netflix Netflix Netflix www netflix com http www netflix com Netflix Netflix 1234 0423 CEC On CEC EPG EPG...

Page 34: ...15 5 6 7 8 9 USB 10 USB 11 nScreen 12 Google 1 Ethernet 2 USB a A b c d 3 4 USB 5 1 2...

Page 35: ...16 1 2 3 4 1 2 3 4 1 2 3 1 2 1 2 1 2 3 4 1 1 2 1 3 1 4 1 5 2 6 1 7 1 8 MINI JACK 1...

Page 36: ...17 TCL SmartTV SmartTV SmartTV TCL TCL TCL TCL TCL TCL TCL TCL...

Page 37: ...18...

Page 38: ...0 240 50 100 240 50 CR 10 Aspect ratio N Weight Sound Power Viewing angles Resolution Brightness Screen size Model Format of signal 19 L32S60A 32 cd m2 220 1366x768 178 178 5 2 3 81 16 9 DVB C T T2 S...

Page 39: ...5 15150 69 50 40 75 100 1 15150 69 5 40 TCL http tcl com ru...

Page 40: ......

Page 41: ...Dolby Laboratories Dolby Dolby Audio D Dolby Laboratories HDMI HDMI High Definition Multimedia Interface HDMI HDMI Licensing Administrator Inc 72 RT41KS XRUBV...

Reviews: