background image

4

Chapter 1 

Connections and Setup 

Before Initial Setup

Protect Against Power Surges

•  Connect all components before you plug any power cords into the wall outlet or power strip.

•  NEVER plug your TV into an outlet that is controlled by a wall switch.

•  Turn off the TV before you connect or disconnect any cables.

•  Make sure all antennas and cables are properly grounded. Refer to the Important Safety Instructions.

Safety Information

•  Protect components from overheating.

•  Don’t block ventilation holes on any of the components. Arrange the components so that air can circulate 

freely.

•  Don’t stack components.

•  If you place the component in a stand, make sure you allow adequate ventilation.

•  If you connect an audio receiver or amplifier, place it on the top shelf so the heated air from it won’t harm 

other components.

Avoid Audio Interference

•  Position cables properly; insert each cable firmly into the designated jack.

•  If you place components above the TV, route all cables down one side of the back of the TV instead of 

straight down the middle.

•  If your antenna uses 300-ohm twin lead cables, do not coil the cables. 

•  Keep twin lead cables away from audio/video cables.

Avoid Direct Light

Don’t place the TV where sunlight or room lighting is directed toward the screen. Use soft or indirect lighting.

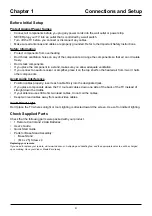
Check Supplied Parts

Check that the following parts were packed with your product.
•  1 Remote Control and 2 AAA Batteries

•  User’s Guide

•  Quick Start Guide

•  Parts for Base Stand Assembly:

•  Base Stand

•  (M4 x 25) Screw x 4

Replacing your remote

If you need to replace your remote, visit www.tclusa.com. A shipping and handling fee, and the appropriate sales tax, will be charged 

upon ordering. Have your Visa or MasterCard ready.

Summary of Contents for LE32HDF3010S

Page 1: ...all 1 877 300 8837 for mainland 48 States or 1 877 800 1269 for AK HI and Puerto Rico For use with models LE32HDF3010 LE32HDF3010S LE32HDF3010TA LE32HDF3010STA Figures and illustrations in this User s...

Page 2: ...the disconnect device shall remain readily operable Therefore you should ensure that the TV is installed in a manner that allows you to disconnect the power cord when desired Product Registration Plea...

Page 3: ...e personnel Service is required when the component is damaged in any way such as power supply cord or plug damage liquid spilled on or objects falling onto the component rain or moisture exposure abno...

Page 4: ...ing Menu System 12 Input Menu 12 Picture Menu 12 Picture Mode 12 Brightness 12 Contrast 12 Saturation 12 Sharpness 12 Tint 12 Color Mode 12 Back Light 12 Dynamic Backlight 12 Geometry 12 Advanced Sett...

Page 5: ...f so the heated air from it won t harm other components Avoid Audio Interference Position cables properly insert each cable firmly into the designated jack If you place components above the TV route a...

Page 6: ...ollow the steps below Note Keep the screws and plastic parts away from grease and organic solvents to avoid damage Especially during the assembly process Mounting Your TV to the Wall If you are mounti...

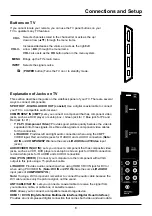
Page 7: ...nt with a VGA output to this jack using a 15 pin D sub cable L R AUDIO Provides audio connection when using HDMI 1 DVI IN jack for DVI or when using PC VIDEO IN Note DVI IN and PC IN share the same L...

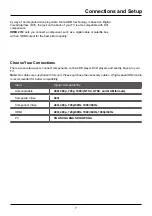
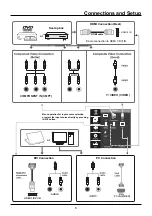
Page 8: ...ture quality Choose Your Connections There are several ways to connect components such as BD player DVD players and set top boxes to your TV Note No cables are supplied with this unit Please purchase...

Page 9: ...OMPONENT IN CMPT HDMI DVI IN 1 PC IN VIDEO Menu operation for input source selection or select the input source directly by pressing INPUT button Input Input Same connection to HDMI 1 DVI IN HDMI Conn...

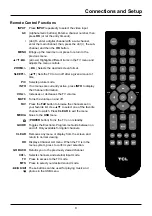
Page 10: ...isplay the Channel information VOL Increases or decreases the TV volume MUTE Turns the volume on and off FAV Press the FAV button to browse the channels set in your favorite list Use to select one of...

Page 11: ...our location and the program will list local analog and digital stations available using your antenna Switching On Follow the instructions on this page on how to switch on your TV set and use the remo...

Page 12: ...inue to the next screen Note if you select Retail Mode a screen menu will display to ask you go back to the previous menu to select Home Mode by pressing to select Go Back and press OK to confirm or y...

Page 13: ...turation Sharpness Tint Color Mode Back Light Dynamic Backlight Geometry Advanced Vibrant 48 49 12 12 8 Cool 64 Off Input Picture Sound Settings Exit Return MENU CLEAR Exit Sound Equalizer Speaker SPD...

Page 14: ...ting the picture are used to obtain the best picture settings according to your preference the type of program you are watching and the ambient lighting To access the Picture menu press MENU to displa...

Page 15: ...When you select the Off option the sound speaker on the TV will be turned off SPDIF Type This option controls the type of audio stream sent to the Digital Audio Output jack SPDIF OUT Available options...

Page 16: ...back into the Channel List by highlighting it and un checking it 3 Repeat the process to hide additional channels 4 Press MENU to return to the previous menu or press CLEAR to close the menu DTV Signa...

Page 17: ...Change V Chip Password The first time you enter the Parental Control menu you must enter the default secret code 0000 to adjust other parental control settings Then set your individual password 1 Sel...

Page 18: ...grams emergency bulletins public announcements and programs without ratings The Exempt option applies to both US and Canadian unrated programs and Canadian programs rated E 1 Select Parental Control U...

Page 19: ...B drive plug it into the drive directly If you have a device with a USB port connect one end of the USB cable to the USB port and the other end to the USB jack on the side of the TV The USB feature on...

Page 20: ...es sent in 4 3 which does not fill your screen It depends on how the station or device connected to your TV is formatting the video If there are bars on the screen press the ZOOM button to try a diffe...

Page 21: ...back of your TV three video cables or bundled component video cables red blue and green connect to the corresponding COMPONENT INPUT jacks on the back of your TV Check the antenna connections Make su...

Page 22: ...sistance If you have black bars on each side of your picture the component you connected might have a switch or a menu option allowing you to change the picture quality output that will fix this Choos...

Page 23: ...may use a cloth dampened with warm water While cleaning do not spray liquid directly on the screen or allow liquid to run down the screen and inside the TV Also never place drinks or vases with water...

Page 24: ...ice location will be at the sole discretion of TTE based upon the TTE Limited Warranty Statement At the sole discretion of TTE television screen sizes 32 and smaller will either be repaired at an Auth...

Page 25: ...ODUCT OR ARISING OUT OF ANY BREACH OF ANY EXPRESS OR IMPLIED WARRANTY ON THIS PRODUCT THIS DISCLAIMER OF WARRANTIES AND LIMITED WARRANTY ARE GOVERNED BY THE LAWS OF THE STATE OF CALIFORNIA EXCEPT TO T...

Page 26: ...ress or implied including but not limited to warranties of merchantability of satisfactory quality fitness for a particular purpose of accuracy of quiet enjoyment and non infringement of third party r...

Page 27: ...try to correct the interference by one or more of the following measures Reorient or relocate the receiving antenna Increase the separation between the equipment and receiver Connect the equipment int...

Page 28: ...al 1 877 800 1269 para AK HI y Puerto Rico Para usar con los modelos LE32HDF3010 LE32HDF3010S LE32HDF3010TA LE32HDF3010STA Las figuras e ilustraciones de este Gu a del Usuario se proporcionan solo co...

Page 29: ...54 del C digo El ctrico de Canad Parte 1 que establece los lineamientos para una conexi n correcta a tierra y estipula especialmente que el cable a tierra deber estar conectado al sistema de puesta a...

Page 30: ...1 Advertencia Para evitar cualquier lesi n causada por la inclinaci n del producto por favor aseg rese de que todo el producto se encuentra dentro de la superficie de la mesa en posici n horizontal 12...

Page 31: ...del men 12 Utilizaci n del sistema de men 13 Men de Entrada 13 Men de Imagen 13 Modo Imagen 13 Brillo 13 Contraste 13 Saturaci n 13 Nitidez 13 Matiz 13 Modo color 13 Luz de Fondo 13 Luz de Fondo Din...

Page 32: ...os componentes Evite interferencias de sonido Sit e los cables correctamente inserte cada cable firmemente en el conector correspondiente Si va a colocar componentes encima del televisor dirija todos...

Page 33: ...Evite que los tornillos y las partes de pl stico entren en contacto con grasa y disolventes org nicos para evitar da os Especialmente durante el proceso de ensamblaje Conexiones y configuraci n Monta...

Page 34: ...ponentes Proporciona una buena calidad de imagen ya que el video est separado en tres se ales Use cables de video de tres se ales o para video por componentes para la conexi n L R AUDIO Proporciona co...

Page 35: ...es tambi n compatible con los componente con DVI HDMI 2 IN Le permite conectar un componente como un descodificador de TV por cable o sat lite con salida HDMI para la mejor calidad de imagen Seleccion...

Page 36: ...exi n de V deo por componentes Mejor Entrada Y VIDEO VIDEO Conexi n de V deo Compuesto Buena Fuente Imagen Sonido Ajuste Salir Volver Salir Seleccione la fuente de entrada a trav s del men o directame...

Page 37: ...modo de imagen INFO Si no hay men s activos pulse el bot n INFO para mostrar la Barra de informaci n del canal VOL Sube o baja el volumen del TV MUTE Activa o desactiva el volumen FAV Pulse el bot n...

Page 38: ...antena Encendido Siga las instrucciones de esta p gina sobre c mo encender su TV y usar el mando de control remoto antes de proseguir con las p ginas siguientes que describen el procedimiento de b squ...

Page 39: ...ra entrar en la pantalla siguiente 2 Una pantalla de men le solicitar que establezca el modo de encendido Seleccionando Modo Casa para la localizaci n del TV le asigna los ajustes de imagen ptimos par...

Page 40: ...o Luz de Fondo Din mica Geometr a Avanzard Energy Star 50 50 50 50 50 Normal 64 Desactivado Fuente Imagen Sonido Ajuste Salir Volver MENU CLEAR Salir Sonido Ecualizador Parlante Tipo SPDIF Smart Volum...

Page 41: ...OK para confirmar Men de Imagen Los men s para ajustar la imagen se usan para obtener los mejores ajustes de imagen seg n sus preferentcias el tipo de programa que est viendo y la iluminaci n de su en...

Page 42: ...opci n de Desactivado el altavoz de sonido del TV se desactivar Tipo de SPDIF Esta opci n controla el tipo de flujo de audio enviado al conector de Salida de audio digital SALIDA DE SPDIF Las opcione...

Page 43: ...a de canales resalt ndolo y quit ndole la marca 3 Repita el proceso para ocultar canales adicionales 4 Pulse MENU para regresar al men previo o pulse CLEAR para cerrar el men Calidad de la se al Muest...

Page 44: ...ra configurar otro c digo para el control para padres A continuaci n establezca su contrase a individual 1 Seleccione Control Para Padres Cambie contrase a pulse OK para entrar 2 Use los botones num r...

Page 45: ...ir si se pueden ver aquellos programas que el V Chip reconoce como sin clasificar o exentos Los programas sin clasificar pueden incluir noticias deportes espacios pol ticos religiosos noticias locales...

Page 46: ...exi n le permite introducir un dispositivo flash USB directamente o conectar un dispositivo de almacenamiento masivo compatible con USB como una c mara digital un lector de tarjetas multi formato o un...

Page 47: ...ero algunas veces se env a en formato 4 3 el cual no llena su pantalla Depende de c mo la emisora o el dispositivo conectado al televisor formatee el video Si aparecen barras en la pantalla oprima el...

Page 48: ...de su VCR El sonido se escucha bien pero la calidad de la imagen es pobre Si obtiene una imagen en blanco y negro de un componente conectado al televisor quiz acopl los cables de video en los conecto...

Page 49: ...nectados Si a n confronta problemas apague el componente y vuelva a conectarlo Reinicie la alimentaci n el ctrica desenchufando el cable de alimentaci n y enchuf ndolo otra vez Si est sintonizado a HD...

Page 50: ...tualizar la preguntas m s comunes FAQ s o contacte con el Servicio de Asistencia al Cliente de TCL en el n mero indicado en la Garant a en el apartado C mo obtener servicio Cuidado y Limpieza Precauci...

Page 51: ...ormaci n de modelo n mero de serie puede encontrarse en la parte trasera de su unidad Un representante localizar su problema por tel fono Si se determina que su unidad requiere de servicio TTE decidir...

Page 52: ...RSO EXCLUSIVO DEL CONSUMIDOR TTE TECHNOLOGY INC NO SER RESPONSABLE POR DA OS ESPECIALES FORTUITOS O RESULTANTES DEBIDO AL USO DE ESTE PRODUCTO NI LOS QUE SURGAN DE CUALQUIER VIOLACI N DE CUALQUIER GAR...

Page 53: ...tivo y a cualquier contenido y servicio ya sea expresa o impl cita incluyendo pero sin limitarse a estas garant as de comerciabilidad de calidad satisfactoria adecuaci n para un prop sito particular d...

Page 54: ...los siguientes procedimientos Vuelva a orientar o cambie de lugar la antena receptora Aumente la separaci n entre el equipo y el receptor Conecte este equipo a un tomacorriente en un circuito diferent...

Reviews: