background image

16

Menu Operation 

plays the program’s audio in a second language, 

if available. SAP audio is broadcast in mono only. 

SAP is also used to broadcast a program’s audio 

with descriptions of the video for the visually 

impaired.

Audio Language

Choose from the list of languages available for the 

program you’re watching. The language chosen 

becomes your preferred language for all digital 

channels until you turn the TV off. If the language 

chosen is not being broadcasted with a program, 

the TV plays the default language for the program 

(usually “English” in the US).

Note: 

The “Audio Language” option is only available 

for digital channels.

Setting Menu

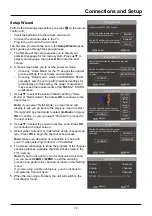
The “Setup” menu allows you to configure the TV 

with your preferences. Press 

MENU

 to diaplay the 

menu screen. Press ▲/▼ to select “Setting”; then 

press 

OK/►

 to display the following options:

Language

Select the OSD menu language from English, 

Spanish, or French.

Channel

Signal Source: 

Choose the signal source (“Cable/

Sat” or “Antenna”) you have connected to the 

ANT/CABLE/SAT IN

.

Scan: 

When you perform a Channel Scan, your 

TV searches for channels with signals and stores 

the channel information in the Channel List. Then, 

as you watch TV and press CH+ or CH-, your 

TV goes to the next or previous channel in the 

Channel List and skips the channels that do not 

have signals. If the TV signal source changes – for 

example, if you change from an outdoor antenna 

to cable TV – you will need to rescan for channels.
To automatically scan for channels:
1.  After choosing a signal source, select 

Setting > 

Channel > Scan

.

2.  Press 

OK/►

 to start the scan. You can see 

the search progress and how many channels 

are found in the on-screen menu. 

(

Note: 

If 

you wish to stop the search, press the 

CLEAR


button.)

3.  After the scan is complete, press 

MENU

 to 

return to the previous menu, or press 

CLEAR


to close the menu.

Favorite: 

1.  Select “Setting > Channel > Favorite”, press 

OK/►

 to enter, a list of available channels 

displayed. 

2.  Press ▲/▼ to select the desired chanel, then 

press 

OK

 to set it as the favorite, and a heart 

icon appears to the right side of the channel 

indicating this channel already stored in the 

favorite channel list. 

3.  Set other favorite channels the same way.
4.  You can easily select the favorite channel to 

watch using 

FAV

 and ▲/▼ buttons. 

Show/Hide: 

You can hide channels in the Channel 

List. Then, when you press the 

CH+

 or 

CH-

 button, 

the TV will skip the hidden channels. You can still 

tune to these hidden channels by pressing the 

number of the channel on the numeric keypad.
To hide specific channels:
1.  Select “Show/Hide”, press 

OK/►

 to open the 

submenu.

2.  Press ▲/▼ to highlight the channel you wish 

to hide; then press 

OK

 to check the highlighted 

channel. You can add the channel back into the 

Channel List by highlighting it and un-checking 

it.

3.  Repeat the process to hide additional channels.
4.  Press 

MENU

 to return to the previous menu, or 

press 

CLEAR

 to close the menu.

DTV Signal: 

Show the condition of DTV signal: 

Good or Bad, Normal. Bad for no DTV siganl or 

very weak DTV signal.

Closed Caption

Many programs are encoded with closed captioning 

information, which allows you to display the audio 

portion of a program as text on the TV screen.

Note: 

Closed caption settings are not available for 

HDMI, CMPT or PC inputs. These settings must be 

set in the connected component’s menu. Closed 

captioning is not available on all channels at all 

times. Only specific programs are encoded with 

closed captioning information. 

The Closed Caption options are: 

CC Mode: 

This option allows you to choose the 

way closed captioning information appears on the 

screen.

CC Off - 

No captioning information displayed.

CC On - 

Chooses this option if you want 

captioning information to be shown whenever 

available.

CC On When Mute - 

This option allows the 

Summary of Contents for LE58FHDE3010

Page 1: ...877 300 8837 User s Guide For use with models LE50FHDE3010 LE58FHDE3010 Figures and illustrations in this User s Guide are provided for reference only and may differ from actual product appearance Pr...

Page 2: ...the disconnect device shall remain readily operable Therefore you should ensure that the TV is installed in a manner that allows you to disconnect the power cord when desired Product Registration Plea...

Page 3: ...e personnel Service is required when the component is damaged in any way such as power supply cord or plug damage liquid spilled on or objects falling onto the component rain or moisture exposure abno...

Page 4: ...13 Using Menu System 14 Input Menu 14 Picture Menu 14 Picture Mode 14 Brightness 14 Contrast 14 Saturation 14 Sharpness 14 Tint 14 Color Mode 14 Backlight 14 Dynamic Backlight 14 Dynamic Light Sensor...

Page 5: ...it on the top shelf so the heated air from it won t harm other components Avoid Audio Interference Position cables properly insert each cable firmly into the designated jack If you place components a...

Page 6: ...reen Then follow the steps below Note A is applied to models of 50 B is applied to models of 58 Mounting Your TV to the Wall If you are mounting your TV to the wall don t attach the table stand To mou...

Page 7: ...ls Use three video grade or component video cables for the connection L R AUDIO Provides left and right audio connection when using the CMPT VIDEO input Red and white jacks for R AUDIO and L AUDIO con...

Page 8: ...nds for Mobile High definition Link and allows you to link a MHL capable mobile device to the television HDMI 3 IN Lets you connect a component such as a digital cable box with an HDMI output for the...

Page 9: ...HDMI 3 IN COMPONENT IN CMPT AUDIO VIDEO IN AV Menu operaton for input source selection or select the input soure directly by pressing INPUT button HDMI 1 DVI IN PC VIDEO IN Component Video Connection...

Page 10: ...automatically When connecting MHL compatible device to HDMI 2 MHL port on the TV switch TV source to HDMI 2 Note Do not connect the MHL compatible device to any ports other than HDMI 2 MHL port When...

Page 11: ...FO If no menus are currently active press INFO to display the Channel information VOL Increases or decreases the TV volume MUTE Turns the volume on and off FAV Press the FAV button to browse the chann...

Page 12: ...al stations available using your antenna Switching On Follow the instructions on this page on how to switch on your TV set and use the remote control before going on to following pages describing how...

Page 13: ...t the desired location setting Home Mode or Retail mode then press OK to continue to the next screen Note if you select Retail Mode a screen menu will display to ask you go back to the previous menu t...

Page 14: ...13 Chapter 2 Menu Operation Menu Display Following are just the illustration of the menu display Some menu items may not be displayed depending on the selected input source...

Page 15: ...ess MENU to display the menu screen Press to select Picture then press OK to display options Picture Mode Displays a list that lets you select one of the preset picture settings Energy Star Vibrant Ci...

Page 16: ...djust audio output To access the Sound Menu press MENU on the remote and then use to select Sound Press OK to enter The following options will be displayed Equalizer The five band equalizer allows you...

Page 17: ...he previous menu or press CLEAR to close the menu Favorite 1 Select Setting Channel Favorite press OK to enter a list of available channels displayed 2 Press to select the desired chanel then press OK...

Page 18: ...such as adult language L Movies can only be blocked by age based ratings Once you block programs you can unblock them by entering a password By default the software inside your TV is turned off or un...

Page 19: ...8 and older G General audience PG Parental guidance 14 Viewer 14 and over 18 Adult Canadian French Ratings G General audience 8 ans Viewer 8 and older 13 ans Viewer 13 and older 16 ans Viewer 16 and...

Page 20: ...l settings USB Menu You can connect a device with USB to your TV or use a USB flash drive only suppport FAT format and unpartitioned USB device This connection allows you to insert a USB flash drive d...

Page 21: ...Why are there bars on my screen and can I get rid of them Most digital video is sent in a 16 9 format which fills your screen but is sometimes sent in 4 3 which does not fill your screen It depends on...

Page 22: ...blue and green connect to the corresponding COMPONENT INPUT jacks on the back of your TV Check the antenna connections Make sure all of the cables are firmly connected to the jacks There is no sound...

Page 23: ...or further assistance If you have black bars on each side of your picture the component you connected might have a switch or a menu option allowing you to change the picture quality output that will f...

Page 24: ...warm water While cleaning do not spray liquid directly on the screen or allow liquid to run down the screen and inside the TV Also never place drinks or vases with water on top of the TV This could i...

Page 25: ...atement At the sole discretion of TTE television screen sizes 32 and smaller will either be repaired at an Authorized TCL Service Center or directly exchanged for a new or refurbished remanufactured u...

Page 26: ...ND LIMITED WARRANTY ARE GOVERNED BY THE LAWS OF THE STATE OF CALIFORNIA EXCEPT TO THE EXTENT PROHIBITED BY APPLICABLE LAW ANY IMPLIED WARRANTY OF MERCHANTABILITY OR FITNESS FOR A PARTICULAR PURPOSE ON...

Page 27: ...ations However there is no guarantee that interference will not occur in a particular installation If this equipment does cause harmful interference to radio or television reception which can be deter...

Reviews: