background image

Advanced


Functions

12

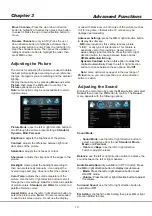
   Subtitle Primary Language 

and

 Subtitle Secondary  

   Language: 

press the left or right direction button to 

   select a subtitle type. You can select 

Hearing Impaired


   to display the hearing impaired subtitle with your    
   selected language. 

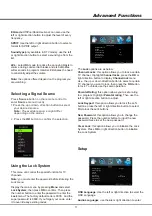
  Mode Setting

: use the left or right direction button to 

  select 

Home 

or 

Store 

mode. 

Home

 mode is the default. 

  In 

Store

 mode, you can adjust the picture mode. 

  Teletext

: press the 

OK

 or right direction button to  

  enter and select the 

Digital Teletext Language

.

  Decoding page language:

 Select a proper type of 

  language in which Teletext will display. 

The 

Setup 

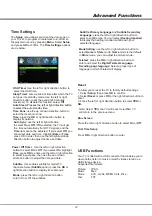
your TV set, to program an automatic turn-off timer.
Display main menu by pressing 

Menu

. Select 

Setup 

and press 

OK

 to confirm. The 

Time Settings

 options 

are as below:

menu allows you to set the time zone on 

Time Settings

   OSD Timer

: Use the left or right direction button to 

    select the OSD time.

   Sleep


Timer

: sets a period of time after which the TV 

   set goes into standby mode. Use the left or right 
   direction button to set the period (240 minutes 
   maximum). To disable this function, select 

Off

   Auto Sleep

   Time


Zone

: use the up or down direction button to 

   select the local time zone.

   Time

: press the 

OK 

or right direction button to 

   display its options:
    

Auto Sync

: use the left or right direction    

    to select 

On

 or 

Off

. If 

On

 selected, the TV will get 

    the  time automatically from DTV signals, and the 

    Time

 item cannot be adjusted. If you select 

Off

, you 

    should set date and time. Highlight 

Date

 or 

Time

    press OK to enter, then use the left/right/up/down
    direction button to adjust the time and date.


  Power


Off


Timer

:  Use the left or right direction 

button to select 

On 

or 

Off

. If you select 

On, 

highlight 

Time

, press 

OK

 to enter, use the left or right direction 

to select input space, then use the up or down

   direction button to adjust the time and date. 

   Subtitle

:  this enables subtitle for digital TV 

channels. Select 

Subtitle

 option, press the 

OK

 or 

right direction button to display its submenus:

   Mode: 

press the left or right direction button

   to turn On or Off the subtitles. 

Presses the left or right direction button

   to select the auto standby time.

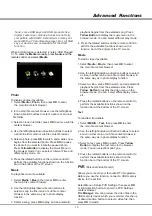
Reset 

To Allow you to reset the TV to factory default settings.
1. Select 

Setup

, then press 

OK

 to confirm.

2. Select 

Reset

 or press 

OK

 or the right direction button to 

enter.
3. Press the left or right direction button to select 

YES

 or 

NO.


  Note: Select 

YES

, the TV will reset. Select 

No

, TV 

  will return to the previous menu.   


Blue Screen

Press the left or right direction button to select 

On

 or 

Off

.

First Time Setup

Press 

OK

 or right direction button to enter.

USB


Functions

Your TV is fitted with a USB connector that enables you to 
view photos, listen to music or watch videos stored on a 
USB storage device. 
Supported file formats:

Picture:       JPEG
Music:         Mp3
Movie:         AVC, H.264, MPEG 1/2/4, Divx

Text

:      

TXT

Summary of Contents for LED49D2900S

Page 1: ...00R 72 I512SI XAPAA 0D2900A 25 7 KD290N2P UR0E 0D2900AS FQ13276O SI512SP1 AP P E A5 P S PAPER 0 T CL TV PE RUSSIA 1 1...

Page 2: ...LED49D2900S LED55D2900S LED40D2900AS...

Page 3: ...eaning Hanging the TV Set on the Wall Sockets Remote Control Functions Important Information Buttons on the TV Switching on Switching off Using Menu System Auto Scan Automatic Update Satellite Manual...

Page 4: ...and the signal cable to moisture Do not place the set on an unstable cart stand or table Use Environment Place the set on a place that allows good ventilation Do not use the set near damp and cold ar...

Page 5: ...efinition Multimedia Interface socket rovides an uncompressed digital connection that carries both video and audio data by way of an integrated mini plug cable HDMI 2 Or HDMI 1 or HDMI 2 socket input...

Page 6: ...is socket can be used to connect a computer VGA YPbPr VIDEO component sockets input Y VIDEO Pb Cb Pr Cr AV COMPONENT IN These Y VIDEO sockets can be used to connect a device that has component video s...

Page 7: ...for a long period of time remove the batteries to avoid battery leakage 4 WARNING The batteries shall not be exposed to excessive heat such as sunshine fire or the like NOTES Enters the PVR Settings...

Page 8: ...back of the TV set The aerial socket 75 OHM VHF UHF cable can be used for connecting an external aerial or other equipment fitted 4 When powered on the TV will be turned on directly or be in standby m...

Page 9: ...t direction button to set functions or change values Use the OK button to activate a setting Use the OK or right direction button to open the corresponding submenu 4 Press Menu to return to the previo...

Page 10: ...ht direction button to select Satellite 2 Press the up or down direction button to highlight Satellite System press the OK or right direction button to enter First select a satellite then press the ri...

Page 11: ...o select the picture size Note You are recommended to use the full screen mode Do not use the display Adjusting the Picture mode with black bars on both sides of the picture such as 4 3 for long time...

Page 12: ...ton to lock To unlock use the same operation Parental Rating this option allows you to set a rating to a program Highlight Parental rating Then use the left or right direction button to adjust Lock Ke...

Page 13: ...On selected the TV will get the time automatically from DTV signals and the Time item cannot be adjusted If you select Off you should set date and time Highlight Date or Time press OK to enter then u...

Page 14: ...isplay the music menu in the browser mode You can select different play mode 4 Press the related buttons on the remote control to perform the available functions shown on the function bar at the botto...

Page 15: ...Only supports USB memory device of FAT32 and FAT16 format Before you plug the USB memory device to the set make sure you have backed up the data in the device to avoid unusual performance which will...

Page 16: ...inimize the interference Snowy dots and interference If the antenna is located in the fringe area of a television signal where the signal is weak the picture may be marred by dots When the signal is e...

Page 17: ...LED49D2900S LED55D2900S LED40D2900AS...

Page 18: ...3 3 3 3 3 3 3 3 4 5 6 7 7 8 8 8 8 9 9 9 9 10 10 11 11 11 12 12 PVR 13 2 4 15 15 15 16 9...

Page 19: ...TCL 3...

Page 20: ...4 1 ATV DTV 2 5 TCL http tcl com ru...

Page 21: ...5 SPDIF USB RF VGA Y Pb Pr CI SPDIF HDMI 1 HDMI 2 USB ANTENNA IN VGA Pr Cr Pb Cb Y VIDEO R L AUDIO IN AV COMPONENT IN CI AC IN DVB S2...

Page 22: ...6 DTV DTV 0 9 Info Return Source Menu VOL CH ECO ZOOM Guide Text List TV Time Shift DTV TV USB MUTE OK Option Exit Red button Green button Yellow button Blue button...

Page 23: ...7 2 1 AAA 2 3 RF 75 OHM VHF UHF RF 4 Power...

Page 24: ...First Time OK MEPS Home 1 2 OK 3 OK OK 4 1 2 Auto Scan OK 3 DTV ATV DTV ATV OK Menu Exit DTV 1 2 8...

Page 25: ...9 OK OK OK OK OK OK H H OK OK...

Page 26: ...10 3 OK 4 3 NR On Off OK DTV OK OK...

Page 27: ...11 Off SPDIF SPDIF DTV AVL SOURCE 1 2 OK 0000 8899 OK OK OSD...

Page 28: ...12 OK 240 OK DTV OK OK Store Home OK 1 OK 2 OK 3 USB OK USB USB JPEG Mp3 AVC H 264 MPEG 1 2 4 Divx USB USB 2 0 USB USB...

Page 29: ...13 USB USB 1 OK 2 3 OK 4 5 OK OK 6 1 OK 2 3 OK 4 1 Movie OK 2 3 OK 4 1 MEDIA OK 2 3 OK 4 PVR DTV USB PVR OK PVR USB OK USB OK OK...

Page 30: ...14 USB USB 1 ECO Time Shift 2 OK 3 STOP OK USB FAT32 FAT16 USB USB PVR USB USB 1 5 0M PVR PVR...

Page 31: ...4 15 1 2 3 4 1 2 3 1 2 1 2 1 Vol 2 MUTE 3 4 1 2 3 4 1 1 2 1 3 1 4 1 5 1 6 2 7 1 8 1...

Page 32: ...ghtness Screen size Model Format of signal DVB C T T2 S S2 72 I512SI XAPAA LED49D2900S 1920x1080 178 178 11 5 16 9 DVB C T T2 S S2 49 cd m2 280 8 2 The power supply 110 240 50 110 240 50 110 240 50 LE...

Reviews: