background image

EN

12

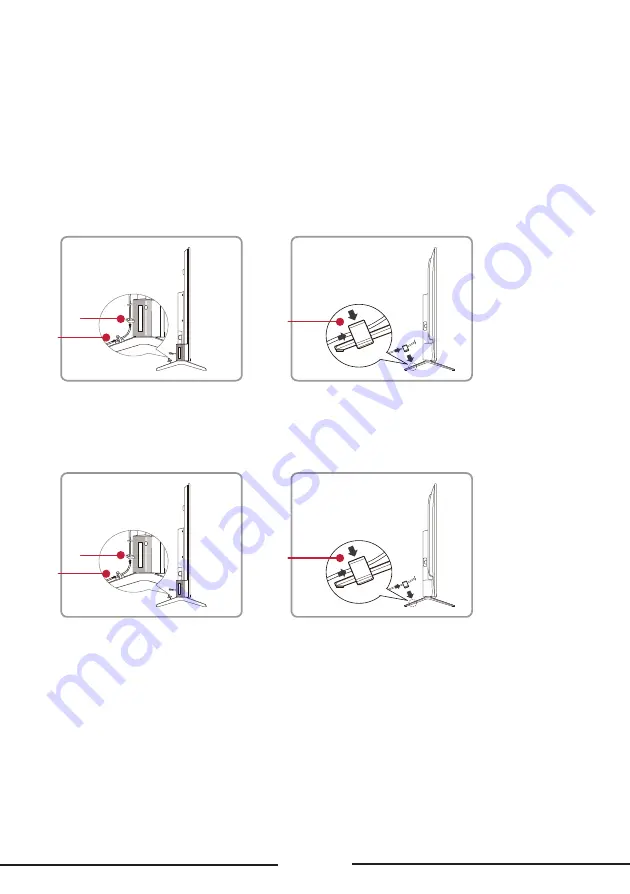
To use the cable clips

For S546 models:

A — On back of the TV, insert the two cable clips into the back of TV on the left and right.

B — Stick the two cable clips on the TV stands on the left and right.

C — Attach the two cable clips to the TV stands on the left and right.

Note: Make sure the installation direction of the cable clip is the same as illustrated.

50’’/55’’/65’’

75’’

A

B

C

For R646 models:

Use the cable clips on the TV stands on the left and right as illustrated below.

50’’/55’’/65’’

75’’

A

B

C

Summary of Contents for R646

Page 1: ...he TCL Logo are owned by TCL Corporation and under license to TCL North America Other brand and product names are the trademarks or registered trademarks of their respective owners To enjoy all smart features and services on your TCL Google TV a free Google account a free TCL account and a reliable broadband internet connection are required ...

Page 2: ...e box 9 To mount on a wall 10 To use the stand 11 To use the cable clips 12 Connect to the Internet 13 Network settings 13 Switch the TV on and off 14 Initial setup 14 Basic TV operations Accessing channels 15 Watching connected devices 15 Adjusting volume 15 Using the power button on your TV 15 Accessing basic TV homepage 16 Using TV settings menu 17 Adjusting your TV Channels Inputs 18 Display S...

Page 3: ...rd in Parental Control 23 Troubleshooting 23 Broadcasting Operating Environment 24 Battery Caution Disposal Information 24 Eletronics Packaging Recycling Information 24 Legal Statement 25 TCL North America Limited Warranty 26 ...

Page 4: ...lose to the point of cable entry as practical Important This television is a table model and is designed to sit on a firm flat surface Do not place the TV on soft carpeting or on a similar surface as this may cause the ventilation slots located on the bottom of the unit to be blocked and may result in reduced product lifespan from overheating To assure adequate ventilation for this product maintai...

Page 5: ...r near the apparatus 14 Unplug this apparatus during lightning storms or when unused for long periods of time 15 Only use attachments accessories specified by the manufacturer 16 Use only with the cart stand tripod bracket or table specified by the manufacturer or sold with the apparatus When a cart is used use caution when moving the cart apparatus combination to avoid any injury 17 Refer all ser...

Page 6: ...s information with respect to proper grounding of the mast and supporting structure grounding of the lead in wire to an antenna discharge unit size of grounding conductors location of antenna discharge unit connection to grounding electrodes and requirements for the grounding electrode See following example ANTENNA LEAD IN WIRE GROUND CLAMP ANTENNA DISCHARGE UNIT NEC SECTION 810 20 GROUND CLAMPS G...

Page 7: ... air can circulate freely on all sides Do not stack objects on the TV If you place the TV on a stand make sure you allow adequate ventilation If you connect an audio receiver or amplifier to the TV place it on the top shelf so the heated air will not overheat the TV Avoid audio interference Position cables properly insert each cable firmly into the designated jack Route all cables down one side of...

Page 8: ... generates uses and can radiate radio frequency energy and if not installed and used in accordance with the instructions may cause harmful interference to radio communications However there is no guarantee that interference will not occur in a particular installation If this equipment does cause harmful interference to radio or television reception which can be determined by turning the equipment ...

Page 9: ...om some TV s are stored in the foam for protection What s in the box For all models For S446 models For S546 models 2 x AAA batteries for remote Power cable TV remote TCL TV TCL TV 43 ST4X25mm 50 55 65 M4x30mm 70 75 M5X25mm 43 50 55 65 70 75 M4X30mm for models of 50 55 65 M5X25mm for models of 75 4 x Stand screws 4 x Stand screws 50 55 65 75 Cable clips 50 55 65 4 x Cable clips 75 2 x Cable clips ...

Page 10: ...mm screws 55 model VESA 300 x 200 4 M6 x 12mm screws 65 model VESA 300 x 300 4 M6 x 12mm screws 75 model VESA 400 x 300 4 M6 x 25mm screws For R646 models 55 model VESA 300 x 300 4 M6 x 20mm screws 65 model VESA 300 x 300 4 M6 x 20mm screws 75 model VESA 400 x 300 4 M6 x 20mm screws The VESA number is the horizontal and vertical measurement of the mounting holes For example 200 x 200 indicates tha...

Page 11: ... located on the TV Secure the stands to the TV with four 4 screws Note Make sure the installation direction of the stand is the same as illustrated For S446 models For S546 models Screws 50 55 65 M4x30mm 75 M5X25mm 50 55 65 75 A A B 55 65 75 A B For R646 models Screws 43 ST4x25mm 50 55 65 M4x30mm 70 75 M5X25mm A B B 70 75 installations 43 50 55 65 installations A 55 65 75 65 75 A B A A B ...

Page 12: ...he two cable clips on the TV stands on the left and right C Attach the two cable clips to the TV stands on the left and right Note Make sure the installation direction of the cable clip is the same as illustrated 50 55 65 75 A B C For R646 models Use the cable clips on the TV stands on the left and right as illustrated below 50 55 65 75 A B C ...

Page 13: ... questions about your home network please refer to your Internet service provider Wired connection Wireless connection Router ETHERNET port Wireless router Network settings 1 Press on the remote control to display the TV homepage 2 Press on the remote control and press OK to enter the Settings menu 3 Press Up Down button to select Network Internet press OK to enter the submenu and follow the on sc...

Page 14: ...ains powered on but with low energy consumption 3 To completely turn the TV off unplug the power cord from the wall outlet Initial setup The first time you switch the TV on the Welcome screen appears which guides you through the initial setup process Follow the on screen instructions to finish the initial setup process including selecting the language connecting to the network and more During each...

Page 15: ...ound Using the power button on your TV In addition to using the remote control to control your TV you can also use the button on your TV You can turn on the TV from standby mode by pressing the button on your TV While the TV is on the multi function menu appears by pressing and holding the button on your TV about 3 seconds For more information on how to use the multi function menu please refer to ...

Page 16: ...he content provider an application s updates or the application itself may be discontinued Depending on your country s regulations some applications may have limited service or not be supported Changes in application content may be made without prior notice by the service provider 1 Press on the remote control to display the TV homepage 2 Press Up Down Right Left button and OK to enter the desired...

Page 17: ... and adjust to exprience the different sound effects Network Internet Configure the Wi Fi and internet settings The network status is also displayed Accounts Sign In Sign in your Google account to make the most of your TV And there are two methods you can choose to sign in The first one means that you should visit androidtv com setup with your phone or computer and then login the Google Account We...

Page 18: ...o confirm Scan Automatically Press Up Down button to select Scan Automatically and press OK to enter Select the tuner mode and channel type you wanted then press Down button to select Search and press OK to start scanning channels Manually Scan Scan channels manually by entering parameters such as channel number or frequency Channel Organizer After the automatic search channels are arranged in a p...

Page 19: ...n to set the preferred brightness Color Saturation Adjust the color saturation level of the picture Press Right Left button to set the preferred color saturation Advanced Settings Adjust more picture options Brightness Settings Adjust Brightness settings such as Contrast Brightness and Black level Color Adjust Color settings such as Color saturation Temperature and Tint Clarity Adjust the Clarity ...

Page 20: ...nly listen to the sound from the TV The TV screen will turn off in about 10 seconds In audio only mode press any key to turn on the TV screen again Advanced settings Adjust more sound options Audio Only Mode Select to switch off the TV display and only listen to the sound from the TV The TV screen will turn off in about 10 seconds In audio only mode press any key to turn on the TV screen again Bal...

Page 21: ...t the date and time You can also set the time zone and choose to use 24 hour format Language Select a menu language The selected menu language will also be set as the voice recognition language Keyboard Configure the settings of the on screen keyboard You can set language and check the version and user agreements of the current keyboard You can also add new virtual keyboards or active virtual remo...

Page 22: ...ust set a four digit password before using the parental control feature Password will be required to watch a program subject to watching restriction Enter the default password 1234 to access the submenu Advanced Settings Set the LED indicator of Mic and in standby mode You can choose the environment in which your TV is used Restart Restart your TV ...

Page 23: ...operly received Poor picture quality can occur due to a VHS camera camcorder or other peripheral being connected at the same time Switch off one of the other peripherals The ghost or double image may be caused by obstruction to the antenna due to high rise buildings or hills Using a highly directional antenna may improve the picture quality The horizontal dotted lines shown on the pictures may be ...

Page 24: ...Standard Carbon Zinc or Rechargeable Nickel Cadmium or Nickel Metal Hydride batteries 7 Do not dispose of batteries in fire 8 Batteries should be recycled or disposed of as per state and local guidelines 9 Replacement of a BATTERY with an incorrect type that can defeat a SAFEGUARD for example in the case of some lithium BATTERY types ELECTRONICS PACKAGING RECYCLING INFORMATION For information on r...

Page 25: ...NY CONTENT AND SERVICES EITHER EXPRESS OR IMPLIED INCLUDING BUT NOT LIMITED TO WARRANTIES OF MERCHANTABILITY OF SATISFACTORY QUALITY FITNESS FOR A PARTICULAR PURPOSE OF ACCURACY OF QUIET ENJOYMENT AND NON INFRINGEMENT OF THIRD PARTY RIGHTS TCL DOES NOT GUARANTEE THE ACCURACY VALIDITY TIMELINESS LEGALITY OR COMPLETENESS OF ANY CONTENT OR SERVICE MADE AVAILABLE THROUGH THIS DEVICE AND DOES NOT WARRA...

Page 26: ...rchase for parts and labor for non commercial use Defects in materials or workmanship to the original owner of this TCL product when purchased as new from an Authorized Dealer of TCL brand products in the United States and packaged with this warranty statement How to get service What we will do At TCL North America s discretion 1 pay an Authorized TCL Service Center for both labor charges and part...

Page 27: ...LITY OR FITNESS FOR A PARTICULAR PURPOSE ON THIS PRODUCT IS LIMITED TO THE APPLICABLE WARRANTY AND WARRANTY PERIOD SET FORTH ABOVE THIS WARRANTY IS SUBJECT TO CHANGE WITHOUT NOTICE PLEASE VISIT WWW TCL COM TO VIEW THE MOST CURRENT VERSION LIMITATION OF WARRANTY How State Law relates to this warranty Some states do not allow the exclusion or limitation of incidental or consequential damages or limi...

Reviews: