background image

33

5  Specifications

Sound Bar main unit

• 

Power adapter: AC100-240V, 50/60Hz 

• 

Power consumption: 25W

• 

Power consumption at standby mode: < 0.5W

• 

Impedance: 8 Ω 

• 

Frequency response: 150 Hz-20 kHz 

• 

Dimensions (W x H x D): 800 x 66 x 84 mm 

• 

Weight: 1.5 kg 

• 

Operating temperature: 0°C - 45°C

Bluetooth

• 

Bluetooth version: 4.2,  Bluetooth profile - Bluetooth 

stereo supported (Advanced Audio Distribution Profile - 

A2DP; Audio Video Remote Control Profile - AVRCP)

• 

Frequency range:  2402 Mhz – 2480 Mhz

• 

Max transmitting power: 5dBm

Remote control 

• 

Distance/Angle: 6m/ 30° 

• 

Battery type: Lithium CR2025 battery (160 mAh) x 1, 

user replaceable. 

Note

 •

Specifications are subject to change without notice.

Summary of Contents for TS5000

Page 1: ...User manual TS5000 2 0 Channel Home Theater Sound Bar...

Page 2: ...our sales receipt to obtain warranty parts and service and for proof of purchase Attach it here and record the serial and model numbers in case you need them These numbers are located on the product M...

Page 3: ...Sound Bar system 21 Connect with the optical cable 21 Connect with the 3 5mm to 3 5mm audio cable 23 Connect your Sound Bar to power supply 24 Connect the Sound Bar with your Bluetooth device 25 Conne...

Page 4: ...2 6 Notice 34 Declaration of conformity 34 Disposal of your old product and battery 34 Trademarks 36 7 FAQ 37...

Page 5: ...TO REDUCE THE RISK OF ELECTRIC SHOCK DO NOT REMOVE COVER OR BACK NO USER SERVICEABLE PARTS INSIDE REFER SERVICING TO QUALIFIED SERVICE PERSONNEL The lightning flash with arrowhead symbol within an equ...

Page 6: ...main voltage and user accessible parts When servicing use only identical replacement parts Warnings To reduce the risk of fire or electric shock do not expose this product to rain or moisture This pro...

Page 7: ...cloth Do not block any ventilation openings Install in accordance with the manufacturer s instructions Do not install near any heat sources such as radiators heat registers stoves or other apparatus...

Page 8: ...tion to avoid injury from tip over Unplug this apparatus during lightning storms or when unused for long periods of time Refer all servicing to qualified service personnel Servicing is required when t...

Page 9: ...y result in hazardous radiation exposure or other unsafe operation The power cord appliance coupler is used as the disconnect device the disconnect device must remain readily operable Battery caution...

Page 10: ...etallic objects Doing so could cause batteries to short circuit leak or explode Do not carry or store batteries with other metallic objects Doing so could cause batteries to short circuit leak or expl...

Page 11: ...his product maintain a spacing of 7 8 inches 20cm or more around the product Make sure the product on the furniture is of adequate size and strength to prevent it from being accidentally tipped over p...

Page 12: ...ate of the art design to best fit your home entertainment system You are recommended to read through this user manual which helps you set up connect and operate the product easily and properly For mor...

Page 13: ...11 Wall anchor x 4 Silicone pad x 2 Wall mount bracket x 2 Wall bracket screw M4 Wall mounting screw M3 x 2 Wall mount template QSG Quick start guide Warranty Warranty card...

Page 14: ...ain unit 8 9 10 11 12 6 5 7 1 2 3 4 OPTICAL USB AUX IR 1 Press to turn the Sound Bar main unit on or to standby mode 2 Press to switch the audio source among AUX Bluetooth Optical USB modes 3 Press to...

Page 15: ...control 6 LED indicators Red in standby mode Green in AUX mode Blue in Bluetooth mode Orange in Optical mode White in USB mode 7 Wall bracket screws 8 Optical input connector 9 USB Type A connector on...

Page 16: ...trol 1 Press to turn the Sound Bar on or to standby mode 2 Press to mute or unmute the sound 3 Source buttons AUX OPTICAL USB Press to switch the audio source among different modes 4 Press to increase...

Page 17: ...tening to music Set up your Sound Bar system Notes Make sure you read all the safety information before you mount the Sound Bar main unit on the wall see Important safety instructions on page 5 Make s...

Page 18: ...l Make sure the wall mount template is at least 2 inches 5cm below the center of the TV 2 Use a level to make sure the Sound Bar is positioned accurately 3 Use the tape to stick the wall mount templat...

Page 19: ...crew holes on the wall 8 Insert the supplied wall bracket screws into the wall anchors 9 Fix and tighten the wall bracket screws on the wall Stick the silicone pads on the wall mount brackets when nec...

Page 20: ...18 10Replace the screws at the back of the Sound Bar main unit with the supplied wall mounting screws 735 mm 11Hang the Sound Bar main unit on the wall mount brackets...

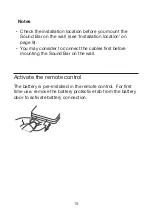
Page 21: ...tion location on page 9 You may consider to connect the cables first before mounting the Sound Bar on the wall Activate the remote control The battery is pre installed in the remote control For first...

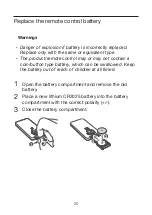
Page 22: ...e The product remote control may or may not contain a coin button type battery which can be swallowed Keep the battery out of reach of children at all times 1 Open the battery compartment and remove t...

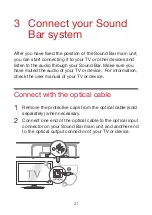
Page 23: ...r Make sure you have muted the audio of your TV or device For information check the user manual of your TV or device Connect with the optical cable 1 Remove the protective caps from the optical cable...

Page 24: ...ices For more information of how to activate the PCM signal output check the user manual of your TV or device Direction for setting up your Sound Bar using an optical cable Do not bend or kink the opt...

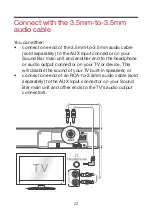
Page 25: ...onnector on your Sound Bar main unit and another end to the headphone or audio output connector on your TV or device This will disable the sound of your TV built in speakers or connect one end of an R...

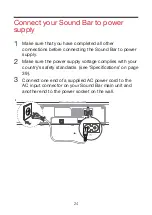
Page 26: ...re connecting the Sound Bar to power supply 2 Make sure the power supply voltage complies with your country s safety standards see Specifications on page 39 3 Connect one end of a supplied AC power co...

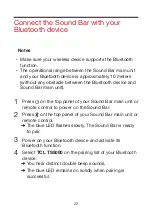
Page 27: ...nd Sound Bar main unit 1 Press on the top panel of your Sound Bar main unit or remote control to power on the Sound Bar 2 Press on the top panel of your Sound Bar main unit or remote control The blue...

Page 28: ...Sound Bar main unit is entering the pairing mode 3 4 2 1 TCL TS5000 Your Sound Bar system is now set up and ready to use 5 To disconnect the Bluetooth function you can press on the Sound Bar main uni...

Page 29: ...ar and TV with the supplied IR pass through cable so that it can receive signal from the remote control of your TV Connect one end of the supplied IR pass through cable to the IR pass through cable co...

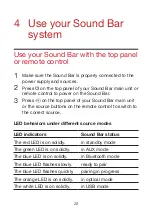
Page 30: ...nel of your Sound Bar main unit or the source buttons on the remote control to switch to the correct source LED behaviors under different source modes LED indicators Sound Bar status The red LED is on...

Page 31: ...resumed Tip You can use more advanced functions on the remote control see Overview of the remote control on page 14 Sound settings You can enjoy your movies or music with your ideal sound Press to ad...

Page 32: ...r Bluetooth device through the Sound Bar If your Bluetooth device supports A2DP you can listen to music but you cannot control the playback If your Bluetooth device supports AVRCP you can listen to mu...

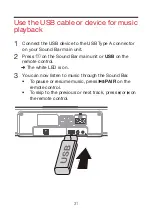
Page 33: ...ector on your Sound Bar main unit 2 Press on the Sound Bar main unit or USB on the remote control The white LED is on 3 You can now listen to music through the Sound Bar To pause or resume music press...

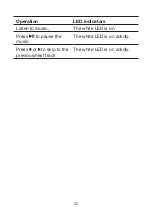
Page 34: ...32 Operation LED indicators Listen to music The white LED is on Press to pause the music The white LED is on solidly Press or to skip to the previous next track The white LED is on solidly...

Page 35: ...ght 1 5 kg Operating temperature 0 C 45 C Bluetooth Bluetooth version 4 2 Bluetooth profile Bluetooth stereo supported Advanced Audio Distribution Profile A2DP Audio Video Remote Control Profile AVRCP...

Page 36: ...other relevant provisions of Directive 2014 53 EU You can find the Declaration of Conformity on www tcl com Disposal of your old product and battery Your product is designed and manufactured with hig...

Page 37: ...Follow local rules and never dispose of the product and batteries with normal household waste Correct disposal of old products and batteries helps prevent negative consequences for the environment an...

Page 38: ...se of such marks by TCL Corporation under license Other trademarks and trade names are those of their respective owners Dolby Audio Manufactured under license from Dolby Laboratories Dolby Dolby Audio...

Page 39: ...ure the Sound Bar is not muted The remote control does not work Make sure you have selected the correct source Make sure the distance of remote control and the Sound Bar main unit is within operationa...

Page 40: ...th name of this Sound Bar on my Bluetooth device Make sure the Bluetooth function is activated on your Bluetooth device Make sure the Sound Bar has paired with your Bluetooth device For further suppor...

Page 41: ...EADY TO HELP contact us first with any questions 2019 TCL Entertainment Solutions Limited All rights reserved This product has been manufactured by and is sold under the responsibility of TCL Entertai...

Reviews: