background image

7 Piece Dining Set - Table Assembly


              Item #21944

7 Piece Dining Set - Table Assembly

Item #21944 


       3 

Customer 

Service 


1-800-599-8898

Customer 

Service 


1-800-599-8898

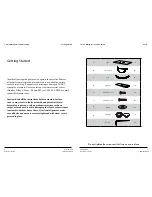
Identify all parts packaged in carton against the parts list. Remove 
all protective materials and place parts on a non-abrasive surface 
to avoid scratching. If any parts are missing or damaged, DO NOT 
attempt to assemble. Please contact our customer service center 
(Monday-Friday 9:00am – 5:00pm EST) at 1-800-599 -8898 or email: 
support@tdcusainc.com.

Caution: Read all the instructions before assembly. Failure 
to do so may result in faulty assembly and potential injury! 
Assemble product on a soft, non-abrasive surface such as a 
carpet or cardboard to avoid damaging the item. Seek assistance 
to assemble bulky or heavy items. After final alignment, make 
sure all bolts and nuts are securely tightened with screw covers 
pressed in place.

Getting started

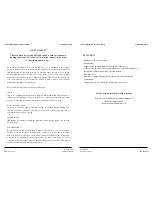
Getting Started

A

Table

1pc

B

Crescent Leg

4pcs

C

Arch

2pcs

D

Leg Brace

1pc

E

1/4”x16mm Screw

14pc

F

1/4”x25mm Screw

8pcs

G

Washer

22pcs

H

Table Ring

1pc

I

Hex Key

1pc

Parts

Do not tighten the screws until all screws are in place.

Summary of Contents for 21944

Page 1: ...7 Piece Patio Dining Set Steel Frame with Powder Coating Instructions Parts 3 Assembly 4 7 Warranty 8 9 Customer Service 1 800 599 8898 Table Assembly ...

Page 2: ...9 8898 or email support tdcusainc com Caution Read all the instructions before assembly Failure to do so may result in faulty assembly and potential injury Assemble product on a soft non abrasive surface such as a carpet or cardboard to avoid damaging the item Seek assistance to assemble bulky or heavy items After final alignment make sure all bolts and nuts are securely tightened with screw cover...

Page 3: ... D see fig 4 Follow this step to connect the additional Arch C with Leg Brace D Tighten all screws that have been left loose throughout the building process Step 1 Set the Table A upside down so that the screw holes on the table rim are right side up Insert two Screws 1 4 x16mm E with Washers G through screw holes at the end of the crescent of a Crescent Leg B see fig 2 and into the corners of rim...

Page 4: ...it counter clockwise see fig 5 When separated you ll have three parts including center cap lower half with inside threading upper half with outside threading Reach under the table with the lower half in one hand while reaching over the table with the upper half in the other hand Bring the two pieces together at the center of the table where a hole is cutout in the glass Screw the two pieces back t...

Page 5: ...e to normal wear and use are not covered Freight Packing TDC will be responsible for shipping handling and packaging charges for all valid warranty claims Care Maintenance Be careful to never allow water build up in frames as this will cause corrosion and freeze damage in cold climates Wash all frames with a solution of mild soap and water Rinse with clean water and dry with a soft absorbent cloth...

Page 6: ... ...

Page 7: ...Distributed By T D C USA INC Fairfield NJ 07004 2017 All Rights Reserved Made in China Comments 1 800 599 8898 9am 5pm EST www tdcusainc com ...

Reviews: