background image

POWERING ON/OFF

To power ON the DA-9000: 

Press the 

POWER

button. The unit will start for a few moments. 

To power OFF the DA-9000:

Press the 

POWER

button. The unit will go into OS backup mode before turning off. (This

will take about 40 seconds.)  If there are rapid archived songs for compressing, the unit
will go into stand-by compressing mode before turning off. You can skip these modes by
pressing the POWER button again.

SELECTING TRACKS AND MENU ITEMS

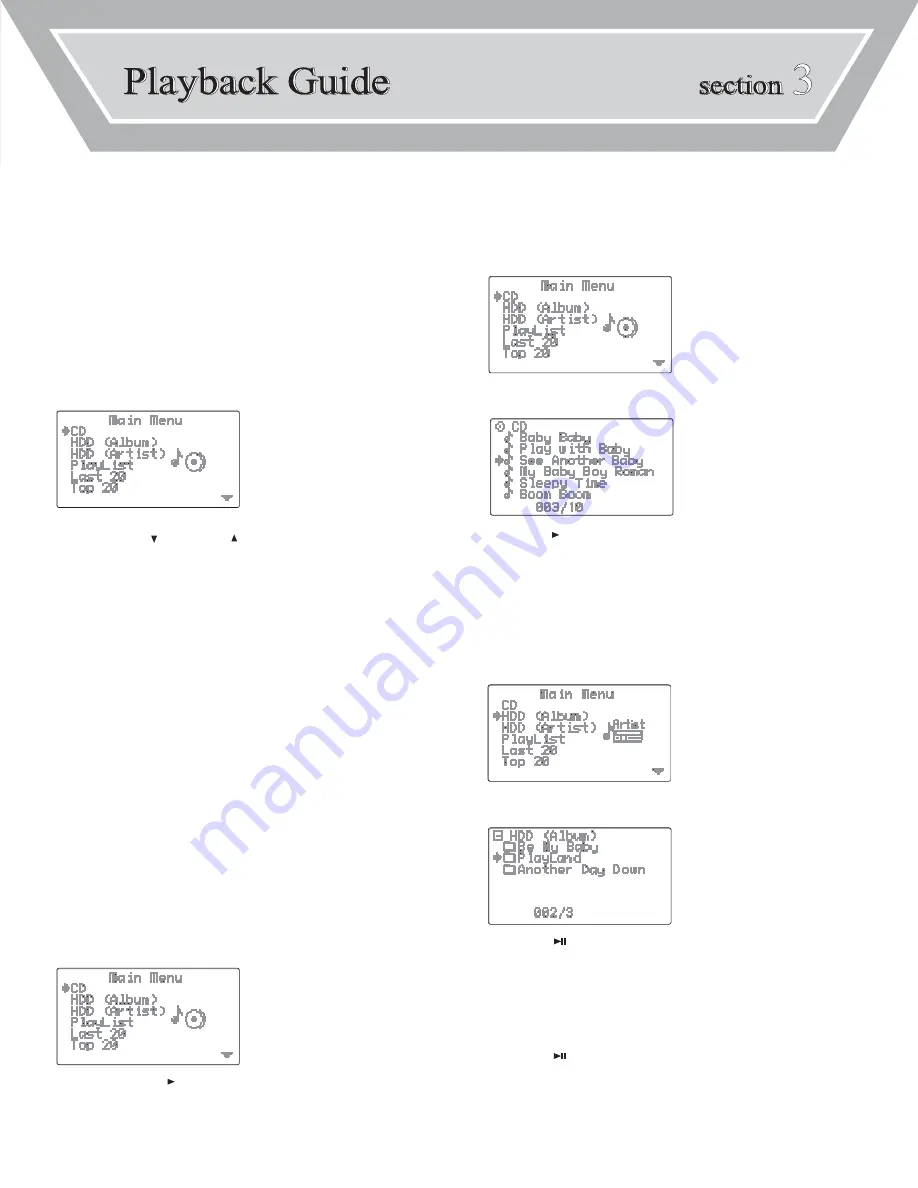
A track or other menu item is selected when an arrow appears next to the item name. In
the example below, CD is selected:

To select a track or other menu item:

Press 

ARROW DOWN

[    ] or 

ARROW UP

[    ] until an arrow appears to the left of the

track or menu item.

THE MAIN MENU

The DA-9000’s Main Menu is the default menu that loads when the device is powered ON.
The Main Menu is your gateway to many key functions. 

To return to the Main Menu from a sub-menu:

Press the 

Main

button.

GRACENOTE CD DATABASE (CDDB)

The DA-9000 includes an internal, upgradeable version of Gracenote’s CD database. The
DA-9000’s TDK PC Transfer Software can also access CDDB through the Internet.  The
DA-9000 contains over 425,000 album and track titles, which it can use to automatically
display CD information.

Gracenote CDDB is automatically checked for the disc and track titles. 

Press 

INFO

to view additional information.  

PLAYING FROM A CD

To load a CD into the DA-9000:
1.

Press 

EJECT

to open the CD tray.

2.

Insert a CD into the tray.

3.

Press 

EJECT

to close the CD tray.

To play an entire CD:
1.

Load a CD into the DA-9000. 

2.

In the Main Menu, select CD.

3.

Press the PLAY button [    ] to begin playback. 

To play a specific song from a CD:
1.

Load a CD into the DA-9000.

2.

In the Main Menu, select CD.

3.

Press 

ENTER

to browse the tracks.

4.

Select the desired track.

5.

Press 

PLAY

[   ] to begin playback. 

PLAYING FROM THE INTERNAL HARD DRIVE

Music that is located on the DA-9000’s hard drive can be navigated by HDD (Album),
HDD (Artist), Last 20, Top 20 and Playlist categories. The HDD (Album), HDD (Artist),
Last 20 and Top 20 categories are compiled automatically, but Playlists are user-pro-
grammed. 

To play a specific album from the hard drive:
1.

In the Main Menu, select HDD (ALBUM).

2.

Press 

ENTER

to open the album list.

3.

Select the desired album.

4.

Press 

PLAY

[      ] to begin playback.

To play a specific track from the hard drive (when browsing by album):
1.

In the Main Menu, select HDD (ALBUM).

2.

Press 

ENTER

to open the album list.

3.

Select the desired album.

4.

Press 

ENTER

to open the track list.

5.

Select the desired track.

6.

Press 

PLAY

[      ] to begin playback.

SECTION 3: 

PLAYBACK GUIDE

5

Summary of Contents for DA9000

Page 1: ...ETURNING THIS PRODUCT v1 TDK is committed to its customers We will help you correct problem or will supply instructions for returning the unit IF YOU EXPERIENCE A PROBLEM PLEASE READ THE SUPPORT MATER...

Page 2: ...ULARLY AT PLUGS CONVENIENCE RECEPTACLES AND THE POINT WHERE THEY EXIT FROMAPPARATUS 11 ONLY USE ATTACHMENT ACCESSORIES SPECIFIED BY THE MANUFACTURER 12 USE ONLY WITH THE CART STAND TRIPODBRACKET OR TA...

Page 3: ...TION 2 Player Remote Controls 3 SECTION 3 Playback Guide 5 SECTION 4 Recording Guide 7 SECTION 5 Additional Features 11 SECTION 6 TDK PC Transfer Software Guide 13 SECTION 7 Troubleshooting 15 SECTION...

Page 4: ...h as disc and song titles Rip audio from a CD to the DA 9000 s internal hard drive Record audio to the DA 9000 s internal hard drive from an external source Transfer MP3 audio files from and to a PC R...

Page 5: ...TAPE OUT jacks on a source device such as a receiver or a tape deck NOTE Most turntables cannot be connected directly to the DA 9000 See About Recording from Your Turntable on page 9 for more informa...

Page 6: ...RTANT NOTE After you ve finished transferring files disconnect the USB cable When the USB cable is connected the DA 9000 is in a passive mode and cannot perform most of its functions IMPORTANT NOTE Th...

Page 7: ...11 NEXT TRACK ARROW RIGHT Press to skip forward to the next track Or press to navigate menus and lists 12 ARROW UP Press to move up in a list 13 ARROW DOWN Press to move down in a list 1 POWER Press t...

Page 8: ...ress to burn a CD 14 TRAY OPEN CLOSE Press to open or close the disc tray 15 ALPHANUMERIC KEYS Press to enter track information search for tracks etc 16 CAP Press to toggle between upper case and lowe...

Page 9: ...can use to automatically display CD information Gracenote CDDB is automatically checked for the disc and track titles Press INFO to view additional information PLAYING FROM A CD To load a CD into the...

Page 10: ...or details To create a playlist 1 Select a track that s located on the DA 9000 s hard drive 2 Press MARK Repeat steps 1 2 until all desired tracks have been marked Marked tracks will have a dot after...

Page 11: ...o the MP3 format medium quality and file sizes CD QUALITY The tracks will remain non compressed and will have the same audio quality as the original CD The tracks will have the largest file sizes To r...

Page 12: ...t after the title 5 Press PROG 6 Press REC 7 Select the desired recording option 8 Press REC to begin ripping the tracks to the internal hard drive To record from an external source to the DA 9000 s i...

Page 13: ...open automatically ERASING A CD RW CD RW discs can be erased and rewritten with new content An erased CD RW disc can be rewritten as an MP3 CD or as a standard CD CD R type discs cannot be erased To...

Page 14: ...10 DA 9000 USER MANUAL THIS PAGE INTENTIONALLY LEFT BLANK...

Page 15: ...ress ENTER to begin compressing DELETING BY TRACK OR FOLDER WITH THE REMOTE You can use the remote control to delete individual tracks entire albums entire artists and playlists The TDK PC Transfer So...

Page 16: ...12 DA 9000 USER MANUAL THIS PAGE INTENTIONALLY LEFT BLANK...

Page 17: ...o your computer you must use the DA 9000 s internal version of Gracenote CDDB to find titles SECTION 6 TDK PC TRANSFER SOFTWARE GUIDE 13 To install the TDK PC Transfer Software 1 Load the included ins...

Page 18: ...e upper right select the playlist you want to edit 3 If you want to change the playlist s name click RENAME PLAYLIST OR If you want to change the playlist s contents highlight a song s then click a bu...

Page 19: ...oesn t operate properly or seems to have crashed CAUSE S SOLUTION S While it s far more reliable than a PC the DA 9000 does have a processor and other PC like components If the unit seems to have froz...

Page 20: ...16 DA 9000 USER MANUAL THIS PAGE INTENTIONALLY LEFT BLANK...

Page 21: ...e CD Types CD R for Audio CD RW for Audio Data Format Mode 1 Session At Once with multisession support File system for Data CD conforms to ISO9660 with Joliet Extension Others Data Transfer Port USB P...

Page 22: ...The DA 9000 is shipped with the following items in its box One 1 TDK PC Transfer Software CD ROM One 1 Remote Control One 1 USB Cable One 1 RCA Type Stereo Audio Cable Two 2 AA Batteries for the Remot...

Page 23: ...roper installation operation testing or maintenance 3 power failure or connection to improper voltage supply or 4 attempted repair by any party other than TDK This Limited Warranty does not apply when...

Reviews: