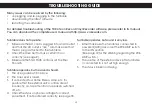
background image

15

OPERATION

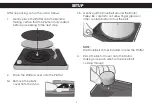
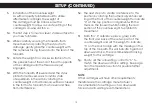
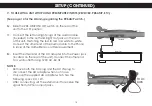
1.  Put a record on the turntable and remember to use the 45 

adapter if using a 45 single record.


NOTE: 

Some 45 single records may not need the 45 adapter.

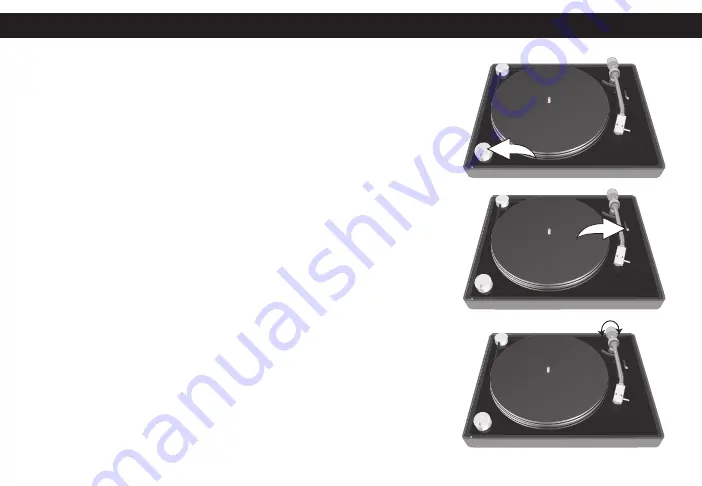
2.  Rotate the 33/OFF/45 control to the 33 or 45 position  

(to match the record being played); the Power indicator  

and display will light.

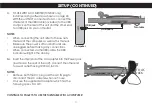
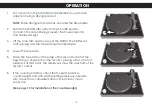
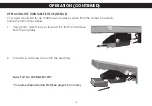
3.  Lift the Tone Arm and move over the Platter. The Platter will  

start spinning and the Tone Arm light will illuminate.

4.  Lower the Cue Lever.

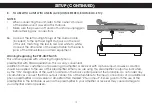
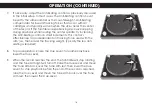
5.  Place the Tone Arm on the edge of the record to start at the 

beginning or anywhere on the record’s playing surface to start 

playback at that point. The display will show the spectrum of the 

record’s output.

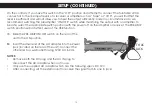
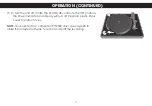
6.  If the sound is distorted, check the tonearm balance, 

counterweight and anti-skating setting previously adjusted.  

Also check for accumulated dust on the stylus by visual 

inspection. 


(See page 10 for Installation of the counterweight.)

Summary of Contents for TVT1001BLK

Page 1: ...PROFESSIONAL TURNTABLE WITH AUTO SPEED CORRECTION Belt Drive Turntable USER GUIDE TVT1001BLK TVT2002BLK...

Page 2: ......

Page 3: ...ons ATTENTION The exclamation point within an equilateral triangle is intended to alert the user to the presence of important operating and maintenance servicing instructions in the literature accompa...

Page 4: ...Consult the dealer or an experienced radio TV technician for help The rating information is located at the bottom of the apparatus WARNING TO PREVENT FIRE OR SHOCK HAZARD DO NOT EXPOSE THIS UNIT TO RA...

Page 5: ...by the manufacturer 12 Use only with a cart stand tripod bracket or table specified by the manufacturer or sold with the apparatus When a cart is used use caution when moving the cart apparatus combi...

Page 6: ...CLUDED Platter Cover Part No 507 E13000 00R Consumer Replaceable Part See page 34 to order AC Adapter Part No 001 41E130 01R Main Unit Platter with Belt Platter Part No 434 E13000 00R Belt Part No 447...

Page 7: ...Guide Consumer Replaceable Part See page 34 to order B Type USB Cable TVT2002 only Part No 061 100100 04RP Audio Cable Part No 008 000015 10P 45 Adapter Part No 456 E13000 00R Counter Weight Part No...

Page 8: ...ator 10 Platter 11 Tone Arm Light 12 Stylus Stylus Part No 069 MG2801 01R 13 Display 14 Tone Arm 15 Audio Out Jacks 16 PRE AMP ON OFF Switch Please see caution on use of this switch on page 12 17 B Ty...

Page 9: ...step 2 Place the Platter Cover onto the Platter 3a Remove the plastic cover from the stylus 3b Gently pull the Drive Belt around the Motor Pulley Be careful to not allow finger grease or other contami...

Page 10: ...will be achieved in the form of a tonearm that is level and free from interference 5e The next step is to create a reference to this position by rotating the numerically enhanced ring at the front of...

Page 11: ...sure the power is off and both units are unplugged before making any connections When connected via the USB cable the USB indicator will light in the display 6a Insert the small end of the AC adapter...

Page 12: ...d with a moving magnet phono preamplifier with RIAA equalization This is a very convenient addition for those customers not possessing an amplifier or receiver with a phono input However caution shoul...

Page 13: ...ate switch position with the power off on the amplifier or receiver The PRE AMP switch position will not affect users of the USB function 7b Slide the PRE AMP ON OFF switch on the rear of the unit to...

Page 14: ...d white to white Connect the other end of the Audio Cable to the Phono In jacks of the Home Stereo or similar equipment 8c Insert the small end of the AC adapter into the Power jack located on the rea...

Page 15: ...atter The Platter will start spinning and the Tone Arm light will illuminate 4 Lower the Cue Lever 5 Place the Tone Arm on the edge of the record to start at the beginning or anywhere on the record s...

Page 16: ...dle try increasing the Anti Skating control in small increments This control s effectiveness is also dependant on tracking force used with the arm i e the heavier the tracking weight typically the les...

Page 17: ...e 33 OFF 45 control to the OFF position the Power indicator and display will turn off Replace plastic Stylus cover to protect stylus NOTE If connected to a computer TVT2002 only see page 23 to utilize...

Page 18: ...up to 400 hours However when the time comes to replace follow the instructions below 1 Very gently slide the stylus towards the front and remove from the assembly 2 To replace slide new stylus onto t...

Page 19: ...ual at the link provided below to utilize all the software s features and effects TDK Vinyl Recorder http www cakewalk com NOTE When using USB audio devices such as the TDK Life on Record turntable it...

Page 20: ...hen select CD ROM in MY COMPUTER and double click on the Vinyl Recorder Setup exe file 2 The Select Setup Language screen will appear Select the language to be used during installation and click OK 3...

Page 21: ...continue with the default destination folder 6 The Select Start Menu Folder screen will appear Select the folder where the program s shortcuts will be installed and then click Next 7 The Shared Folde...

Page 22: ...rocess for Windows Vista and XP is very similar to that of Windows 7 which has been described here After inserting the CD ROM follow the respective on screen instructions in the Setup Wizard for these...

Page 23: ...am unless you deselect the Show at Startup box at the bottom left of the window With the turntable connected to your computer launch the software if not already open by double clicking on the Vinyl Re...

Page 24: ...tings For more detailed explanations click on the Help button within the Audio Options window The Recorder Module To make a recording use the turntable according to the instructions beginning on page...

Page 25: ...the Record button and the Pause function will automatically engage 2 If desired click the Input Monitor button This will output the sound as it is recording 3 Click the Pause button to start recordin...

Page 26: ...e second side of the record has ended click the Stop button You will now have two separate recordings one for each side of the record 6 Click the Rewind button to go back to the beginning of the recor...

Page 27: ...Recorder module and do more editing if you desire 2 Select the destination and name the file Make sure the Channel Format is set to Stereo the Sample Rate is 44100 and the Bit Depth is 16 3 Click the...

Page 28: ...the full version of the Encoder module If you already have an MP3 encoder installed on the computer from another software application this software will utilize that encoder The Tagger Module Click on...

Page 29: ...n an Audio File to CD 1 Insert a blank CD into your computer s disc drive 2 Click on the Audio CD tab in the Burner window 3 Click ADD to select the desired audio files 4 Select the desired disc drive...

Page 30: ...k the stylus on phono cartridge for correct placement If not positioned correctly see page 18 Turntable operates but sound is very low 1 Either make sure the turnable is connected to powered AUX jacks...

Page 31: ...ncorrectly make sure it is set to the corresponding speed TROUBLESHOOTING GUIDE CONTINUED MAINTENANCE Clean the stylus tip frequently with a soft brush in a back to front motion only If using Stylus f...

Page 32: ...stems Windows 7 Vista XP Mac 10 4 Type Belt Drive Turntable Motor DC Servo Controlled Wow Flutter Less than 0 25 WTD Signal to Noise Ratio More than 50dB Output Level PRE AMP set to ON 200mV Output Le...

Page 33: ...33...

Page 34: ...FOR CONSUMER REPLACEABLE PART S CONTACT OUR PARTS AND ACCESSORIES FULFILLMENT CENTER AT 1 800 379 8439 Imation Enterprises Corp 1 Imation Way Oakdale MN 55128 3414 USA The TDK Life on Record logo is a...

Page 35: ......

Page 36: ...Imation Enterprises Corp 1 Imation Way Oakdale MN 55128 3414 USA The TDK Life on Record logo is a trademark of TDK Corporation used under license TVT1001BLK TVT2002BLK 63952289 B...

Reviews: