background image

08

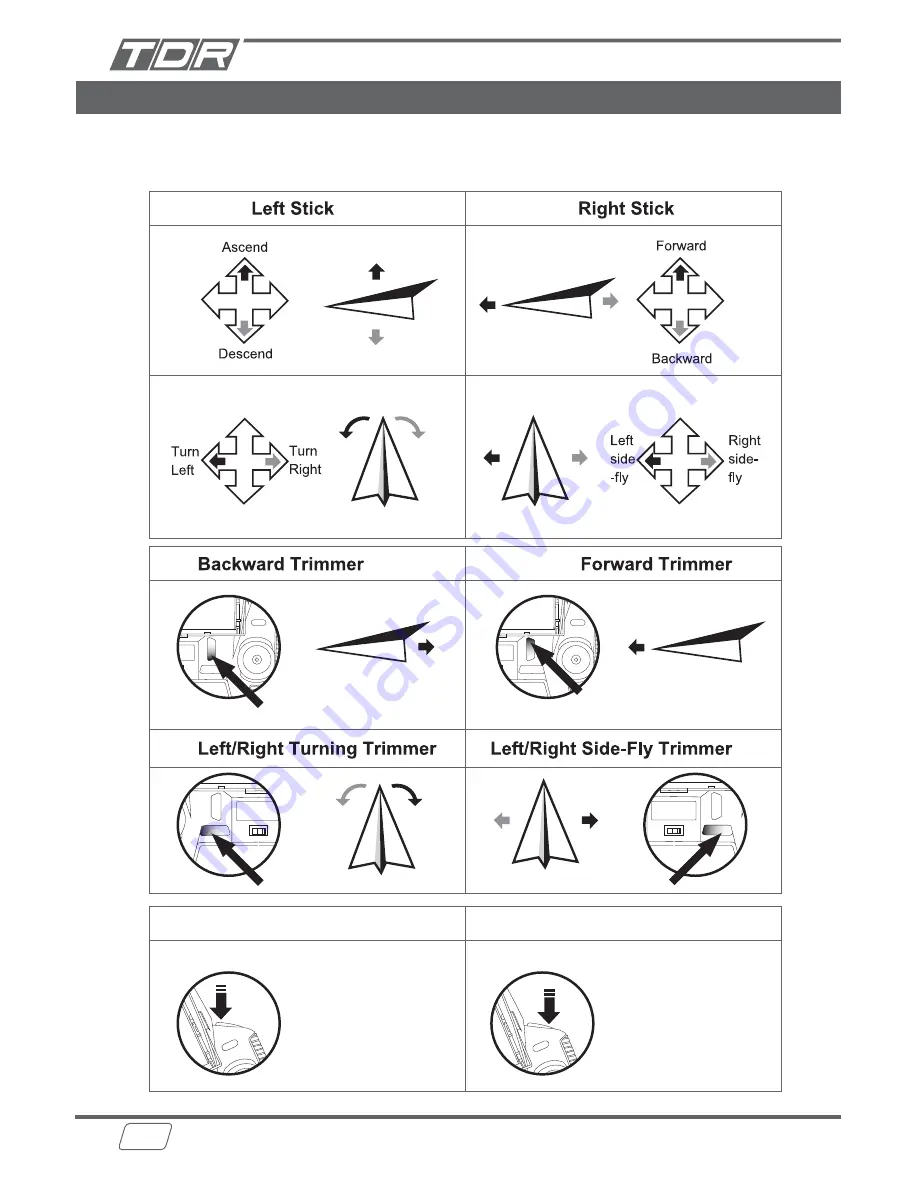
Basic operation controls

Basic operation:

Left stick controls altitude and direction.
Right stick controls the rotation forward, backward, left or right movement.

Press down to trim

Press left/right to trim

Short press the button

to take a photo

Short press the button

to shoot a video.

Press up to trim

Press left/right to trim

Photo Taking

Video Shooting

Summary of Contents for 61351

Page 1: ...ease contact service tenergy com CONTENT LIST 2x Blade A 2x Blade B 1x USB 3 Port Charger 1x 8GB Micro SD Card 1x USB Card Reader 1x Robin 1x Controller 1x Battery for Controller 2x Battery for Robin...

Page 2: ...ell clear of and do not interfere with manned aircraft operations and you must see and avoid other aircraft and obstacles at all times Do not intentionally fly over unprotected persons or moving vehic...

Page 3: ...es in your area please reference the instructions of the battery manufacturer WARNING Batteries are harmful if swallowed Please keep away from children Waste Electrical and Electronic Equipment WEEE T...

Page 4: ...logy Wrap around Shot With Orbit Video 6 axis Flight Control System 5 8GHz Real time Video Streaming 2MP 720p HD Camera Advance Headless Flight Mode 4 way 3600 Stunt Rolls Left Right Forward Backward...

Page 5: ...Roll Power Switch Display Speed Selection Throttle Trim Throttle Rudder Stick Rudder Trim Video Short Press Photo Long Press Orbit Video Forward Backward Trim Elevator Aileron Stick Left Right Trim Ba...

Page 6: ...chamber cover is closed Charge the battery for the drone Remove the battery from controller Insert the battery into the drone LED Charging Status Indicators On Charging the battery Off Charging compl...

Page 7: ...stick to bottom left and the right stick to bottom right at the same time then release ON 3 To turn on the controller and begin binding switch the power switch to ON 2 When 2 red LEDs flash rapidly t...

Page 8: ...direction Right stick controls the rotation forward backward left or right movement Press down to trim Press left right to trim Short press the button to take a photo Short press the button to shoot a...

Page 9: ...roll Orbit Video Press and hold the Photo Button for 1 second to start Orbit Video shooting Press the Photo or Video Button to stop 1 5m 5ft Note The orbit radius is approximately 1 5m 5ft please ens...

Page 10: ...e starts the flying speed will be reset to default low speed setting Cautions Use this feature with caution ensure there are no obstacle in its way Face the same direction Yellow Blade Yellow Blade He...

Page 11: ...Memory Card Micro SD card Supports up to 64G Video Format 2MP 720P 30FPS Camera Viewing Angle 120 Battery Capacity 380mAh Flight Time approx 5 6 minutes Controller LWH 18x16x7cm 6 6x6 2x2 7inch Weight...

Page 12: ...r use Black Blade A and Black Blade B Note The letters A and B are printed on reverse side of blades A B Front Yellow Blades Rear Black Blades Yellow Yellow B Black A Black To disassemble the blade Re...

Page 13: ...erating system or preferred photo transferring program to transfer the photos and videos CAUTION Never remove the USB Card Reader from the computer during file transfer After the photos and videos hav...

Page 14: ...n as you makes flying easier and more intuitive Stay 2 to 3 feet away from walls and ceilings as the drone will be drawn towards them if you fly too close If the propeller blades come in contact with...

Page 15: ...the ground LEDs are flashing Battery power level is too low Fully recharge the battery 5 Unstable drone flying strong vibration Damaged blade s Replace the blade s 6 All blades spin but drone does no...

Page 16: ...16 Thank You Happy Flying...

Reviews: