background image

SETUP

When the item name of Advanced is blinking,
press the 

ENTER

 button to confirm it. The de-

fault parameter Sensitivity will be shown and
blinking.

You could change parameter by rotating the

SCROLL WHEEL

.

Any  parameter  is  assigned    for  each  pad
individually. You must select a pad to edit. The
default pad is Tom1. You may select pad to setup
by pressing the pad select button or strike the
pad directly.

Note:

1. There is no alternative part such as rim, edge
can be selected. It is different from part selection
procedure in DRUM KIT EDIT.
2. The advanced setup does not include Hi-Hat
pedal, which  is available in individual item.

After select the parameter and pad, press the

ENTER 

button to confirm. The current value of

the parameter will appear and blink. Now, you
can change the value.

There are 4 advanced parameters can be edited.
They are:


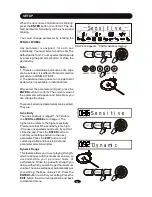
Sensitivity

The pad sensitivity is ranged 1-127. Rotate

the 

SCROLL WHEEL

 to change it. The

higher value refers to the higher sensitivity.
Please note that if the sensitivity is too high,
it

ll cause unexpected sound even if you don

t

strike the pad. Press the 

ENTER

 button to

confirm your setting and turn to the next
parameter. Press the 

EXIT

 button to exit

current operation and back to Advanced
parameter selection window.

17

Dynamic Range

This feature allows you to set playing strength,
which response with the maximum volume, to
a c co m m o d a t e   y o u r   p e rs o n a l  t a s t e   o f
performance. Strike the pad with strength you
desire, with which you want to get the maximum
volume.The value will appear automatically per
your striking,  the Max. value is 127. Press the

ENTER

 button to confirm your setting. Press the

EXIT

 button to exit current operation and back

to Advanced menu.

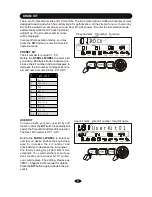
  Sensitive

  Dynamic

Sensitive

Pad

·

for advanced setup

EDIT icon appears

Summary of Contents for DD-503

Page 1: ...00030676 Version 12 2014 DD 503 E Drum Set User manual...

Page 2: ...ned to provide reasonable protection against harmful interference in a resi dential installation This equipment generates uses and can radiate radio frequency energy and if not installed and used in a...

Page 3: ...AC adaptor into the same AC outlet as appliances with high power consumption such as electric heaters or ovens SERVICE AND MODIFICATION This product should be serviced by qualified service personnel w...

Page 4: ...13 Select parameter to edit 14 Edit the parameter 14 Edit another parameter or part 14 Complete the edit 15 SETUP 16 Accompaniment Volume for Demo 16 Percussion Volume for Demo 16 Master Tune 16 Advan...

Page 5: ...ALLATION The drawing shows complete drum kit after your installation Power adaptor and connection cables are not shown in the drawing 1 CRASH TOM 1 TOM 2 HI HAT RIDE TOM 3 KICK SNARE HH CTRL SOUND MOD...

Page 6: ...INSTALLATION 2 You can find all of these components in package for rack system installation Pad clamp Rack clamp L Rod Arm Leg Cymbal rod Foot Cross beam Cymbal rod clamp Wing nut...

Page 7: ...2 3 Install the right and left foot adjust the height to have the feet firmly fixed onto the ground then tighten the winhuts 4 Move and rotate all the clamps to proper location then tihgten the wing...

Page 8: ...Installation Crash and Ride Installation Snare Installation 1 Insert the tom into the L Rod then tighten the wing nut Note All the toms use the same pad 2 Adjust the angle of the L Rod before tighteni...

Page 9: ...onfigure drum kits 5 SETUP Press this button to edit system parameters 6 MODE Press to change the playing mode for demo songs 7 CLICK Switch and set up the metronome 8 TEMPO Change the speed of metron...

Page 10: ...module Connect this output to any amplifier using 1 4 TS cable While using single amplifier please connect L MONO only 5 TRIGGER Trigger inputs socket of sound module Connect the multi trigger connec...

Page 11: ...ce sensitivity feature Strike the pad harder to make a higher volume and strike the pad softer to make a lower volume Playing Tom Drum Strike the central position to create a sound Playing Hi Hat 1 St...

Page 12: ...you desire Rotate the knob clock wise to increase the kit number and anticlockwise to decrease the kit number The factory setting for all User Kits is Uni versal Kit You could call them even if you do...

Page 13: ...ong There are 52 demo songs built in Press the DEMO button once to engage the demo song mode with the indicator lighting The display will show All Demo Press the button immediately all demo songs will...

Page 14: ...DEMO button is longer than 2 seconds it ll turn to Kit mode instead of Song mode Note If you didn t record any song the display will show No u song After 3 second the mode will change to Kit select au...

Page 15: ...e time signature setting the next parameter to setup is metro nome volume The display will show Metro Vol and current volume is blinking Rotate the SCROLL WHEEL to change the volume ranged 0 127 The d...

Page 16: ...are is marked by an arch under the SNARE icon Each part has multi parameters to create its characteristics such as voice volume reverb level and Pan etc The detailed description is listed In the table...

Page 17: ...ect button to engage editing for this part while the corresponding icon willblink Some instruments have two or more parts for example the crash has bow and edge Hi Hat has open and close etc Press the...

Page 18: ...selected part is finished You may continue to edit other parameters in this part or change part to edit 1 Edit other parameter in the current part After you press the ENTER button to finish cur rent...

Page 19: ...s successful it ll turn to the Kit select mode The indicators of the pad select button and the EDIT button will turn off The display always asks Replace it Press the ENTER button to replace existing o...

Page 20: ...lay demo song you may adjust per cussion volume Adjust this volume by pa rameter D Drum Vol Rotate the SCROLL WHEEL to change the volume ranged 0 24 The default setting is 11 Press the ENTER button to...

Page 21: ...ere are 4 advanced parameters can be edited They are Sensitivity The pad sensitivity is ranged 1 127 Rotate the SCROLL WHEEL to change it The higher value refers to the higher sensitivity Please note...

Page 22: ...t Cross Talk in the menu and press ENTER The option Cross Talk on screen will stop blinking which indicates you have entered cross talk adjusting mode Keep striking a single pad repeatedly with high v...

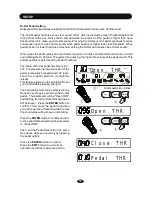
Page 23: ...is determined by Pedal Threshold your comfortable pressing strength The Threshold points can be adjusted in the Sensitive settings by pressing the Hi Hat pedal The parameter will be Open THR and blink...

Page 24: ...tup operation When ResetSetup is blinking press the ENTER button The display will show AreYouSure Press the ENTER button to con firm and return to the Kit Selection mode Or press the EXIT button to re...

Page 25: ...can also select user song to playback Please refer to the SONG chap ter in this Manual for details 3 Save as a User Song In the save operation the User Song number for saving your record will blink Yo...

Page 26: ...world wide standard communication interface that enables electronic musical instruments and computers to communicate with each other so that instructions and other data can pass between them This exch...

Page 27: ...l 50 tFiesta3 81 hoVintage 18 xMetal 51 tElectro1 82 hcVintage 19 sJungle1 52 tElectro2 83 hpVintage 20 sJungle2 53 tElectro3 84 hoRock 21 sJazz 54 tElectro4 85 hcRock 22 xJazz 55 tElectro5 86 hpRock...

Page 28: ...sor Pad Button 10 for fast select and hear the sound while editing Setup Menu Accomp Vol D Drum Vol MasterTune Advanced Reset Pad Edit Voice Volume Pan Pitch Reverb Tempo Default 96 range 40 240 Metro...

Reviews: