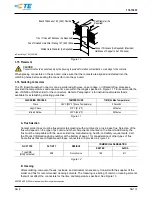
background image

114-13233 

Rev B


of 13


Prolonged exposure to ultraviolet light may deteriorate the chemical composition used in the product 
material. 

B.


Shelf Life 

The contacts and connector kits should remain in the shipping containers until ready for use to prevent 
damage. These products should be used on a first in, first out basis to avoid storage contamination. 

C.


Chemical Exposure 

Do not store product near any chemical listed below as they may cause stress corrosion cracking in the 
material. 

Alkalies 

Ammonia 

Citrates 

Phosphates Citrates 

Sulfur Compounds 

Amines 

Carbonates 

Nitrites 

Sulfur Nitrites 

Tartrates 

NOTE 

Where the above environmental conditions exist, phosphor-bronze contacts are recommended if available. 

3.4.


Cable Selection and Preparation 

Special considerations must be adhered to in the cable stripping operation. 

A.


Selection 

The pin and socket contacts will accept a wire size of 24 and 26 AWG in a 4-conductor (Quad) cable 
configuration in 100 Ohm and 150 Ohm. Cable suppliers such as Raychem* and TENSOLITE may be 
used. Contact TE to confirm all cable sizes and compatible contacts. 

B.


Preparation 

CAUTION 

Reasonable care must be taken not to nick, scrape, or cut any conductors during the stripping operation. 

NOTE 

Dimensions and procedures for stripping the cable may be found on TE Application Specification 114-13123. 

3.5.


Crimped Contact Requirements 

NOTE 

Dimensions and procedures for crimping the contacts may be found on TE Application Specification 114-13123. 

3.6.


Pin Contact Assembly 

NOTE 

Dimensions and procedures for assembling pin contacts and pin shell may be found on TE Application Specification 

114-13123. 

3.7.


Socket Contact Assembly 

NOTE 

Dimensions and procedures for assembling the socket contacts and socket shell may be found on TE Application Specification 

114-13123. 

3.8.


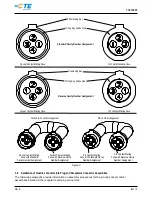
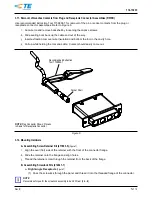
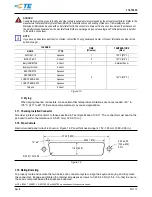
Contact Cavity Numbering 

Figure 2 provides information on contact cavity numbering with regards to standard and reverse number 
assignments for the pin and socket connector assembly per ARINC 600 Supplement 14. 

NOTE 

The same specific part number can be used as either a standard or reverse pin assignment. Cavity numbers 2 and 4 are the 

same for either standard or reverse assignment. On standard wiring assignment, position 1 will be adjacent to the wiring key 

(index line). On reverse assignment, position 3 will be adjacent to the wiring key. Standard verses reverse assignments are 

dependent on the location of cavity numbers 1 and 3. 

TENSOLITE is a trademark. 

Summary of Contents for 2000739-1

Page 1: ...ng panel mount plug a right angle printed circuit pc board mount receptacle and a free hanging receptacle The Quadrax Pin and Socket Contacts shall be applied to appropriate Quadrax cables The contact assembly contains an outer shell a one piece dielectric and four signal contacts An inner crimp ferrule is included with the cable applied contacts and an optional sealing boot plug is also available...

Page 2: ...ed in the manual as a guide for information on soldering problems 2 5 Specifications Product Specification 108 2131 and Qualification Test Report 501 574 provides product performance and test information for the Quadrax Contacts Test Specification 109 11 provides solderability requirements and evaluation methods The DSub connectors are tested to Product Specification 108 2311 Application Specifica...

Page 3: ...e must be taken not to nick scrape or cut any conductors during the stripping operation NOTE Dimensions and procedures for stripping the cable may be found on TE Application Specification 114 13123 3 5 Crimped Contact Requirements NOTE Dimensions and procedures for crimping the contacts may be found on TE Application Specification 114 13123 3 6 Pin Contact Assembly NOTE Dimensions and procedures f...

Page 4: ...Standard Cavity Number Assignment Socket Contact Mating Face Pin Contact Mating Face Socket Contact Mating Face Pin Contact Mating Face Positioning Key Wiring Key Index Line Reverse Cavity Number Assignment Socket to Socket Arrangement Pin to Pin Arrangement Socket Contact Mating Face with Reverse Cavity Number Assignment Socket Contact Mating Face with Standard Cavity Number Assignment Pin Contac...

Page 5: ...g Refer to Figure 3 Figure 3 B Installation of Quadrax Socket Contact Assemblies into Plug Connectors Line up the positioning key with the internal key on the connector Install the socket shell sub assembly in the plug assembly until the socket shell snaps in place Insert wire seal until flush with rear surface of housing Refer to Figure 4 Figure 4 Pin Shell Assembly Shown with Wire Seal Align Con...

Page 6: ... Make sure the screw threads are recessed into the strain relief clamp to prevent interference with the housing during assembly Repeat step 1 with the other half of the strain relief clamp Using a 5 64 in Allen wrench tighten the captive screws Apply two cable ties through the backshell as shown Figure 5 Captive Screws Recessed for Assembly Seal Gland Under Backshell Backshell Retention Rib Cable ...

Page 7: ...e tool and cable Contact should easily come out Figure 6 3 12 Mounting Hardware A Assembling Screw Retainer Kit 211883 5 Figure 7 Align the oval flat side of the retainer with the front of the connector flange Slide the retainer onto the flange and align holes Thread the retainer screw through the retainer from the back of the flange B Assembling Screwlock Kits 212447 1 a Right Angle Receptacle Fi...

Page 8: ...t washers on the screwlock and insert the screwlock through the front of the connector flange 2 Secure the assembly with a lockwasher and a nut Figure 8 Screw Retainer Kit 211883 5 Screwlock Right Angle PC Board Receptacle Cable Plug Screwlock Kit 212447 1 Male Jackscrew Supplied with Connector Cable Receptacle Cable Receptacle ...

Page 9: ...m of page 1 for suitability pc board materials or thicknesses B PC Board Layout The contact holes in the pc board must be located as shown to ensure proper placement and performance of the connector Design the pc board using the dimensions provided in Figure 9 The layout shows the top component side of the board Figure 9 C Contact Holes The contact holes in the pc board must be precisely located t...

Page 10: ...e rosin base flux Selection of the flux will depend on the type of pc board and other components mounted on the board Additionally the flux must be compatible with the wave solder line manufacturing health and safety requirements Call the Product Information phone number at the bottom of page 1 for consideration of other types of flux Some fluxes that are compatible with these connectors are provi...

Page 11: ...0 C 212 F KESTER 5778 Aqueous KESTER 5779 Aqueous LONCOTERGE 520 Aqueous LONCOTERGE 530 Aqueous Terpene Solvent Figure 13 C Drying When drying cleaned connectors make certain that temperature limitations are not exceeded 40 to 105 C 40 to 221 F Excessive temperatures may cause degradation 3 17 Checking Installed Connector All solder joints should conform to those specified in Test Specification 10...

Page 12: ...specified Military DANIELS tool positioner and die sets are available to crimp the screw machine pin or socket contact and ferrule See Figure 15 for recommended tooling WIRE SIZE AWG CONTACT TYPE CONTACT TERMINATION TOOLING FERRULE TERMINATION TOOLING RECOMMENDED EXTRACTION TOOL HAND TOOL POSITIONER OR DIE SET SELECTOR SETTING HAND TOOL DIE SET 26 Pin or Socket M22520 2 01 K709 4 M22520 5 01 or 60...

Page 13: ...this specification and in the instructional material shipped with the product or tooling FIGURE 16 VISUAL AID WIRE MUST BE VISIBLE IN INSPECTION HOLE CONTACT MUST BE VISUALLY STRAIGHT AND NO DAMAGE TO MATING END WIRE MUST BE VISIBLE IN INSPECTION HOLE WIRE SEALS ORIENTED CORRECTLY WIRE SEALS FULLY SEATED PIN CONTACTS FULLY BOTTOMED IN PIN DIELECTRIC TWO 0 79 MM 031 IN THICK WASHERS OR 1 57 MM 062 ...

Reviews: