408-35023
Rev A
4
of 5
5.2.
Periodic Inspection
Lubrication
Lubricate all pins, pivot points, and bearing surfaces with SAE 20 motor oil as follows:
Tool used in daily production - lubricate daily
Tool used daily (occasional) - lubricate weekly
Tool used weekly - lubricate monthly
Wipe excess oil from tool, particularly from crimping area. Oil transferred from the crimping area onto
certain terminations may affect the electrical characteristics of an application.
Visual Inspection
1. Close the tool handles until the ratchet releases and then allow them to open freely. If they do not
open quickly and fully, the spring is defective and must be replaced. See Section 6, REPLACEMENT
AND REPAIR.
2. Inspect the jaws for worn, cracked, or broken areas. If damage is evident, return the tool for evaluation
and repair. See Section 6, REPLACEMENT AND REPAIR.
Crimp Height Inspection
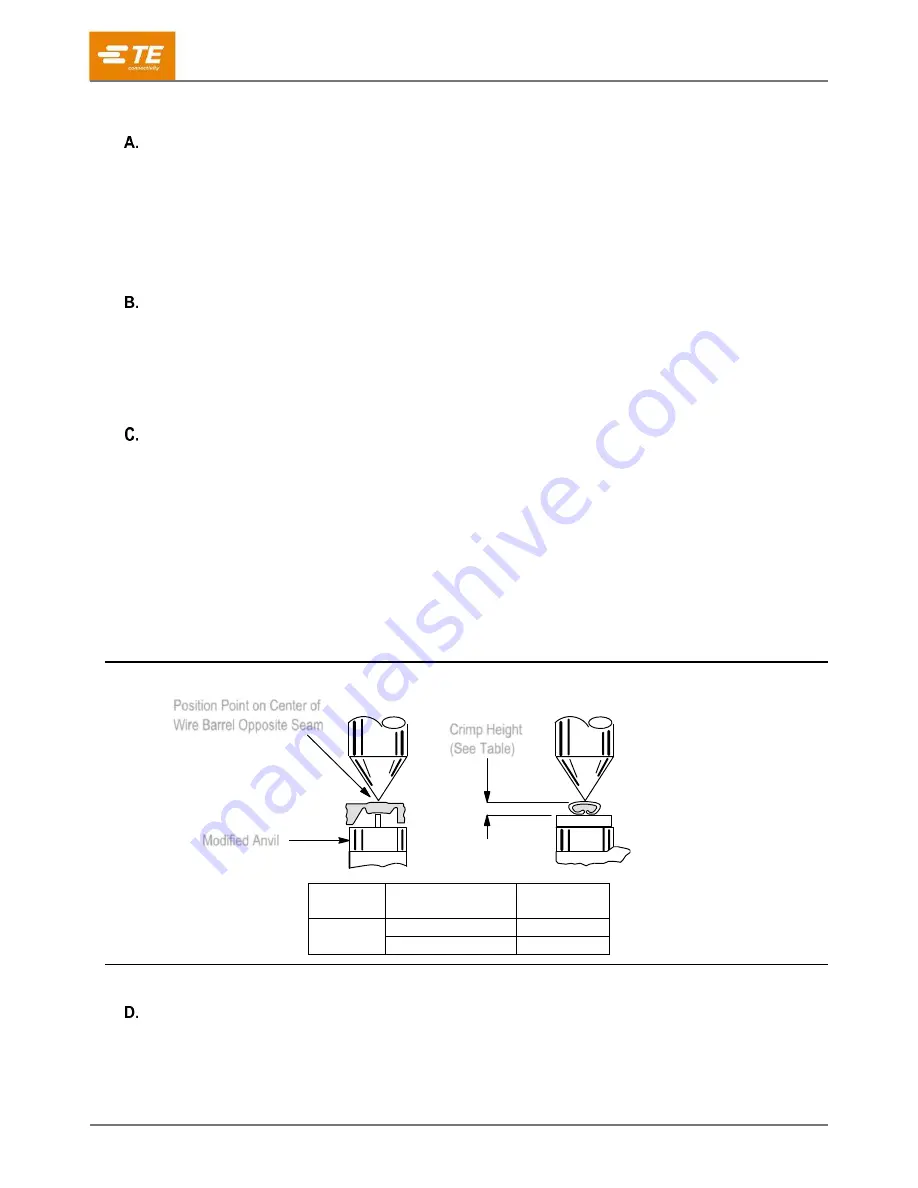
Crimp height inspection is performed through the use of a micrometer with a modified anvil, commonly
referred to as a crimp-height comparator. TE does not manufacture or market crimp-height comparators.
Detailed information on obtaining and using crimp height comparators can be found in Instruction Sheet
408-7424.
Proceed as follows:
1. Select a receptacle and maximum size wire for each crimping chamber.
2. Refer to Section 3, CRIMPING PROCEDURE, and crimp the receptacle accordingly.
3. Measure the wire barrel crimp height as shown in Figure 4. If the crimp height conforms to that height,
the tool is considered dimensionally correct. If not, return the tool for evaluation and repair. See
Section 6, REPLACEMENT AND REPAIR.
Figure 4
Ratchet Inspection
1. Select a receptacle and maximum size wire for the tool.
2. Position the receptacle and wire between the jaws as described in Section 3, CRIMPING
PROCEDURE.
Hand Tool Maximum Wire Size
Crimp Height
± 0.05 [.002]
675930-1
1.5
1.40 [.055]
2.5
1.52 [.060]
Position Point on Center of
Wire Barrel Opposite Seam
Modified Anvil
Crimp Height
(See Table)


