Installing IPC Assembly to Main & Tap Conductors
PII 408-32287 (EPP-3429) Page 2/2
Please dispose of all waste according to
environmental regulations.
12
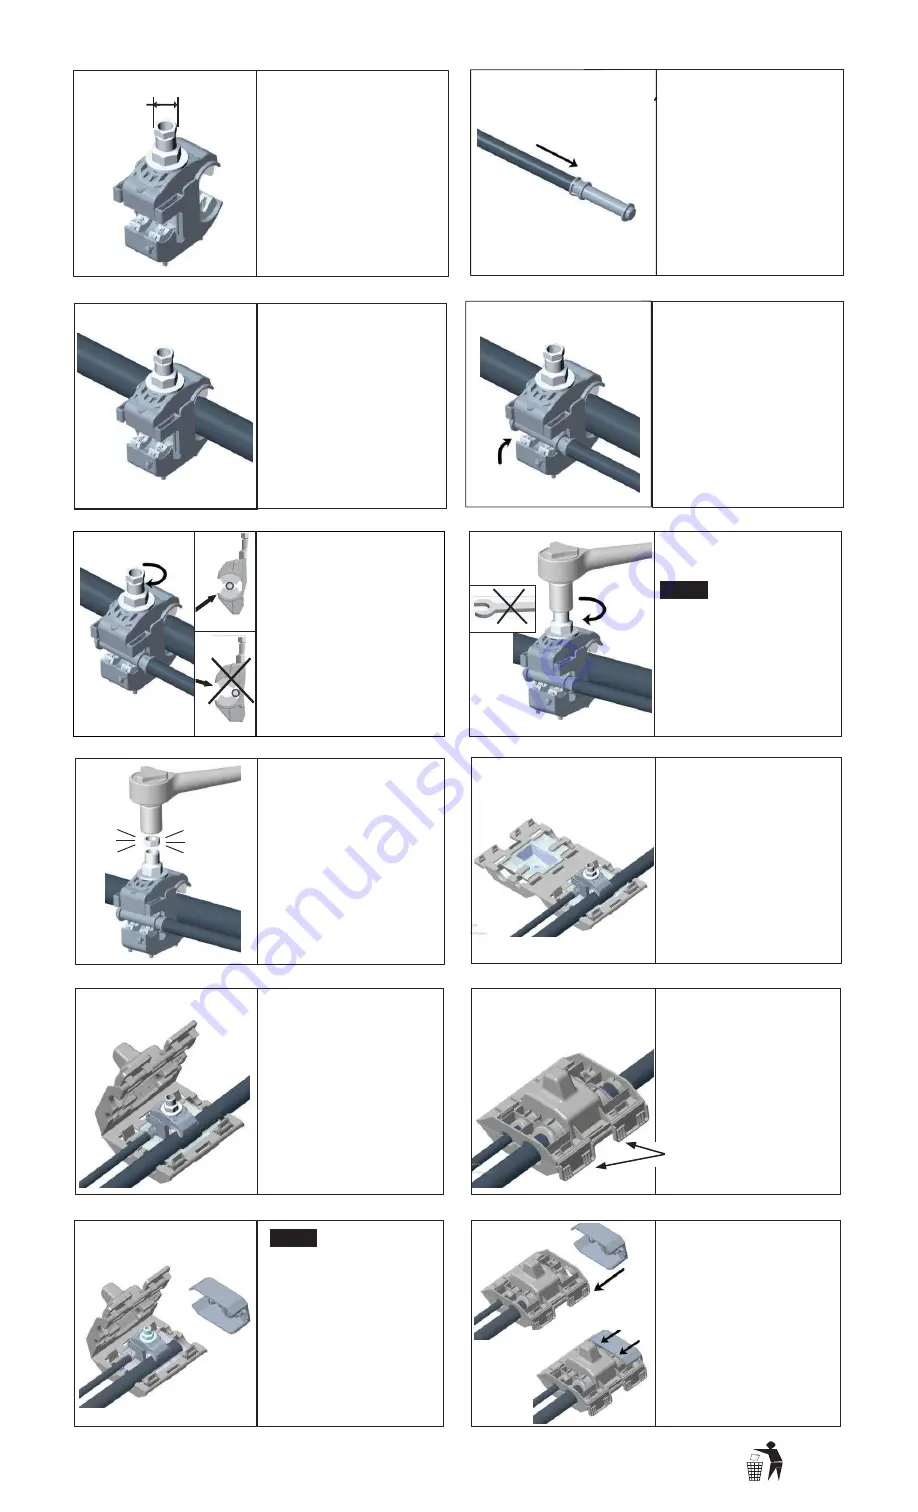
Insert the End Shield
Cap to the open end of
cover assembly.
NOTE
11
Steps 11 and 12 are only
required when both cables
will be terminated inside of
the cover on an end-run
installation.
Ensure main trunk cable
ends within the cover
enclosure.
1O
Bring the opposite side of
the cover closed until all
four latches engage.
Snap close the two
side latches.
9
Press the deeper side of the
cover around the bolt head
until the cables are partially
seated in their ports.
8
Align the cover with the
hinge closest to the tap
cable and the bolt head
towards the deeper side of
the cover. Refer to
orientation markings if
necessary.
7
Further tightening the
nut until nut shears.
Nominal shear value
of about 11Nm (8ft-
lbs)
Installation
Temperature of
-4°F (-20°C) to
+130°F (55°C)
6
Use socket wrench or low
torque impact gun for
tightening the nut.
NOTE
Spanners are not
recommended.
5
Hand tighten shear nut to
snug fit IPC over main/tap
cables.
Assembled conductors must
be seated properly between
contact blade support
grooves as shown.
Make sure the rubbers that
surround the blades are not
jammed due to an improper
position of the cable.
4
Placed the tap conductor
on the tap side.
NOTE: Ensure that seal
remains in place while
positioning Tap Cable/
Cap in connector jaw.
Accommodates String Line
Tap cable ranging from
#10 to #6 AWG,
Stranded/Str, AL9CU
3
Assemble the IPC over the
main conductor and hand
tighten the shear nut to
snug fit the IPC over the
conductor until it holds in
place freely.
Accommodates Main Line
Trunk cable ranging from
350 to 500 kcmil,
Stranded/Str, AL9CU
2
Insert the tap
conductor fully into the
cap.
1
13 mm
Make sure the cables are
not energized prior any
installation.
Clean and dry the cable jacket
before starting the installation.
Make sure that the assembly
is compatible with the
conductor sizes being used.
There is no need to strip the
main or tap conductor
insulations. Do not back off/
remove the shearnut.


