114-94114
REV. H2
17 of 19
Step 10
/ Schritt 10
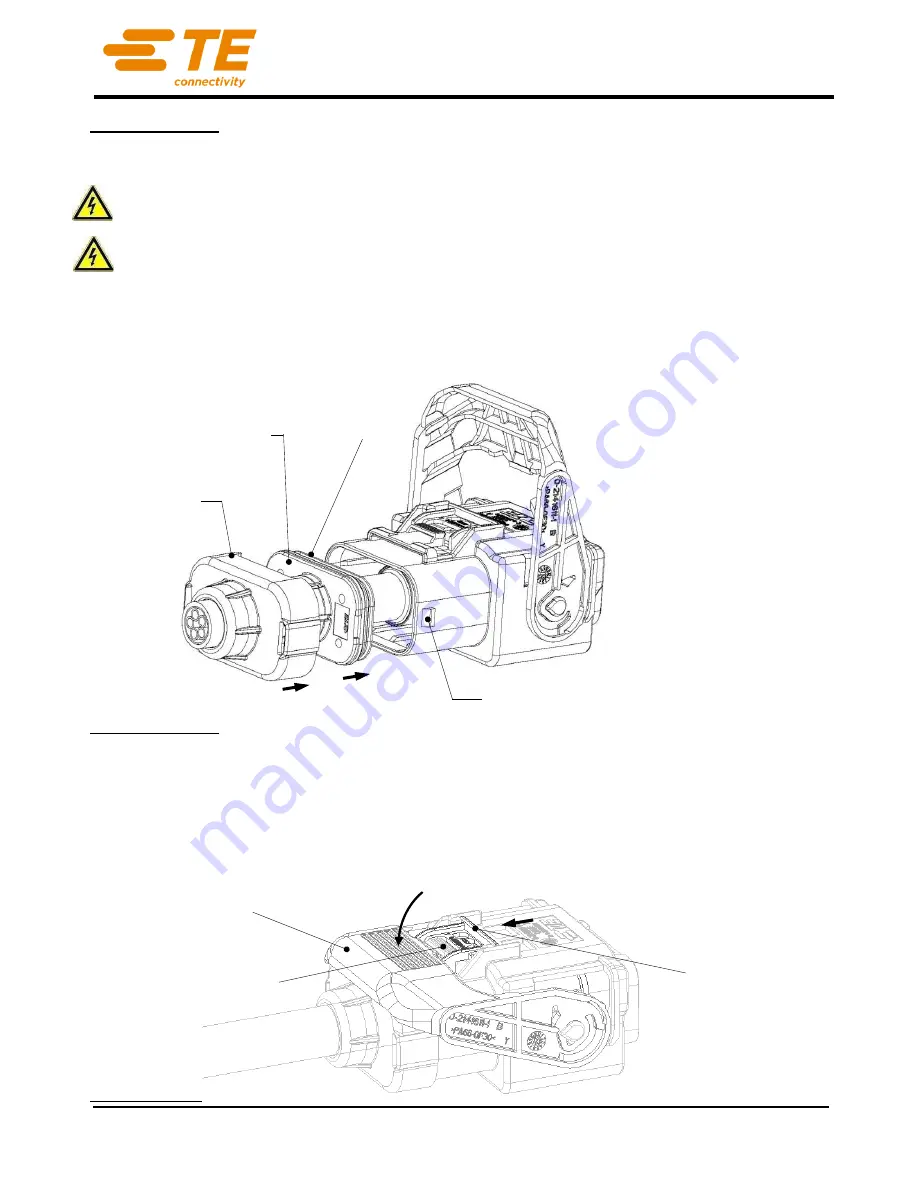
Push the CABLE SEAL with the CABLE SEAL CARRIER into the OUTER HOUSING (Figure 15) in its
final position.
CAUTION: Ensure that the cable isolation length after removal of the outer sheath (STEP 2) is
correct to ensure proper sealing!
Die Kabeldichtung mit der Halterung in die Endposition im Aussengehaeuse druecken (Bild 15).
ACHTUNG: Es ist sicherzustellen, dass die Abisolierlaenge des Leitungs-Aussenmantels (Schritt 2) korrekt
ist und damit eine zuverlaessige Abdichtung durch die Dichtung erreicht wird!
Press then the COVER over the OUTER HOUSING and over the CABLE SEAL CARRIER. Ensure
that both Catch-Mechanisms are snapped in.
Die Abdeckkappe auf das Aussengehaeuse und auf die Halterung aufschieben, bis es verrastet. Eine
korrekte Verrastung beider Schnapphaken sicherstellen.
Step 11
/ Schritt 11
For a save handling of the cable assembly the lever should be closed. Ensure that the lever is
locked in the snap hook of the housing. In case of a CPA the CPA has to be closed directly after
closing the lever to avoid plastic deformation (Figure 16).
Fuer eine einfache Handhabung der Leitungsbaugruppe sollte der Hebel geschlossen werden. Eine
korrekte Verrastung im Rasthaken des Gehaeuses ist sicher zu stellen. Im Falle einer CPA ist diese direkt
nach Schliessen des Hebels zu schliessen um eine plastische Verformung der CPA zu vermeiden (Bild16)
Figure /
Bild
15
CATCH MECHANISM
Verrastung
COVER
Abdeckkappe
CABLE SEAL
Kabeldichtung
CARRIER, CABLE SEAL
Halterung
Figure /
Bild
16
SNAP HOOK
Rasthaken
CPA
LEVER
Hebel


