background image

  Te Pari - www.tepari.com - FREEPHONE 0800 837 274  

HD3 Sheep Handler Installation Manual     

1214-V1

6

Racewell HD 

SHEEP HANDLING SYSTEMS

THE COMPRESSOR

We recommend a 12cfm belt driven compressor, if the compressor is too small the 
Racewell will run slowly and may not operate properly 

The compressor does not need to be close to the Racewell in fact having it at some 
distance reduces noise levels in the working area  It is important to run compressors in a 
well ventilated area as close as possible to a main supply near a switchboard - this avoids 
the use of leads which can affect the power input  From time to time the oil level on the 
dipstick should be checked and the water drained from the air reservoir 

Please Note: When turning the compressor on or off use the switch on the compressor. 
Do not turn on or off at the power source switch. 

This applies to all compressors, because air is not discharged, the compressor is being asked to start 
under load and this can burn out its capacitor


ATTACHING THE AIR FITTINGS AND COMPRESSOR HOOK UP

Pipe the air to the compressor to the unit via standard 15mm (1/2 inch) alkathene water 
line  We have some units working with the compressor up to 2kms from the work site 

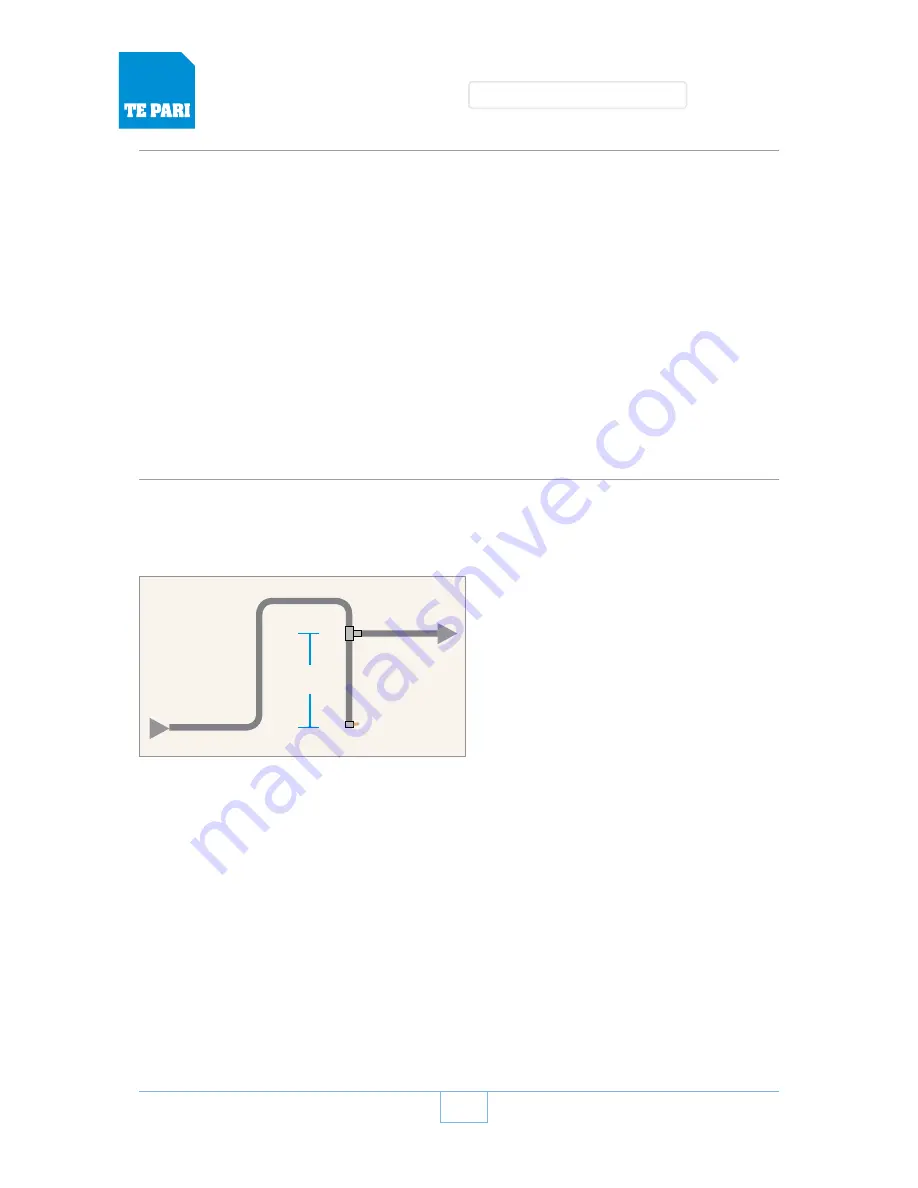
If your compressor is situated some 
distance from your Racewell we 
recommend the airline configuration 
shown here  
This provides a purge tap or ball valve 
so that condensation can be periodically 
removed from the air system 

Assemble the airline and connect to the 
compressor  Plug the compressor into a 

power source and turn the power source on, then using the switch on the compressor turn 
the compressor on  Always turn the compressor on or off at the compressor, not the wall 

The 3 pin socket on the power pack situated under the sheep unit can now be connected 
to the power source  The airline from the compressor (female end) can now be plugged 
into the male fitting on the underside of the sheep unit  This is on the same side as the 
power pack was plugged in  It is just inside the frame, toward the back 

Using the Hoist Switch on the dashboard or the manual hoist lever under the floor section, 
carefully tilt the unit  Disconnect the air from the sheep unit  You now have access under 
the unit  Non-tilt options are tilted for access by hand, just lift up until the weight is taken 
on the safety chain 

From your 

Compressor

To your 

Racewell

Ball or tap valve

1 metre 

(approx)

Summary of Contents for Racewell HD3

Page 1: ...Racewell HD3 HD6 Sheep Handlers Including scale indicator quick setup guides and Racewell sheep handler troubleshooter Installation and Operation Manual...

Page 2: ...6 Attaching air fittings and compressor hook up 6 Installing the autogate 7 Installing the anti backing hook 7 Installing the drafter 7 The remote control 8 Sheep backing gates if not already fitted 8...

Page 3: ...scales on your Racewell Quick set up guides iScale iS 5 or iS 7 14 Iconix FX21 15 Iconix FX41 16 Tru Test XR3000 and ID3000 17 Gallagher Smartscale 800 18 Some uses for your Racewell sheep handler 19...

Page 4: ...Gallagher scales will run directly from the power source Please pay particular attention to the information relating to the use of the sensor eyes on pages 11 and 12 Your Racewell Sheep Handler is des...

Page 5: ...s easy at the end of the day This is optional 4 The moving Crush Wall can now be mounted Do so by placing the fixed end to the rear of the crush in one of the holes provided Use the spring pin at the...

Page 6: ...dard 15mm 1 2 inch alkathene water line We have some units working with the compressor up to 2kms from the work site If your compressor is situated some distance from your Racewell we recommend the ai...

Page 7: ...ball end of the spear can be bolted onto the gate bracket Tighten firmly using second bolt provided 4 The airlines can now be plugged into the ram One goes to the front one to the back Be sure to push...

Page 8: ...d to re programme it to your Racewell before you can use it again SHEEP BACKING GATES IF NOT ALREADY FITTED The standard backing gate can be fitted on either side of your race There are just two bolts...

Page 9: ...This catches the sheep on activation To release the switch move to the downward direction This is a master switch and will over ride any mode TILT OPTION FOOT PEDALS Twin operated foot pedals are supp...

Page 10: ...s that are being carried out e g eyes well forward for the capsule drenching or well back for crutching An added safety feature is that one of the green eyes at the back has to be covered for the blac...

Page 11: ...ys use the black eyes for catching only Use one green eye to shut the entry gate at the time required Position the other green eye so it is always covered by the animal while it is caught Sensor eye p...

Page 12: ...ated wind the screw right in to stop its air supply This screw only controls the speed that the gate shuts If you have this adjusted correctly the gate can be made to operate very smoothly ADJUSTING T...

Page 13: ...te throughput can be increased because the delay in opening the gate can be reduced Mode 3 Disables auto catching and the auto gate but still allows catching with the manual controls The eyes must be...

Page 14: ...0 C OM 1 POW ER ON C OM PORT 2 MODE EID READ PC CONNECT C OM 2 BAUDR ATE 960 0 C OM 2 POWER ON SYSTEM SE TUP PRESS S ELECT SYSTEM INFORMATI ON P RESS SE LECT FLASH MEMORY 4M OK VER G FLASH FIRMWARE V...

Page 15: ...afting zones to set up drafting press the DRAFT LIMITS button The display will briefly show DrAFT 1 Draft limit 1 key in your preference Press the DRAFT LIMITS button again key in the Draft limit 2 fi...

Page 16: ...here on how the draft zones are set from the limits Press the WEIGH MODE key to scroll through until WEIGH MODE HI SPEED is displayed Note the WEIGH MODE key requires quick presses to scroll through...

Page 17: ...ranges and draft to pen options RANGE FROM TO PEN 1 0 15 1 2 15 1 24 0 2 3 24 1 40 0 3 Press the back arrow twice to return to the main weigh screen Press and together to enter the Specialised Setup s...

Page 18: ...the existing entry then key in the new number using the keypad Note Draft limits always put the lesser value at the top and the larger value at the bottom When done press the OK soft key 1 DRAFT MENU...

Page 19: ...n our system we would be delighted to hear about them Crutching Culling EID Applying or reading eartags for performance recording Ear Marking Weighing Auto drafting to pre selected weight ranges Inocu...

Page 20: ...malfunction or failure resulting from the misuse neglect abuse or used for a purpose for which it was not designed or is not suited and no repairs alterations or modifications have been attempted This...

Page 21: ...YSTEMS SERVICE RECORD NOTES Date Serviced Serviced By Next Service Due Date Serviced Serviced By Next Service Due Date Serviced Serviced By Next Service Due Date Serviced Serviced By Next Service Due...

Page 22: ...uses Possible solutions Magic eye s obscured by dust or wool Check the green magic eyes for dust on the lenses Also check they have no loose wool in front of them SYMPTOM Older drafter working slowly...

Page 23: ...ses after sheep are clamped Possible causes Possible solutions Air may be leaking from the dump valve Catch solenoid may be faulty Damage to cylinder piston Check for air leaks beneath the squeeze ram...

Page 24: ...YMPTOM The unit is not holding the sheep Possible causes Possible solutions The unit is designed to operate at 90 130psi Check the ram adjustment on the moving walls allows the ram to apply pressure t...

Page 25: ...r indicator Battery and unit charges must be kept dry SYMPTOM Not automatically drafting or releasing Possible causes Possible solutions Comms cable fault Incorrect indicator settings Communication ca...

Page 26: ...3 433 0077 Email NZ sales nz tepari com Rest of World admin tepari com Thank you for your purchase enjoy your new Racewell Sheep Handling System from the Te Pari team TE PARI PRODUCTS Ltd www tepari c...

Reviews: