background image


Customer Manual 

取扱説明書


409-78004


Rev A 

11 of 31


Attaching 

Attaching 

Attaching 

Attaching and Detaching 

and Detaching 

and Detaching 

and Detaching the Battery Pac

the Battery Pac

the Battery Pac

the Battery Pack

k

k


1.

1.

1.

1.


To attach the battery pack, slide

To attach the battery pack, slide

To attach the battery pack, slide

To attach the battery pack, slide  


 it into the tool until it stops

it into the tool until it stops

it into the tool until it stops

it into the tool until it stops. 

.   


2.

2.

2.

2.


To detach the Battery Pack, 

To detach the Battery Pack, 

To detach the Battery Pack, 

To detach the Battery Pack, pulling out t

pulling out t

pulling out t

pulling out the 

he 

he 

he  battery

battery

battery

battery pack

 pack

 pack

 pack  


 while pressing the latches

while pressing the latches

while pressing the latches

while pressing the latches.

.

.


3.

3.

3.

3.


After inserting 

After inserting 

After inserting 

After inserting the

the

the

the  


  b

b

b

battery Pack, check it is securely in

attery Pack, check it is securely in

attery Pack, check it is securely in

attery Pack, check it is securely in  


 place by pulling it gently.

place by pulling it gently.

place by pulling it gently.

place by pulling it gently. 


Do not press t

Do not press t

Do not press t

Do not press the Latch

he Latch

he Latch

he Latch es

es

es

es 


 when pulling the battery

when pulling the battery

when pulling the battery

when pulling the battery.

.

.

.  


Trigger & Release Button

Trigger & Release Button

Trigger & Release Button

Trigger & Release Button 


The Ram advances when the 

The Ram advances when the 

The Ram advances when the 

The Ram advances when the  Switch Knob

Switch Knob

Switch Knob

Switch Knob  is pressed and stops

 is pressed and stops

 is pressed and stops

 is pressed and stops  


 when the Switch Knob is released.

when the Switch Knob is released.

when the Switch Knob is released.

when the Switch Knob is released. 


To retract the Ram, press the Release 

To retract the Ram, press the Release 

To retract the Ram, press the Release 

To retract the Ram, press the Release lever

lever

lever

lever. The Ram co

. The Ram co

. The Ram co

. The Ram continues to

ntinues to

ntinues to

ntinues to 


  retract while the Release 

retract while the Release 

retract while the Release 

retract while the Release lever

lever

lever

lever is pressed.

 is pressed.

 is pressed.

 is pressed.  


CRIMPING OPERATIONS

CRIMPING OPERATIONS

CRIMPING OPERATIONS

CRIMPING OPERATIONS 


1.

1.

1.

1.


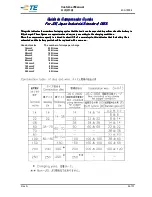
Select an appropriate size of die for the connector 

Select an appropriate size of die for the connector 

Select an appropriate size of die for the connector 

Select an appropriate size of die for the connector   


2.

2.

2.

2.


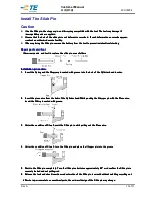
Turn the Slide pin counterclockwise to release the lock and pull it out

Turn the Slide pin counterclockwise to release the lock and pull it out

Turn the Slide pin counterclockwise to release the lock and pull it out

Turn the Slide pin counterclockwise to release the lock and pull it out.

.

.

.  


Summary of Contents for REC-Li250M

Page 1: ... OPERATED COMPRESSION TOOL BATTERY OPERATED COMPRESSION TOOL BATTERY OPERATED COMPRESSION TOOL TE REC TE REC TE REC TE REC Li25 Li25 Li25 Li250 0 0 0M M M M バッテリー バッテリー バッテリー バッテリー油圧式工具 油圧式工具 油圧式工具 油圧式工具 Part Number 2155363 Part Number 2155363 Part Number 2155363 Part Number 2155363 部品番号 部品番号 部品番号 部品番号 215536 215536 215536 2155363 3 3 3 LANGUAGE 言語 ENGLISH FROM2of31to14of31 JAPANISE FROM15of31to31...

Page 2: ...lease read and understand all of the instructions and safety information in this manual to operate the equipment Please read and understand all of the instructions and safety information in this manual to operate the equipment safely safely safely safely CONTENTS CONTENTS CONTENTS CONTENTS Important Safety Precautions 3 of 31 For Safe Operation 4 of 31 Precautions for the crimping tool 5 of 31 Pre...

Page 3: ...leakage of hazardous chemical substances 5 In any of the following cases retract the ram completely and remove the battery Not in use or need repair Changing dies or other attachments A potentially hazardous condition Activation of the tool may cause personal injury if the battery is attached 6 Never operate the tool while the head is pointing in the direction of bystanders The head may break and ...

Page 4: ...ired 9 Do not abuse the cord of the charger Do not carry the charger by the cord Do not yank the cord to disconnect from the outlet Keep the cord clear of heat oil and an accessible sharp point 10 Use the extension cord for outdoor use Use cabtire type extension cord when charging outdoor 11 Maintain tools with care Keep the tool clean for better and safer performance Follow instructions for lubri...

Page 5: ...ntacts Do not expose the pack to water oil or solvents Do not disassemble modify or attempt to repair the battery pack Do not dispose of the battery pack in a fire or as domestic garbage Do not drop or otherwise abuse the battery pack Do not leave the battery pack in locations where it is exposed to a temperature greater than 40 for an extended period Do not short circuit the battery by attaching ...

Page 6: ...ry pack Battery pack BP BP BP BP 14LN 14LN 14LN 14LN JIS JIS JIS JIS Japan Industrial Standard Japan Industrial Standard Japan Industrial Standard Japan Industrial Standard Indent die Indent die Indent die Indent die 6 6 6 6 pieces pieces pieces pieces Nest die Nest die Nest die Nest die 4 4 4 4 piec piec piec pieces es es es Charger Charger Charger Charger CH CH CH CH 25LNW 25LNW 25LNW 25LNW Carr...

Page 7: ...Soft steel ss Stainless W1 2 Soft steel ss Stainless Re bar Cutter 200AT S16 16mm rebar soft steel bar SS41 MAX SD35 Angle Steel Puncher 200AT AP18 Punching capacity φ10 5mm φ13 5mm φ17 5mm holes on 6mm thickness steel Knock out Puncher 200AT 9PD Punching capacity up to B104 115 5mm diameter hole on 3 2mm thickness mild steel Raceway Cutter Raceway cutter 150AT DCM Cutter cassette D1 Cutter casset...

Page 8: ... 200mm2 Battery Pack BP Battery Pack BP Battery Pack BP Battery Pack BP 14LN 14LN 14LN 14LN Battery Type Battery Type Battery Type Battery Type Lithium Lithium Lithium Lithium Ion Ion Ion Ion Battery Battery Battery Battery Output Output Output Output 14 4 V DC 14 4 V DC 14 4 V DC 14 4 V DC Capacity Capacity Capacity Capacity 3 0 A 3 0 A 3 0 A 3 0 Ah h h h Charging Time Charging Time Charging Time...

Page 9: ...ary according to the charging conditions charged These figures are approximate and may vary according to the charging conditions charged These figures are approximate and may vary according to the charging conditions When the compression capacity is reduced to about 1 2 of a normal cycle this indicates that the battery life is When the compression capacity is reduced to about 1 2 of a normal cycle...

Page 10: ...ator When charging is finished the Indicator When charging is finished the Indicator Lamp lights COMPLETION in orange Lamp lights COMPLETION in orange Lamp lights COMPLETION in orange Lamp lights COMPLETION in orange Note If the Indicator Lamp displays HIGH TEMPERATURE remove the Battery from the Charger and allow it to cool down before trying to charge it again 4 4 4 4 When the battery becomes de...

Page 11: ...hen pulling the battery when pulling the battery Trigger Release Button Trigger Release Button Trigger Release Button Trigger Release Button The Ram advances when the The Ram advances when the The Ram advances when the The Ram advances when the Switch Knob Switch Knob Switch Knob Switch Knob is pressed and stops is pressed and stops is pressed and stops is pressed and stops when the Switch Knob is...

Page 12: ...r as far as it goes When crimping sleeve B insert the conductor as far as it goes When crimping sleeve B insert the conductor as far as it goes 9 9 9 9 Press the Trigger until the compression is Press the Trigger until the compression is Press the Trigger until the compression is Press the Trigger until the compression is completed completed completed completed A click will be heard w A click will...

Page 13: ...o Insert the piano wire from the hole of the Cylinder head While pushing the Stopper pin with the Piano wire wire from the hole of the Cylinder head While pushing the Stopper pin with the Piano wire wire from the hole of the Cylinder head While pushing the Stopper pin with the Piano wire wire from the hole of the Cylinder head While pushing the Stopper pin with the Piano wire insert the Slide pin ...

Page 14: ...ration do not replace the broken parts and use the tool again This is tool again This is tool again This is tool again This is the end of the tool life the end of the tool life the end of the tool life the end of the tool life 4 4 4 4 Clean the plastic parts with soapy cloth if they get dirty or dusty Clean the plastic parts with soapy cloth if they get dirty or dusty Clean the plastic parts with ...

Page 15: ...明してありますのでご してありますのでご してありますのでご してありますのでご使用前 使用前 使用前 使用前によくお によくお によくお によくお読 読 読 読みのうえ みのうえ みのうえ みのうえ 正 正 正 正しく しく しく しく安全 安全 安全 安全にご にご にご にご使用 使用 使用 使用ください ください ください ください 目次 安全上のご注意 16 of 31 バッテリー油圧式工具使用上の注意 20 of 31 各部の名称および標準付属品 21 of 31 オプション 別売品 のご案内 22 of 31 用途 23 of 31 仕様 23 of 31 標準圧着可能回数 24 of 31 ダイスと電線の組合せ表 24 of 31 使用方法 25 of 31 スライドピンの取付け手順 29 of 31 保守 点検 31 of 31 修理のときは 31 of 31 ...

Page 16: ...Customer Manual 取扱説明書 409 78004 Rev A 16 of 31 安全上 安全上 安全上 安全上のご のご のご のご注意 注意 注意 注意 ...

Page 17: ...Customer Manual 取扱説明書 409 78004 Rev A 17 of 31 ...

Page 18: ...Customer Manual 取扱説明書 409 78004 Rev A 18 of 31 ...

Page 19: ...Customer Manual 取扱説明書 409 78004 Rev A 19 of 31 ...

Page 20: ...Customer Manual 取扱説明書 409 78004 Rev A 20 of 31 バッテリー バッテリー バッテリー バッテリー油圧式工具使用上 油圧式工具使用上 油圧式工具使用上 油圧式工具使用上のご のご のご のご注意 注意 注意 注意 ...

Page 21: ...Customer Manual 取扱説明書 409 78004 Rev A 21 of 31 各部 各部 各部 各部の の の の名称 名称 名称 名称および および および および標準付属品 標準付属品 標準付属品 標準付属品 バッテリー式油圧工具 TE REC Li250M ...

Page 22: ...タ 200AT S16 鉄筋コンクリート用棒鋼 軟鋼材 SS41 SD35以下 D16 φ15 8 以下 アングルパンチャ 200AT AP18 穴径 φ10 5 φ13 5 φ17 5 等辺山形鋼 50x50xt6mm 平鋼 50xt6mm ダクター D1 D2 D15 チャンネル S D1 S D2 パンチャ 200AT 9PD 軟鋼板 SPCC T3 2mm レースウェイカッタ レースウェイカッタ 150AT DCM カッタカセット D1 カッタカセット S D1 カッタカセット D2 カッタカセット D15 カッタカセット P 1 カッタカセット P 2 レースウェイ 200AD DCM アタッチメント レースウェイカッタ150AT DCMをTE REC Li250Mに取り付ける には レースウェイアタッチメント200AD DCMが必要です 適用切断物 D1 DP1 適用切断物 S...

Page 23: ...工具 TE REC Li250M バッテリーパック BP 14LN 充電器 CH 25LNW 注意 注意 注意 注意 バッテリーパック バッテリーパック バッテリーパック バッテリーパック BP BP BP BP 14LN 14LN 14LN 14LN は は は は 充電器 充電器 充電器 充電器 CH CH CH CH 25LNW 25LNW 25LNW 25LNW 以外 以外 以外 以外の の の の充電器 充電器 充電器 充電器で で で で充電 充電 充電 充電することはできません することはできません することはできません することはできません ...

Page 24: ...09 78004 Rev A 24 of 31 標準圧着可能回数 標準圧着可能回数 標準圧着可能回数 標準圧着可能回数 1 1 1 1 回 回 回 回の の の の満充電 満充電 満充電 満充電で で で で可能 可能 可能 可能な な な な圧着回数 圧着回数 圧着回数 圧着回数の の の の目安 目安 目安 目安 ダイス ダイス ダイス ダイスと と と と電線 電線 電線 電線の の の の組合 組合 組合 組合せ せ せ せ表 表 表 表 ...

Page 25: ...バッテリーパック バッテリーパック バッテリーパック バッテリーパックの の の の使用時間 使用時間 使用時間 使用時間が が が が著 著 著 著しく しく しく しく低下 低下 低下 低下してきたときは してきたときは してきたときは してきたときは バッテリーパック バッテリーパック バッテリーパック バッテリーパックの の の の経済寿命 経済寿命 経済寿命 経済寿命とお とお とお とお考 考 考 考えいただき えいただき えいただき えいただき 新 新 新 新しい しい しい しいバッテリーパック バッテリーパック バッテリーパック バッテリーパックと と と と交換 交換 交換 交換してください してください してください してください ...

Page 26: ...Customer Manual 取扱説明書 409 78004 Rev A 26 of 31 ...

Page 27: ...Customer Manual 取扱説明書 409 78004 Rev A 27 of 31 ...

Page 28: ...くなると なくなると なくなると なくなると モーター モーター モーター モーターが が が が停止 停止 停止 停止する する する する場合 場合 場合 場合が が が が ありますが ありますが ありますが ありますが これは これは これは これはバッテリーパック バッテリーパック バッテリーパック バッテリーパックの の の の電池保護機能 電池保護機能 電池保護機能 電池保護機能によるものであり によるものであり によるものであり によるものであり 故障 故障 故障 故障ではありません ではありません ではありません ではありません この この この この場合 場合 場合 場合は は は は バッテリーパック バッテリーパック バッテリーパック バッテリーパックを を を を充電 充電 充電 充電してからご してからご してからご してからご使用下 使用下 使用下 使用下さい...

Page 29: ...Customer Manual 取扱説明書 409 78004 Rev A 29 of 31 スライドピン スライドピン スライドピン スライドピン取付 取付 取付 取付け け け け手順 手順 手順 手順 ...

Page 30: ...Customer Manual 取扱説明書 409 78004 Rev A 30 of 31 ...

Page 31: ...Customer Manual 取扱説明書 409 78004 Rev A 31 of 31 保守 保守 保守 保守 点検 点検 点検 点検 修理 修理 修理 修理のときは のときは のときは のときは ...

Reviews: