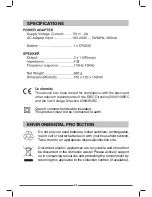
background image

TEAC CORPORATION

1-47, Ochiai, Tama-shi, Tokyo 206-8530, Japan

UMA0565A

Summary of Contents for CRX-300i

Page 1: ...Stereo Clock Radio for iPod and iPhone Please read through this manual carefully before operating CRX 300i Owner s Manual iPhone shown is not included Stereo Clock Radio for iPod and iPhone TEAC CRX 300i Manual Size 190 130mm 2011 09 19 ...

Page 2: ......

Page 3: ...st time so that you will be able to enjoy your new TEAC equipment for a long time CONTENTS PAGE Important Safety Instructions 2 Introduction 4 Preliminaries 4 Controls and Connections 5 Display 7 Backup Battery 8 Getting Started 9 Power Control 9 Setting the Time and Date 9 Selecting a source 10 Adjusting the volume 11 Listening to FM radio 11 Radio presets 12 iPod dock and adapters 12 Docking an ...

Page 4: ...ghtning storms or when unused for long periods of time Refer all servicing to qualified service personnel Servicing is required when the apparatus has been damaged in any way such as the power supply cord or plug is damaged liquid has been spilled or objects have fallen into the apparatus the apparatus has been exposed to rain or moisture does not operate normally or has been dropped Warning To re...

Page 5: ...t into an outlet on a circuit different from that to which the receiver is connected Consult the dealer or an experienced radio TV technician for help ELECTRICAL INFORMATION Use this appliance only with the supplied AC Adaptor Using non approved power supplies will void the warranty Mains Supply The mains operating voltage of the AC Adaptor is marked on a rating plate on the AC Adaptor The means o...

Page 6: ...on the Owner s manual We suggest you retain the packaging If you dispose of it do so having regard to any recycling regulations in your area CONTENTS The carton should contain The CRX 300i Clock Radio AC Adapter 3 5mm Cable 3 x iPod Adapter Owner s Manual If any items are missing or damaged contact your nearest TEAC store for a replacement Have your receipt ready when you call Retain the packaging...

Page 7: ...CONTROLS AND CONNECTIONS FRONT VIEW 5 ...

Page 8: ...6 CONTROLS AND CONNECTIONS TOP VIEW BACK VIEW 12 24 hr AUDIO IN DC IN 5V ...

Page 9: ...7 DISPLAY DISPLAY DIMMER The display brightness can be set to one of 3 levels Press the SNOOZE DIMMER button repeatedly to set the display brightness to one of the options of high medium or off ...

Page 10: ...ry cover anti clockwise to the unlocked symbol 2 Lift out the battery cover 3 Fit a CR2032 battery Included observing polarity as shown below 4 Replace the battery cover with the slot aligned to the unlock symbol 5 Turn the cover to align the slot with the lock symbol to lock it in place DISPOSAL OF BATTERIES Dispose of used batteries with regard to the recycling regulations in your area DO NOT sh...

Page 11: ...DBY CONTROL To turn the radio on Press the ALARM RESET button on the top panel The unit will turn on and the iPod FM or AUX function indicator will light to show the selected audio source To set the radio to Standby Press the ALARM RESET button on the top panel The unit will set to Standby All function indicators will turn off TIME AND DATE DISPLAYS SETTING THE TIME AND DATE When first switched on...

Page 12: ... this setting The date left digits will flash Press the SET or SET button to set the correct date Press the ENTER button to confirm this setting The date has been set SETTING THE TIME AND DATE USING THE TEAC iDock APPLICATION The time date and alarm settings for your clock radio can also be set via a TEAC iDock application for iPhone or iPod touch Once this application has been installed you can s...

Page 13: ... show the tuned frequency After a few seconds the display will revert to show the time unless you change any FM settings for example re tuning To auto tune to FM stations Press and hold the SET or SET button to auto tune up or down the band The radio will search in the direction indicated and the tuning frequency will be displayed whilst searching When a usable station is detected the radio will s...

Page 14: ...o will revert to normal operation To recall any preset 1 20 Press the PRESET button repeatedly to step through the preset stations stored When you stop browsing through the presets the display will change briefly to show the station frequency before returning to display the time RETRACTABLE DOCK This model features a retractable iPod iPhone dock that is built in to the left side of the unit To ope...

Page 15: ...er in the packaging If so fit the adapter by pressing it gently into the Docking Bay as shown above NOTE Do not dock an iPod without fitting the correct adapter you may damage the iPod and your unit NOTE When inserting an iPhone iPod Touch into the CRX 300i make sure the correct adapter is used The adapter should have been supplied with the Apple product If otherwise the adapter can be purchased f...

Page 16: ... the music you want to play using the controls on the iPod Once an iPod is docked and playing you can operate some of the functions from the front panel controls Playback functions Press the ENTER button to toggle between Play and Pause mode at any time Press the SET or SET button to select the next or previous track on your iPod iPhone iPod touch To play a docked iPhone iPod touch Unlock the iPho...

Page 17: ...ny time Press the SET or SET button to select the next or previous track on your iPod CONNECTING AUDIO SOURCES TO THE AUDIO IN JACK The AUDIO IN jack may be used to connect sound sources with a Line or Headphone analogue output to play through your unit These may include iPod models that cannot be docked to the unit iPod Shuffle MP3 players CD walkman players Tape walkman players Personal computer...

Page 18: ...e up to the sound of radio music from an iPod or a buzzer Setting the Alarm 1 alarm time Press and hold the ALARM button The Alarm 1 indicator will light and the hours digit will flash 1 Press the SET or SET button to set the correct alarm hour 2 Press the ENTER button to confirm this setting The minutes digits will flash 3 Press the SET or SET button to set the correct alarm minutes 4 Press the E...

Page 19: ...on the display The indicators shown next to each option will light on the display to confirm the mode that is set Alarm 1 activated Alarm 2 activated Alarm 1 2 activated No alarms activated Remember to set the unit to Standby before going to bed If you have chosen FM radio as wake up mode remember to tune to IMPORTANT NOTES a station If you have chosen iPod as wake up mode remember to dock your iP...

Page 20: ...e unit iPhone in this section also applies to iPod touch Advanced features Weather and temperature display Automatic clock setting via the iPhone application Alarm setting via the iPhone application Radio operation via the iPhone application Installing the application The TEAC iDock application must be installed on the iPhone to enable the advanced features Press the INPUT button repeatedly to sel...

Page 21: ...s located at the bottom of the screen to select the function you want Once this has been set the time date weather and temperature displays of your clock radio will synchronise with the latest information available from the iPhone TIP Remember that the TEAC iDock application will run on your iPhone when it is not docked to display time date and weather information Application help Clock function A...

Page 22: ...ck screen 1 Alarm setting icon 2 Time and date displays 3 Alarm time displays 4 Location and weather summary Setting the alarms via the application NOTE When an iPhone is docked and the TEAC iDock application is running alarm settings made in the application will override alarm settings made on your clock radio To set alarm times and wake up music From the clock display screen touch the alarm sett...

Page 23: ...alarm settings press the DONE icon to return to the clock screen NOTE When the iPhone is docked and the alarms are set through the application the wake up mode will always be the music you selected from the iPhone WEATHER FUNCTION Touch the Weather icon to launch the weather application From the weather screen you can choose sub screens that display detailed information of the current weather cond...

Page 24: ...wheel sets tuning in 1MHz steps the lower half in 0 1MHz steps For example to tune 105 5MHz set the upper wheel to 105 the lower wheel to 5 Both the iPhone display and the clock radio display will tune Storing a station as a preset NOTE If you know the station frequencies of your favourite stations you can enter the frequencies into the application and store them as presets before docking your iPh...

Page 25: ... you want to rename The text entry keypad will appear Enter the preset name APPLICATION SETTINGS From the Application setting screen you can choose the following settings Flash colon Set to ON for a flashing colon on the clock display Brightness Set the display brightness for the application useful to make the display dimmer when docked at night 24 Hour Mode Set the clock mode to your preference o...

Page 26: ...set the alarm to wake you wake up mode symbol s will be displayed Check also that the unit is set to Standby before you go to bed If you have docked an iPhone with the application running check that the application settings are correctly made in the application No sound low volume from AUDIO IN source Check that the volume control is turned up on the AUX source No display The display dimmer may ha...

Page 27: ...not be discarded in the domestic waste Please actively support us in conserving resources and protecting the environment by returning this appliance to the collection centres if available SPECIFICATIONS Conformity This device has been tested for compliance with the basic and other relevant requirements of the EMC Directive 2004 108 EC and the low Voltage Directive 2006 95 EC Class II construction ...

Page 28: ...TEAC CORPORATION 1 47 Ochiai Tama shi Tokyo 206 8530 Japan UMA0565A ...

Reviews: