


EN-
7
CLOCK SETTING
S
etting the Clock
- can only be set during standby mode
1.
Press"PROG/CLOCK ADJ" button. Either "12H" or "24H" will display.
2. Choose 12/24 HRS by pressing button, then press
"PROG/CLOCK ADJ"
button.
3. Press button for HOUR setting, then press
"PROG/CLOCK ADJ"
button to store.
4. Press button for MINUTES setting and press
"PROG/CLOCK ADJ"
button to store.
S
etting the Alarm
1 (
wake to CD, iPod, Tuner
)
1. Press the “ALARM 1” button, the ALARM 1 icon will be
shown on the display.
2. Press the
"FUNCTION" button
to select your desired source
CD, iPOD or TUNER, then press VOL- or VOL+ to adjust the
volume level.
3. Press the or button to set the
hours
.
Press “ALARM 1” button to store.
4. Then, Press the or buttons to set the
minutes
.
Press “ALARM 1” button to store.
5. Switch the system to Standby mode. At the preset time the selected source will play,
press ALARM 1 button to cancel, The ALARM 1 icon is still be shown on the display for
function the next day.
6. To completely turn off ALARM 1 function, press ALARM 1 button once again, the
"ALARM 1" icon will not be shown again.
NOTE: If the selected source CD is not available when the preset time is
reached, BUZZER will be selected automatically.
S
etting the Alarm
2 (
Buzzer
)
1. Press the "ALARM 2" button, the ALARM 2 icon will be shown on the display.
2. Press the or buttons to set the hours. Press "ALARM 2" button to store.
3. Then, Press the or buttons to set the minutes. Press "ALARM 2" button to store.
4. Switch the system to Standby mode. At the preset time the BUZZER source will play,
press ALARM 2 button to cancel, The ALARM 2 icon is still be shown on the display for
function the next day.
5. To completely turn off ALARM 2 function, press ALARM 2 button once again, the
"ALARM 2" icon will not be shown again.
S
leep Function
The sleep function can only be set while the unit is on in either RADIO, CD or iPod
mode. To activate, press the “SLEEP” button on the remote handset. Continue
pressing the “SLEEP” button, one press at a time, to set the timer to either 90,
60, 30, 15 minutes or OFF.
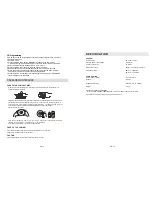
Remote Control Handset
REMARKS:
Insert 2 “AAA” batteries (not included) before using.
1
3
4
5
2
15
6
7
8
10
11
12
13
14
24
23
22
21
20
19
18
17
16
9
1. MUTE Press to activate/deactivate
MUTE function.
2. STANDBY Press to turn power on/off.
3. FUNCTION Press to select the system for
CD/TUNER/iPod.
4.CD Press to switch to CD mode.
5.PROG/ADJ In CD or Tuner mode, press to set CD
or Tuner memory
.
In
S
tandby mode,
p
ress to set clock
.
6.FOLDER- In MP3 mode, press to go to previous
/PRE- album number. In Tuner mode,
press to go to previous pre-set
station. In iPod mode, press to choose
a menu item.
7. In MP3 mode, press to go to the next
/PRE+ album number. In Tuner mode, press
to go to next pre-set station. In iPod
mode, press to choose a menu item.
8. /MENU Press the MENU key to show iPod menu.
9. /ENTER In iPod MENU mode, press the ENTER
button to choose the menu.
10. /-10
S
elects the CD tracks (-10).
11. /+10
S
elects the CD tracks (+10).
12.DBBS Press the DBBS button to
change the bass boost.
13.
Press to reduce volume.
14. TUNER Press to switch to
T
uner mode
15.
i
Pod Press to switch to iP
o
d mode.
16.ALARM2 Press to set or deactivate the ALARM 2 function
17. ALARM1 Press to set or deactivate the ALARM 1 function
18.PLAY MODE In CD mode, press to switch between Repeat
1
, R
ep
eat
All
, RANDOM
and
INTRO mode
19.ST./MONO In Tuner mode, press to switch between FM MONO and FM STEREO
20.ID3
P
ress to show the I
D
3 Tag (if any)
21. SLEEP Press to activate sleep function using
CD/RADIO/iPod to turn off
automatically after 90, 60, 30 or 15 minutes.
22.SNOOZE
P
ress to activate the SNOOZE
function during
ALARM 1 or ALARM 2 is
activating,
the ALARM 1 or ALARM 2 will activate aga
i
n 6 minutes later
.
To
cancel, press ALARM 1 or ALARM 2 accordingly
23. /BAND
In CD mode, press to terminate CD playback.
In Tuner mode, press to switch between AM or FM.
24. In CD mode, press once to start playback. Press once more to pause
the disc play temporarily..
25. In Tuner mode, press to increase to the next frequency, or press and
hold to search forward.
26. In CD mode, press once to skip to previous track, press and hold to
search backwards. In
T
uner mode, press to decrease frequency.
27. EQ Press to select the presets EQ mode.
28. Press to increase volume.
25
26
28
27
This unit provides 4 sound modes to enhance your listening quality. You can select
the desired effect by pressing the”EQ” button repeatedly for the following sequence
FLAT
CLASSIC
ROCK POP JAZZ
EN-
8