background image

EN-1

4

Specifications subject to be changed without notice.

CARE AND MAINTENANCE

CARE OF THE COMPACT DISC

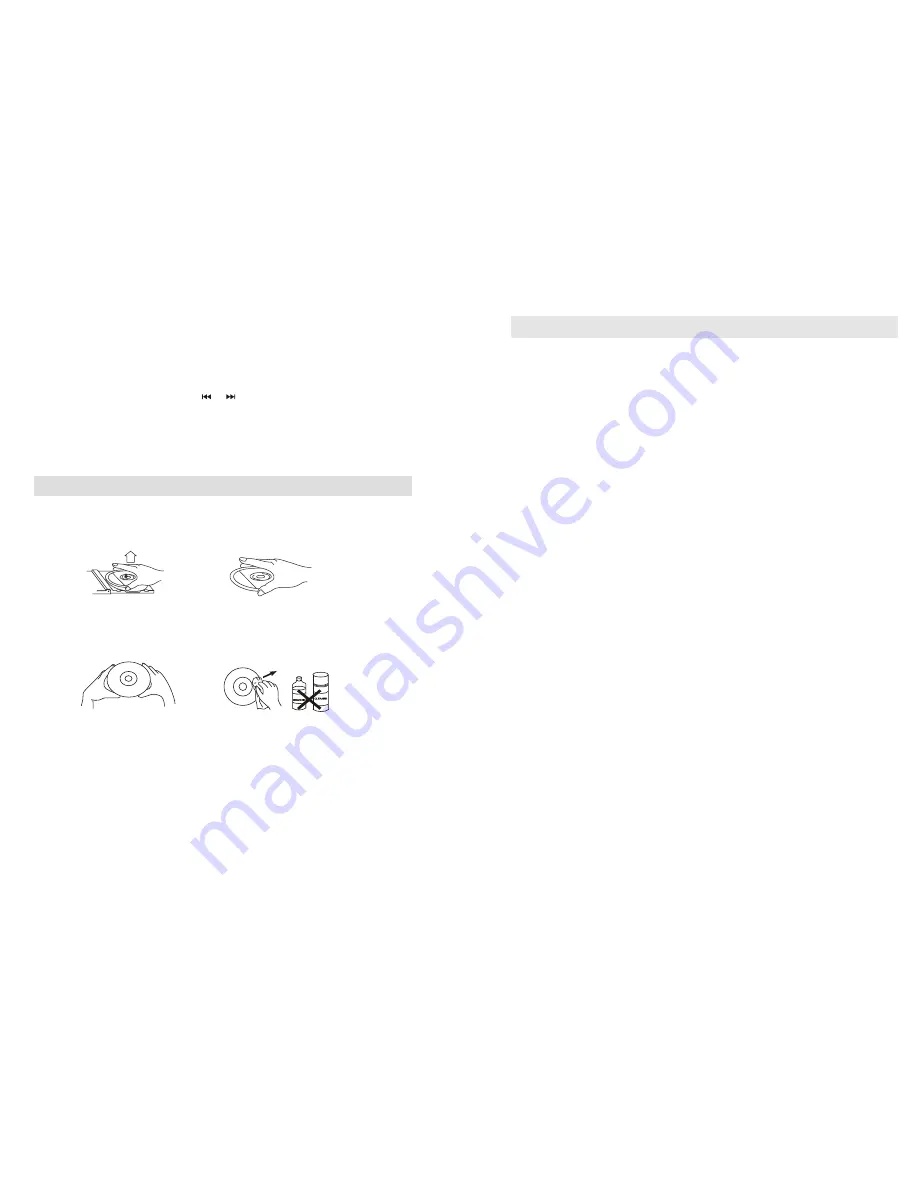
•  To remove a disc from its storage case, press down on the center of the case  and lift the disc out, 
     holding it carefully by the edges.

•  Fingerprints and dust should be carefully wiped off the disc’s recorded surface with a soft cloth. Unlike 
    conventional records, compact discs have no grooves  to   collect  dust  and   microscopic  debris, so  
    gently  wiping  with  a soft cloth should remove most particles. Wipe  in  a  straight line  from  the  inside  
    to  the outside of the disc. Small dust particles and light stains will have absolutely no
    effect on reproduction quality.

•  Clean  the  disc  periodically   with   a   soft,   lint - free , dry   cloth. Never   use detergents  or  abrasive  
     cleaners  to  clean   the  disc.  If   necessary, use  a  CD  cleaning kit.

•  Never write on or affix labels to the surface of compact discs.

CARE OF THE  CABINET

If the cabinet becomes dusty wipe it with a soft dry dust cloth. Do not use any wax,
polish sprays, or abrasive cleaners on the cabinet.

CAUTION

Avoid spilling any water or other liquids

 inside the unit while cleaning.

EN-

1

3

CD P

rogramming

Up to 

20

 tracks can be programmed to play in any sequence. Before use, be sure to 

press the STOP button.
1. Set in CD mode.
2. Press the “

PROG/ADJ

” button, “MEMORY” will 

flash

 on the LCD display.            

It will indicate program number and digits of the track number to be programmed.

3. Select a desired track by pressing the         or         buttons.
4. Press the “

PROG/ADJ

” button to store the track into memory.

5. Repeat steps 3 and 4 to enter additional tracks into the memory if desired.

6. When all the desired tracks have been programmed, press the PLAY/PAUSE

    button to play the disc in the order you have programmed.  

7. Press the 

"

STOP

"

 button twice to terminate programmed play. 

T

he "PROGRAM"  

    icon will disappear on the screen.   

SPECIFICATION

MP3 TRACK FORMAT REQUIREMENT:
- Bit rate : 32 KBPS 

-

320KBPS, SAMPLING RATE : 32 KHZ, 44.1 KHZ and 48 KHZ  decode format.

GENERAL

Power supply 


: AC 240V ~ 50Hz

Standby power consumption   


: 2.6 Watts

Power consumption  


: 16 Watts

Dimensions of unit   


: 250(W) X 179(H) X 103(L)mm

Frequency range   


: AM 515 - 1650 KHz


: FM 87.5 - 108.5 MHz

AUDIO SECTION

Output Power (RMS) 


: 2 x 1.5W R.M.S

Speaker   


: 8 Ohms

Supported Disc type  


: MP3, CD, CD-R, CD-RW

Weight    


: 7 

K

gs

Summary of Contents for CRX260i

Page 1: ...LUG TO WIDE SLOT Know these sa saf afe fet ety ty y symbols CAUTION RISK OF ELECTRIC SHOCK DO NOT OPEN CAUTION TO REDUCE THE RISK OF ELECTRIC SHOCK DO NOT REMOVE COVER OR BACK NO USER SERVICEABLE PART...

Page 2: ...a TEAC Authorised Service Centre Where In Home service Pick up is not available the purchaser is required to send the product to the nearest TEAC Authorised Service Centre for repair In this event a c...

Page 3: ...connection with the sale of any equipment other than as stated in this warranty and outlined above 11 In no event will TEAC be responsible or liable for indirect or consequential damages from interrup...

Page 4: ...ice Centre 3 Please have your purchase receipt as your proof of purchase and the following details completed for a valid Warranty Owner s Name Owner s Address Postcode Model Name No Serial No Dealer s...

Page 5: ...re that there is space around the unit for ventilation CONNECTION 1 Connect the power adaptor to AC outlet 2 When you first plug the unit into the mains the unit will go into standby mode the display...

Page 6: ...7 8 10 11 12 13 14 24 23 22 21 20 19 18 17 16 9 1 MUTE Press to activate deactivate MUTE function 2 STANDBY Press to turn power on off 3 FUNCTION Press to select the system for CD TUNER iPod 4 CD Pres...

Page 7: ...cted to this unit the battery will start charging Fig 1 this icon will show when the battery is charging Fig 2 this icon will show when the battery is fully charged Charging Charged 1 2 EN 9 LISTENING...

Page 8: ...sed during play or pause mode CD play will go to stop mode SKIP SEARCH MODE SKIP UP SKIP DOWN 1 During play or pause mode If button is pressed it will go to next track and display the track number and...

Page 9: ...binet CAUTION Avoid spilling any water or other liquids inside the unit while cleaning EN 13 CD Programming Up to 20 tracks can be programmed to play in any sequence Before use be sure to press the ST...

Page 10: ...stern Highway LAWSON 2783 02 47 59 1254 02 47 59 2312 Iwac Repairs Pty Ltd Shop 8 12 Statham Street BENNETTS GREEN 2290 02 49 48 1067 02 49 48 1069 Visual Audio Services 510 Chapple Street PO BOX 76 B...

Page 11: ...PENRITH 2750 02 47 22 8550 02 47 22 9949 Eastport Televideo Service 49 Swift Street PORT MACQUARIE 2444 02 65 84 4408 02 65 84 4429 BJRAE Electronics 2 199 Adelaide Street RAYMOND TERRACE 2324 02 49...

Page 12: ...r City TV Video Shop 3 1 Mellefont Street GLADSTONE 4680 07 49 72 9495 07 49 72 9495 Lloyd Lawrence Electronics Shop 8 9 5 Torquay Road HERVEY BAY 4655 07 41 24 3787 07 41 24 3787 Professional VCR Sal...

Page 13: ...2 78 8387 K T National Electronics 1 Hobart Road SANDHILL 7249 03 63 44 5665 03 63 43 0466 VIC Name Address Phone Fax Border Video TV Service 362 Griffith Road LAVINGTON 2641 02 60 40 2229 02 60 40 21...

Page 14: ...4047 08 97 21 1161 Busselton TV Video 65B Strelley Street BUSSELTON 6280 08 97 54 4457 08 97 54 4824 Electronic Plus Unit 3 11 Egan Street CARNARVON 6701 08 99 41 3690 08 99 41 3660 Esperance Communi...

Page 15: ...TEAC CUSTOMER CARE CENTRE TCCC Free call 1800 656 700 Between Monday to Friday EST 9AM to 5PM...

Reviews: