background image

32


TASCAM  DR-2d

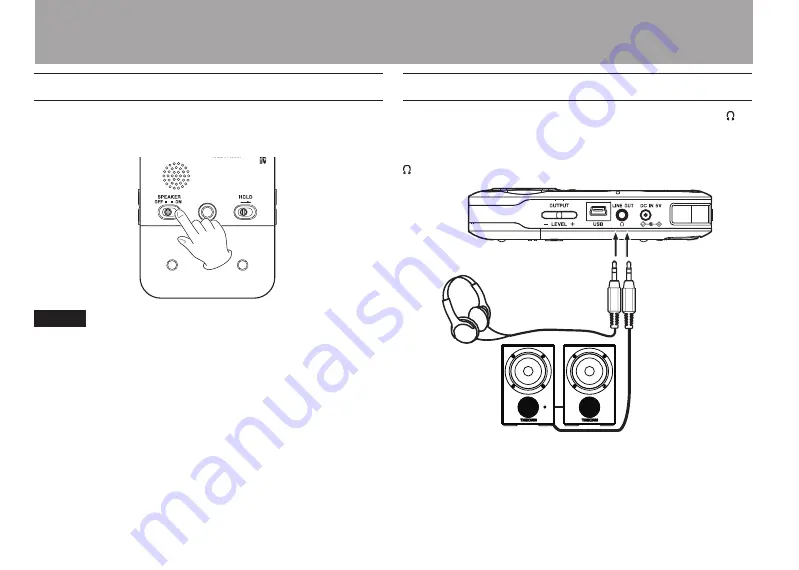
Using the built-in speaker

Set the 

SPEAKER

 switch to 

ON

 on the bottom panel to listen 

to a playing track through the built-in speaker.

NOTE

Even  when  ON,  no  sound  is  output  during  recording,  in 

recording standby, when headphones are connected, or input 

monitor is activated.

Connecting monitors and headphones

To listen with headphones, connect them to the 

LINE OUT/


connector.
To listen with an external monitoring system to the 

LINE OUT/

 connector.

Headphones

Powered monitor speakers or

amplifier and speakers


3–Preparation

Summary of Contents for DR-2d

Page 1: ...DR 2d Linear PCM Recorder D01101220B OWNER S MANUAL This device has a serial number located on the bottom panel Please record it and retain it for your records Serial number __________________...

Page 2: ...tion manual may cause harmful interference to radio communications However there is no guarantee that interference will not occur in a particular installation If this equipment does cause harmful inte...

Page 3: ...s of time 14 Refer all servicing to qualified service personnel Servicing is required when the apparatus has been damaged in any way such as power supply cord or plug is damaged liquid has been spille...

Page 4: ...together The batteries could rupture or leak causing fire injury or stains around them Do not carry or store batteries together with small metal objects The batteries could short causing leak rupture...

Page 5: ...TASCAM DR 2d 5...

Page 6: ...y 26 Cautions about the use of the battery 26 Using the remote control 27 Precautions for use of the remote control 28 Start up shutdown 28 Inserting and removing SD cards 29 Inserting the SD card 29...

Page 7: ...th Files and Folders BROWSE screen 52 Screen navigation 52 Icons on the BROWSE screen 52 File operations 53 Folder operations 54 6 Playback 56 Adjusting playback volume 56 Setting the playback area AR...

Page 8: ...g 75 Setting the search speed 75 Turning the unit power OFF automatically 75 Backlight Auto OFF setting 75 Adjust the display contrast 75 Adjust the backlight brightness 75 Remote control setting 76 S...

Page 9: ...s a new file Built in 0 6 W monaural output speaker Built in effect reverb can be used during recording and playback Auto record function starts recording automatically when a set sound input level is...

Page 10: ...g the package not to damage the items Keep the package materials for transportation in the future Please contact the store where you purchased this unit if any of these items are missing or have been...

Page 11: ...plications via Internet intranets and or other networks other content distribution systems pay audio or audio on demand applications and the like or on physical media compact discs digital versatile d...

Page 12: ...d A list of SD cards that have been tested with this unit can be found on the TASCAM web site www tascam com Precautions for use SD cards are delicate media In order to avoid damaging a card or the ca...

Page 13: ...active 3 Display Shows a variety of information 4 HOME key Press this key to stop recording and playback or to end recording standby When a setting screen is open press to return to the Home Screen On...

Page 14: ...this key to move up a level 9 key Press this key during playback or when playback is stopped to skip to beginning of the next track Press and hold this key to search forward On the setting screens us...

Page 15: ...elected item When the Home Screen is open use the wheel to adjust the file playback position t ENTER MARK key When a setting screen is open use this to confirm selections When recording use it to add...

Page 16: ...nect with a computer USB port a LINE OUT jack Use this to connect with headphones or the line input jack of an amp or other equipment s DC IN 5V jack Connect a TASCAM PS P520 AC adaptor purchased sepa...

Page 17: ...ected or input monitor is activated k Tripod attachment screw hole 1 4 inch Use this to attach the unit to a tripod or mic stand CAUTION Tighten the unit securely to the tripod or mic stand to prevent...

Page 18: ...d this to search a track in reverse 2 STOP key Press to stop playback and recording 3 RECORD key Press to start and pause recording 4 key Press this key briefly to move to the start of the next file P...

Page 19: ...control off Key control on 4 Part cancel status Part cancel off Part cancel on 5 Input monitor status Input monitor off Input monitor on 6 Power supply status When a battery is being used a battery ic...

Page 20: ...n be saved in MP3 files 0 Playback position display The current playback position is shown by a bar As playback progresses the bar extends to the right q Elapsed time Shows the elapsed time hours minu...

Page 21: ...opens when you press the RECORD key to start recording standby mode and stays open when you press the RECORD key again to start recording This status of the power and the effect use appears the same...

Page 22: ...ars in hours minutes seconds w Peak value in decibels dB Peak recording level values are shown digitally e Recording mode sampling frequency Shows the recording file format and sampling frequency Menu...

Page 23: ...d and appear as light letters on a dark back ground and press the ENTER MARK key to open a setting screen Example REC SETTINGscreen 3 Use the wheel to select highlight a setting item Example setting t...

Page 24: ...rn to the Home Screen Use this to answer NO to a confirmation message ENTER MARK key Use this to confirm the selection of a setting item or to answer YES to a confirmation message key Use this to move...

Page 25: ...amount of power remaining and allow the unit to accurately determine whether power is available for proper operation See Setting the type of batteries on page 76 NOTE Manganese dry cell batteries R6 c...

Page 26: ...pulling toward 2 2 Install the coin shaped lithium ion battery CR2025 into the holder with the correct orientation 3 Reinsert the battery holder into the remote control When to change the battery Rep...

Page 27: ...f the battery cover the contacts with tape to prevent them from touching other batteries or metal objects Follow the disposal instructions written on the battery or pro vided by the local government w...

Page 28: ...y clean any residue from inside the battery compartment and install a new battery When using other devices controlled by infrared rays use of this remote control might operate these devices by mistake...

Page 29: ...rt the SD Card into the slot as shown in the following illustration until it clicks into place NOTE An SD card is already installed when the unit is shipped from the factory If you want to use this ca...

Page 30: ...format the card in this unit at any time See System Settings and Formatting on page 75 CAUTION Please use a PS P520 AC adapter sold separately or make certain that there is sufficient remaining batter...

Page 31: ...or and use the wheel to change values 4 Press the ENTER MARK key to confirm the change and return to the MENUscreen NOTE You can set the unit to automatically add the date and time to file names See S...

Page 32: ...N no sound is output during recording in recording standby when headphones are connected or input monitor is activated Connecting monitors and headphones To listen with headphones connect them to the...

Page 33: ...e dual recording Selecting file format sampling frequency and maximum file size Select the audio file type that you want to record before you start recording 1 Press the MENU key to open the Menu Scre...

Page 34: ...ng the unit will automatically continue recording in a new file Depending on the file format the amount of recording time will differ for the same file size Recording automatically stops if recording...

Page 35: ...eo mini jack When a microphone cable is connected to the MIC IN jack the input microphone signal becomes the input source When LINEis selected sets the source as the line level signal input to the lef...

Page 36: ...o monitor when you are recording with a microphone If you use speakers to monitor the sound output from the speakers may also be recorded causing a poor recording and even feedback NOTE Try using one...

Page 37: ...nnector Point the mics at the sound source and place the unit in a stable location where there is little vibration Recording an external device LINE IN Use a stereo miniplug cable to connect to the ou...

Page 38: ...thout causing the PEAK indicator to light red when the loudest sounds occur When you have selected MIC as the input source and are using the built in microphone or MIC IN jack if you find the level to...

Page 39: ...the distance and angle between the microphone and the sound source The angle and distance of the microphone can also change the character of the recorded sound Use the auto gain control and limiter fu...

Page 40: ...er overdubbing By overdubbing you can play an instrument or sing as you play back a saved track and mix and record both sounds in a new file NOTE You cannot overdub if input monitoring is OFF or the P...

Page 41: ...l to select MONITOR highlighted in inverse and press the ENTER MARK key MONITORscreen appears 3 Use the wheel to select INPUTand press the key or ENTER MARK key 4 Use the wheel to select ON Input moni...

Page 42: ...he MONITOR screen to adjust the playback volume level NOTE When input monitoring is ON and during overdub recording the PEAK indicator shows the maximum level of the combined input and playback signal...

Page 43: ...th the highest possible level and a second recording with a slightly low level as a backup at the same time NOTE Input must be set to MIC to enable dual recording See Setting the input functions on pa...

Page 44: ...rding The options are OFF default setting AUTOand LMT OFF Level control is disabled AUTO The input gain of the unit is changed according to the input level adjusting loud and quiet sounds to the same...

Page 45: ...e file name is given as follows DR0000_0000_AUTO wav Playback of files created using dual recording See Chapter 6 for details about file playback Press the DUAL key during playback of a file created u...

Page 46: ...put the unit into recording standby Recording starts automatically when the input signal exceeds the STARTLEVEL If the input volume drops below the set level for 5 or more seconds recording pauses aut...

Page 47: ...file size set in advance is exceeded 1 Press the MENU key to open the Menu Screen 2 Use the wheel to select REC SETTING highlighted in reverse and press the ENTER MARK key REC SETTINGscreen appears 3...

Page 48: ...when paused and during playback You can use this function to identify points to create shortcuts to the beginning of songs for example Press the keys while pressing and holding the ENTER MARK key duri...

Page 49: ...bing please set the PRE REC item OFF Delaying the start of recording REC DELAY This function allows you to delay the start of recording by 0 3 seconds fixed interval after the RECORD key is pressed Th...

Page 50: ...screen is open you can press the PLAY PAUSE key and to set the divide position while playing the track After dividing a file two new files with _a and _b added to the end of the original file name are...

Page 51: ...31 1 02 2 04 4 08 MP3 32 kbps 44 1 kHz 48 kHz 74 32 149 04 298 08 596 16 64 kbps 44 1 kHz 48 kHz 37 16 72 32 149 04 298 08 96 kbps 44 1 kHz 48 kHz 24 50 49 40 99 20 198 40 128 kbps 44 1 kHz 48 kHz 18...

Page 52: ...rom the computer as you would the contents of a hard drive Furthermore you can change file names from the computer Screen navigation On the Browse Screen folders and music files appear in a hierarchic...

Page 53: ...select the item you want from the following list and press ENTER MARK to execute it PLAY Plays the file The display returns to the Home Screen If the playback area is set to FOLDER the playback area b...

Page 54: ...yback area regardless of the previous playback area setting When recording files are created in this folder CREATE A pop up appears to confirm that you want to create a new folder Press the ENTER MARK...

Page 55: ...SCAM DR 2d 55 NOTE You cannot erase read only files and files that are not recognized by this unit CANCEL No operation is conducted and the selected folder is left as is 5 Working with Files and Folde...

Page 56: ...folder as the playback area TIP On the Browse Screen regardless of the playback area setting you can select any file on the card that you want Adjusting playback volume The volume output from the bui...

Page 57: ...ge 59 If there is no playlist defined a No PLAYLISTpop up appears 5 Press the HOME key to return to the Home Screen NOTE The current playback area setting appears in the lower left of the Home Screen...

Page 58: ...k area setting Selecting a folder for the playback area 2 When the playback area is set to FOLDER if you select a file on the Browse Screen the folder that contains the selected file becomes the playb...

Page 59: ...MENU key to open the Menu Screen 2 Use the wheel to select BROWSE and press the ENTER MARK key BROWSEscreen appears NOTE For an explanation of how to use the Browse Screen see Screen navigation on pag...

Page 60: ...file and return to the Home Screen ALL CLR A confirmation message appears to confirm that you want to remove all the files from the playlist Press the ENTER MARK key to remove all the files or the HO...

Page 61: ...previous file If you press the key when located at the beginning of or middle of a file the playback position will skip to the beginning of the next file NOTE Only files in the playback area that is...

Page 62: ...etting the search speed on page 75 Using the wheel to change the playback position When the Home Screen is open and a track is playing back or stopped you can use the wheel to change the playback posi...

Page 63: ...different mode 5 Press the HOME key to return to the Home Screen Loop playback With this function you can continuously repeat loop the playback of a selection that you make 1 Press the I O key during...

Page 64: ...the key to set that time as the OUT point 5 When the setting is complete press the I O key to start the loop playback Making fine adjustments to the loop playback IN and OUT points 1 Press and hold t...

Page 65: ...e or solo instrument on a track You can use these playback control functions effectively to practice and learn parts Setting the playback control functions Use the Playback Control Screen to set the p...

Page 66: ...udition VSA function ON to keep the pitch the same when changing the tempo Use the VSA item to turn the VSA function ON and OFF the factory setting is ON Changing the pitch without changing the speed...

Page 67: ...cal or solo instrument sound sufficiently If this is the case changing the PART and RANGE settings might make the reduction more effective Listen to the music as you adjust the settings to achieve the...

Page 68: ...en appears Although it appears different from other setting screens operation is the same 3 Use the wheel to select the desired item and press the key or ENTER MARKkey to access that item s settings 4...

Page 69: ...ck signal PLAY Select the SOURCE icon press the ENTER MARK key and use the wheel to select the effect source The default setting is PLAY 6 Press the HOME key to return to the Home Screen Effects Prese...

Page 70: ...e BPM Default 120 BEAT Set the accent frequency between 0 and 9 There is no accent when set to 0 For example set this to 4 if you want 4 4 time Default 4 LEVEL Set the metronome volume between 0 and 1...

Page 71: ...uilt in SD card slot or by using a card reader CAUTION You cannot use this unit s other functions when it is connected to a computer by USB Connect this unit to the computer directly Proper operation...

Page 72: ...dio files on the third level or below Since you can set the DR 2d to only play the contents of a specific folder you can organize tracks into genres artists or other categories as you like If you name...

Page 73: ...he use status of the currently inserted SD card System information page SYSTEM Shows the unit s system setting information and firmware version File information page The FILEpage shows information abo...

Page 74: ...ity REMAIN SIZE USED SIZE Shows the amount of unused used capacity on the SD card Press the or key to switch between REMAINSIZE and USEDSIZE System information page The SYSTEM page shows information a...

Page 75: ...ons x2 x4 x8 factory setting x10 Turning the unit power OFF automatically Use the AUTOOFFitem to set the time before the unit power automatically turns OFF after the last activity or use when powered...

Page 76: ...s unit to their factory settings 1 Select INITIALIZEand press the ENTER MARK key to highlight Exec 2 Press the ENTER MARK key again to open a confirma tion pop up window 3 Press the ENTER MARK key to...

Page 77: ...r press the HOME key to cancel formatting CAUTION When using FULL FORMAT use the AC adapter sold separately or confirm that the battery is sufficiently charged If the power fails during formatting the...

Page 78: ...wav DATE The date is used as the file name in yymmdd format Example 090101_0000 wav NOTE The date is set using the unit s internal clock See Setting the date and time on page 31 Setting the WORD item...

Page 79: ...ylist cannot be found or a file could be damaged Please check the file in question Non Supported The audio file is not a supported format Please see 9 Connecting with a Computer for file formats that...

Page 80: ...valid Card Change Card Something might be wrong with the card Change the card Protected Card Change Card This appears when the card is protected and lacks the necessary Music Folder and other folders...

Page 81: ...sLINE Input is set to LINE Dual recording can only be used when input is set to MIC Not Continued If any of these errors occur turn the unit power OFF and restart it If the power cannot be turned OFF...

Page 82: ...r turn the unit power OFF and restart it If the power cannot be turned OFF remove the batteries and disconnect the AC adaptor if connected If the error message continues to appear please contact a TEA...

Page 83: ...he SD card is inserted completely Playback does not work If you are trying to play a WAV file confirm that the sampling frequency is supported by this unit If you are trying to play an MP3 file confir...

Page 84: ...ion is not on Confirm that the playback pitch is not being adjusted Confirm that the playback speed is not being adjusted I cannot erase a file Is the SD card write protect switch engaged This unit s...

Page 85: ...put impedance 25 k Nominal input level GAIN LOW 32 dBV GAIN MID 48 dBV GAIN HIGH 64 dBV Maximum input level GAIN LOW 16 dBV GAIN MID 32 dBV GAIN HIGH 48 dBV LINE IN jacks Connector 1 8 3 5 mm stereo m...

Page 86: ...Hz LINE IN to LINE OUT Input Level Nominal Total harmonic distortion 0 02 AES 17 LINE IN to LINE OUT S N ratio 90 dB A Weight LINE IN to LINE OUT Computer compatibility Widnows Pentium 300 MHz or fast...

Page 87: ...Ni MH type battery About 6 hours JEITA playback time About 6 hours JEITA recording time Dimensions W x H x D 65 x 118 x 24 mm 2 559 x 4 646 x 0 945 in Weight 140 g 4 518 oz not including batteries Ope...

Page 88: ...com 5939 Wallace Street Mississauga Ontario L4Z 1Z8 Canada TEAC MEXICO S A de C V Phone 52 55 5010 6000 www teacmexico net R o Churubusco 364 Colonia Del Carmen Delegaci n Coyoac n CP 04100 M xico DF...

Reviews: