background image

4

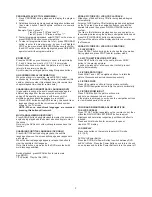
INITIAL SETTINGS

Initial settings page is for you to make your preferred settings
up for your player. Once the initial settings are done they are
retained in the CPU of the player until otherwise modified.

1. Press SETUP button.
2. Use the navigation buttons to select the item you want to

modify, setting page with further setting items displayed
shows on the TV screen. Again use navigation buttons to
make changes. Press OK(PLAY/PAUSE) button to confirm
modifications.

3. Use navigation buttons to switch to another setting on the

main setting page.

4. Press SETUP button to exit main setting page.

COMMON PROCEDURES FOR INITIAL SETTINGS

3.1 BRIGHTNESS

- to set the brightness for the display.

3.2 CONTRAST
3.3 HUE
3.4 SATURATION

- to set the contrast effect for display.

- to set the colour impression for display.

- to set the saturation level for display.

3. Video setup

Brightness

Video Setup Page

Contrast

Hue

Saturation

4. Preference setup

4.1 TV TYPE

4.2 AUDIO

4.3 SUBTITLE

- select preferred audio language.

(DVD only - need disc software support)

Options: PAL/AUTO/NTSC

- select preferred subtitle language.

(DVD only - need disc software support)

- select preferred disc menu language.

(DVD only - need disc software support)

- Reset to factory settings

4.4 DISC MENU

4.5 DEFAULT

The first Power on this set by press power button on the front
plane without placing any disc on this tray, press setup button,
then you can enter the Preference Page by pressing navigate
button.

TV Type

Audio

Subtitle

Disc Menu
Default

Preference Page

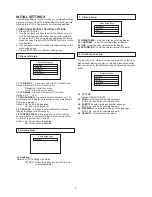
1. General Setup

1.1 TV DISPLAY

1.2 LCD Mode

1.3 ANGLE MARK

1.4 OSD LANG

1.5 SCREEN SAVER

- it is used to select the TV output mode.

Options: Normal /PS: Pan & scan mode

Normal/ LB: Letter box mode
Wide: 16:9 wide screen mode

- it is used to select the LCD mode.

Options: 4:3

16:9

- it is used to select whether or not The

multi-angle icon is display on the screen when a Multi-angle
DVD disc is playing.
Options: On: Icon will be displayed

Off: Icon will be turned off

- it is used to select different On Screen

Display language for different user.

- when the player is not in used for

several minutes, a running DVD logo will move across the
TV screen to protect the TV screen.
Options: On: Screen saver is enabled

Off: Screen saver is disabled

2. Audio setup

Downmix

Audio Setup Page

2.1 Downmix

Options: LT/RT-Left/Right mix mode

STEREO - Select this option if you don't have a 5.1

channels amplifier.

General Setup Page

LCD Mode

OSD Lang
Screen Saver

TV Display

Angle Mark

Summary of Contents for DVP904

Page 1: ...USER MANUAL PORTABLE DVD PLAYER Model DVP904 IMPORTANT WARRANTY INFORMATION INSIDE PLEASE READ www teac com au...

Page 2: ...ised Service Centre Where in home service is not available the purchaser is required to send the product to the nearest TEAC Authorised Service Centre for repair In this event a copy of this warranty...

Page 3: ...e any obligation on it in connection with the sale of any equipment other than as stated in this warranty and outlined above 11 In no event will TEAC be responsible or liable for indirect or consequen...

Page 4: ...Service Centre 3 Please have your purchase receipt as your proof of purchase and the following details completed for a valid Warranty Owner s Name Owner s Address Postcode Model Name No Serial No Dea...

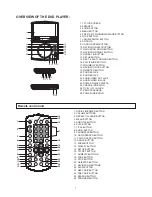
Page 5: ...unit 9 10 1112 13 14 15 16 17 18 19 20 21 22 23 24 25 26 27 28 1 2 3 4 5 6 7 8 1 10 0 7 4 1 8 5 2 9 6 3 TITLE AUDIO ANGLE ZOOM SKIP SEARCH PROGRAM PAUSE STEP SLOW ENTER DVD AV IN DISPLAY SETUP TFT SE...

Page 6: ...press F FWD SEARCH button or F BWD SEARCH button several times to scan the disc forward or backward at X2 X4 X8 X16 X32 normal speed Press PLAY button to resume normal play During playback press PAUS...

Page 7: ...GE DVD MULTI ANGLE VIEWING DVD ONLY CHANGING SUBTITLE LANGUAGE DVD ONLY 1 Press PROGRAM during playback to display the program menu 2 Select location s to be memorized via navigation buttons and then...

Page 8: ...t select preferred disc menu language DVD only need disc software support Reset to factory settings 4 4 DISC MENU 4 5 DEFAULT The first Power on this set by press power button on the front plane witho...

Page 9: ...scratches or dirt Check that the label side of the disc is facing up The pick up lens of the DVD player may be dirty Contact the service center for lens cleaning Check that the TV channel is set to VI...

Page 10: ...783 02 47 59 1254 02 47 59 2312 Iwac Repairs Pty Ltd Shop 8 12 Statham Street BENNETTS GREEN 2290 02 49 48 1067 02 49 48 1069 Visual Audio Services 510 Chapple Street PO BOX 76 BROKEN HILL 2880 08 80...

Page 11: ...E 2250 02 43 23 3623 02 43 23 1581 Quickfix Repairs 118 Stafford Street PENRITH 2750 02 47 22 8550 02 47 22 9949 BJRAE Electronics 2 199 Adelaide Street RAYMOND TERRACE 2324 02 49 87 7032 02 49 87 619...

Page 12: ...City TV Video Shop 3 1 Mellefont Street GLADSTONE 4680 07 49 72 9495 07 49 72 9495 Lloyd Lawrence Electronics Shop 8 9 5 Torquay Road HERVEY BAY 4655 07 41 24 3787 07 41 24 3787 Professional VCR Sale...

Page 13: ...85 82 4677 08 85 82 5294 E K Dunstan Co 255 Main Street CLARE 5453 08 88 42 2144 08 88 42 3942 Peter s Electronics 25 Lorna Street LOXTON 5333 08 85 84 6920 08 85 84 6920 Gambier Sound Vision Repairs...

Page 14: ...ol Street GEELONG 3200 03 52 22 1418 03 52 22 1418 RTD Services Pty Ltd 25 29 Fairlie Street GEELONG NORTH 3215 03 52 78 9766 03 52 78 3545 Linke Electrical Repairs 82 Londsdale Street HAMILTON 3300 0...

Page 15: ...tronics 6 200 Winton Road JOONDALUP 6027 08 93 00 1066 Printek Electronics 1 Lesueur Drive JURIEN BAY 6516 08 96 52 1664 08 96 52 1664 Kalgoorlie Electronics 395 Hannan Street KALGOORLIE 6430 08 90 21...

Page 16: ...TEAC CUSTOMER CARE CENTRE TCCC Free call 1800 656 700 Between Monday to Friday EST 9AM to 5PM...

Reviews: