background image

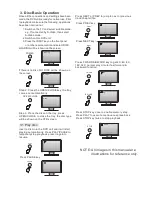
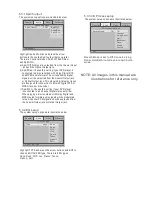
Spdif Setup Pa ge

Setup Sp dif

Spdif  Ou tput
   

PCM
                

Spdif Off
Spdif/Raw
Spdif/Pcm
                   

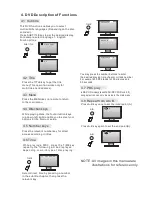
CH EQ U Pa ge

Select  EQ Type

Type  

None
           

None
Rock
POP
Live
Dance
Tenco
Classic
Soft                    

5.3.1 Spdif output

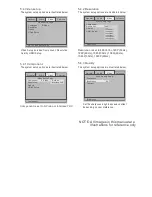
5.3.2 EQ setup

The sy stem  se tup options are illustr ated below:

The sy stem  se tup options are illustr ated below:

Highlight TYPE and pres s the arr ow buttons and ENT to 
ch oose EQUALIZER typ e. There are 8 EQ typ es: 
None, Rock , POP, Live , Dance , Tenco ,
Class ic, Soft.

Highlight th e Spdif opti on and pre ss th e arro w 
butt ons to choose th e Spdif outp ut th at you pre fe r.
There are 3 opti onal modes: Spdif Off, Spdif/ Raw, 
and Spdif/ Pcm.
a) Spdif Off: No signal is outp utt ed fro m th e Coaxial Ouput
     jack and th e Opti cal Outp ut jack.
b) Spdif/ Raw: Choose th is sett ing if your DVD player is 
    connecte d to a disc re cord ed with Dolgy Digita l,D TS 
    and MPEG audio fo rm ats .T he corre sponding digita l, 
    signals will be outp utt ed fro m th e Coaxial Outp ut jack 
    or Opti cal Outp ut jack. This players digita l outp ut jacks 
    are designed fo r connecti on to a Dolby Digita l,D TS or 
    MPEG re ceiver or decoder.
c) Spdif/ Pcm: Choose th is sett ing if your DVD player 
    is connecte d to a 2-c hannel digita l ste re o amplifi er.
    When playing a disc re cord ed with Dolby Digita l and
    MPEG audio fo rm ats ,a udio signals will be modulate d
    into a 2-c hannel PCM signal and will be outp utt ed fro m 
    th e Coaxial Outp ut jack or Opti cal Outp ut jack. 

Ge neral

Audio

Video

Preference

Ge neral

Audio

Video

Preference

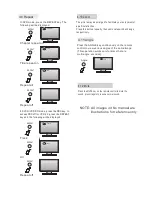
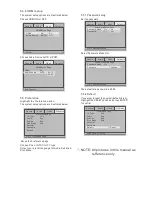
3D Pr ocessing Pa ge

Off

5.3.3 3D Process setup

Reverb Mode is set to Off,Concert,Living 
Room,Hall,Bathroom,Cave,Arena,Church 
mode.

The sy stem  se tup options are illustr ated below:

Ge neral

Audio

Video

Preference

Reverb Mo de  

Off
           

Off
Concert
Living Ro om
Hall
Bathroom
Cave
Arena
Church              

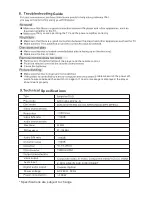
NOTE: All images in this manual are 
            illustrations for reference only.

Summary of Contents for HMX2500

Page 1: ...HMX2500 Home Entertainment Party System...

Page 2: ......

Page 3: ......

Page 4: ......

Page 5: ...nd thus greatly extend the service life of the laser head Water Damage The apparatus must not be exposed to dripping or splashing and objects filled with liquids such as vases must not be placed on th...

Page 6: ......

Page 7: ...NE OUTPUT 12 AUDIO INPUT LINE 13 AUX AUDIO INPUT 14 FM ANTENNA JACK 15 DIGITAL SIGNAL COAXIAL OUTPUT 16 VIDEO OUTPUT JACK 17 S VIDEO OUTPUT JACK 18 DIGITAL SIGNAL OPTICAL OUTPUT 9 RIGHT SPEAKER OUTPUT...

Page 8: ...batteries leak Dispose of old batteries SPEAKER LIGHT X Bass ON OFF MULTI MENU USB STEP STEREO MONO MULTI MENU ADJUST MULTI MENU ADJUST SOURCE SUBTITLE F WARD TUNING B WARD TUNING NEXT CHANNEL PREV C...

Page 9: ...Video cable yellow 1PC DVD to TV Instruction Manual 2PCS example Do not place the amplifier unit on top of the speakers the vibrations may damage the unit and void the warranty...

Page 10: ...tep 3 Place the disc on the tray press OPEN CLOSE to close the tray the disc type will be shown on the VFD screen No disc Open Loading Press PREV key PREV Press NEXT key NEXT 2X F WARD Press F WARD B...

Page 11: ...s the relevant number key for direct access according to titles While playing a DISC press the TIME key repeatly the following will be displayed depending on which type of disc playing TIME Select dir...

Page 12: ...EPEAT REPEAT REPEAT Repeat off All Track ln SVCD VCD CD mode press the PBC key to acc ess PBC off for VCD 2 0 press the REPEAT key and the followi ng will be displ aye d Press the MUTE key on the remo...

Page 13: ...options are illustrated below Th e user may set the language of screen displays subtitles audio and DVD menus General Audio Video Preference TV Display Angle Mark OSD Lang Captions Screen Saver HDCD L...

Page 14: ...Digital DTS and MPEG audio formats T he corresponding digital signals will be outputted from the Coaxial Output jack or Optical Output jack This players digital output jacks are designed for connectio...

Page 15: ...6I 720P 50Hz The system setup options are illustrated below Video Quality Setup Sharpness Brightness Contrast Brightness 00 5 4 3 Quality The system setup options are illustrated below General Audio V...

Page 16: ...tup options are illustrated below Highlight the Preference option The system setup options are illustrated below Set up the Preference page If you want to reset the system default value highlight the...

Page 17: ...creen Press a direction key to select a picture Press the PLAY key to enter play mode Press STOP to exit play mode 6 Operating the DVD unit This DVD unit has a USB jack Press the INPUT key to select D...

Page 18: ...ons you must attach the supplied antenna Adjust the antenna to obtain optimum reception Press the INPUT key on the front panel amplifier or on the remote control to select FM function Do not Adjust th...

Page 19: ...tch the power off wait a few seconds and then switch it on again If no error message is displayed the player should work properly is a 300W 2 0CH LINE IN AUX DISC USB BT 2500W that Specifications AC 2...

Page 20: ...d candles should be placed on the apparatus When the mains plug or an appliance coupler is used as the disconnect device the disconnect device shall remain readily operable To be completely disconnect...

Reviews: