background image

39

Troubleshooting

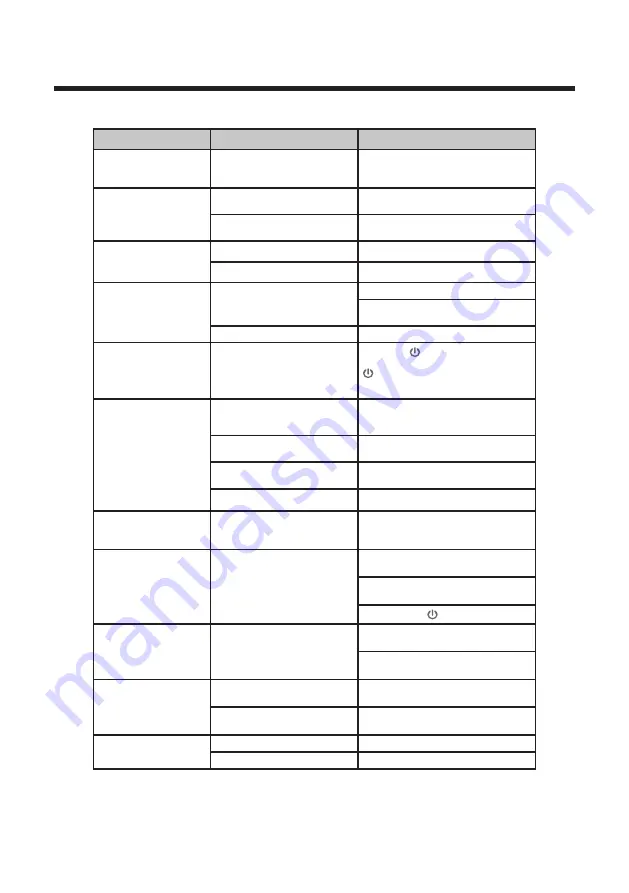
If the device performance fails, check whether the detected problem is in the 
following table. If your device still fails, contact customer service.

SYMPTOM

POSSIBLE CAUSE

REMEDY

TV – 

No signal input 

connected, loose or 
disconnected.

Signal cable is loose or not 
connected.

Ensure signal cable is not  loose 
or disconnected. Reattach and try 
again.

Remote Control

Distance is short,  
no control.

Receiver of remote control 
is covered.

Ensure the remote receiver is not 
obstructed.

The battery energy of the 
remote control is too low.

Change the batteries.

TV

Display is faint.

Adjustment is incorrect.

Use au

to-adjustment function. 

Display mode is incorrect.

Use 

recommended mode.

TV

Display image does 
not fill the screen.

Adjustment is incorrect.

Use au

to-adjustment function.

Ent

er PICTURE 

to adjust the 

horizontal and vertical position.

Display mode is incorrect. 

Use 

recommended mode.

TV

Unable 

to operate 

the TV

Exterior influence, for 
example lighting, static 
electricity and so on, which 
might disturb the normal 
operation of the TV.

Press the 

 button to tum off 

electrical source, then press the 

 button to turn on the TV again 

after 1-2 minutes.

Static and sound 
noise.

Antenna cable connector is 
loose, cable is damaged.

Check the antenna cable 
connector plug for secure 
connection and any damage.

Antenna cable type is not 
correct.

Check ant

enna cable type (VH

F/

UHF).

Direction or position of 
antenna is incorrect.

Adjust the direction or position of 
antenna.

Signal is weak.

Attempt to use signal amplifier.

TV image is better, 
but has noise.

Antenna cable connector 
is loose, cable is damaged.

Check the antenna cable 
connector plug for secure 
connection and any damage.

No image. No sound.

Power plug is loose, 
power cord does not 
connect well.

Check to ensure power cord is 
connected.

Press POWER on panel or 
remote control.

Check if the 

 button is on.

TV image has 
stripes.

Signal is exposed to 
interference, such as a car, 
neon light, electric blower, 
etc.

Do not use an electric blower 
around unit.

Adjust antenna cable direction 
to reduce interference.

TV image has 
shadows.

TV signal is reflected by 
valley or building.

Use a high-di

rectional antenna.

Direction of antenna is 
incorrect.

Adjust direction of the antenna.

TV has no sound.

Volume setting is too low.

Adjust volume to proper level.

Sound is muted.

Pres

s MUTE 

to deactivate mute.

CAUTION:

 Do not allow your TV screen to display the same image for an extended 

period of time. Please set up a screen protection procedure. If a high-contrast picture 
remains on the TV screen for a long time, this picture could burn the image onto the 
scr

een. Usually the burnt image will disappear g

radually when you tum off the TV’s 

power

. H

owever, this damage cannot be repaired.

Summary of Contents for LEV24A121

Page 1: ...USER MANUAL WARRANTY INFORMATION INSIDE PLEASE READ www teac com au IMPORTANT LEV24A121 LED TV Trademark of TEAC Corporation JAPAN...

Page 2: ......

Page 3: ...below and keep this information for your own records Owner s Name Owner s Address Postcode Model Name No S erial No Dealer s Name Dealer s Address Postcode Thank you for selecting a TEAC product If yo...

Page 4: ...all required parts are made available for any required service repair 8 TEAC Australia Pty Ltd and its Authorised S ervice C entres will use their best endeavours to complete product repairs within a...

Page 5: ...V 7 What is Included TV Placement Setup 4 TV Stand Installation Removal 4 Unit and Accessories 4 Wall Mounting 4 TROUBLESHOOTING 39 SPECIFICATIONS 40 First installation 10 Select input source 12 The M...

Page 6: ...rack is used use caution when moving the cart apparatus combination to avoid injury from tip over Unplug the apparatus during lightning storms or when unused for long periods of time Refer all servici...

Page 7: ...qualified personnel should service this apparatus To avoid battery leakage remove exhausted batteries from the remote control or when not using for a long period Do not break open or throw exhausted b...

Page 8: ...Caution Your new TV is heavy please consult with a professional wall mount installer WARNING Large TVs can fall over and cause major damage injury If you are standing a large TV on its feet we recomm...

Page 9: ...settings menu CH Previous channel CH Next channel VOL Decrease volume VOL Increase volume 2 5 6 3 4 7 8 10 IR RECEIVER Receives infrared signals from the remote control 11 INDICATOR LED Status indica...

Page 10: ...7 AUDIO IN R L Stereo audio input 6 PC AUDIO Connect it to the audio output terminal of the PC 9 VGA PC video input 8 VIDEO Video input NOTE Before making or changing cable connections please make sur...

Page 11: ...Connecting external devices to your LED TV 7 cable receiver satellite box HDMI cable Coaxial cable Component cable USB Audio cable VGA cable cable TV company VHF UHF antenna RF Coaxial cable Composite...

Page 12: ...ogram Guide 14 INFO Show informations 16 RETURN Press to return to the previous menu 26 D SETUP Open DVD mode system settings menu 9 Play Pause Return to the previous channel tuned 8 28 A B Press disp...

Page 13: ...with their terminals corresponding to the and indications in the battery compartment 3 Replace the cover NOTE Availability of teletext services depends on your local service provider 33 SLEEP Auto Po...

Page 14: ...choose First Time Installation by pressing button Press OK for Auto Tuning Tune Type Select Tune Type as DTV ATV or DTV you can choose Air DVB T Cable DVB C in Digital Type Air DVB T Auto Tune Select...

Page 15: ...Scan Type and choose OK to start Auto Search for the channels 2 Network Select Network in Scan Type Input the number of the Network ID of the channel and choose the frequency and press OK button to f...

Page 16: ...12 Select input source...

Page 17: ...13 The Main Menu OK OK Refer to P 10 and P 11...

Page 18: ...e step by changing the channel number DTV Manual Tuning DVB T Manual Tuning Enter the DTV Manual Tuning Press button to adjust the channel and press OK button to manual tune DVB C Manual Tuning Enter...

Page 19: ...15 OK OK button to add or remove the channnel to from your favorite list...

Page 20: ...16 OK...

Page 21: ...17 S...

Page 22: ...18 OK OK OK...

Page 23: ...19 OK OK press OK button to confirm selection and enter the sub menu press OK button to confirm selection and enter the sub menu Available options are Off 15min 30min 45min 60min 90min 120min 240min...

Page 24: ...20 press OK button to confirm selection and enter the sub menu press OK button to confirm selection and enter the sub menu...

Page 25: ...21 OK OK OK...

Page 26: ...22 OK Green OK...

Page 27: ...23 OK OK OK OK...

Page 28: ...24 OK OK OK...

Page 29: ...25 OK OK OK...

Page 30: ...26 OK OK OK OK OK...

Page 31: ...27 Press INPUT choose PC OK OK OK OK OK OK OK OK OK Screen Menu Under PC mode only...

Page 32: ...28 DVD operation General Setup...

Page 33: ...29...

Page 34: ...30 AUDIO Setup...

Page 35: ...31 Dolby Digital Setup Preference Setup...

Page 36: ...32...

Page 37: ...33...

Page 38: ...34 OK OK Multimedia operation...

Page 39: ...35 OK...

Page 40: ...36 OK OK...

Page 41: ...37 OK OK OK...

Page 42: ...38 OK OK...

Page 43: ...ector plug for secure connection and any damage Antenna cable type is not correct Check antenna cable type VHF UHF Direction or position of antenna is incorrect Adjust the direction or position of ant...

Page 44: ...Coaxial Output Data Interface USB Supported System Files Dimensions Weight With stand Without stand 550 153 354mm 550 86 332mm 3 45kg FAT32 and FAT16 Remote Control Signal Type Infrared Control Dista...

Page 45: ......

Page 46: ......

Page 47: ......

Page 48: ...ranty period please call the TEAC Warranty Service Hotline 1300 553 315 Between Monday to Friday 8 30AM to 5PM AEST Please have your purchase receipt and the product s serial number ready For other en...

Reviews: