background image

34

Programmed playback (1)

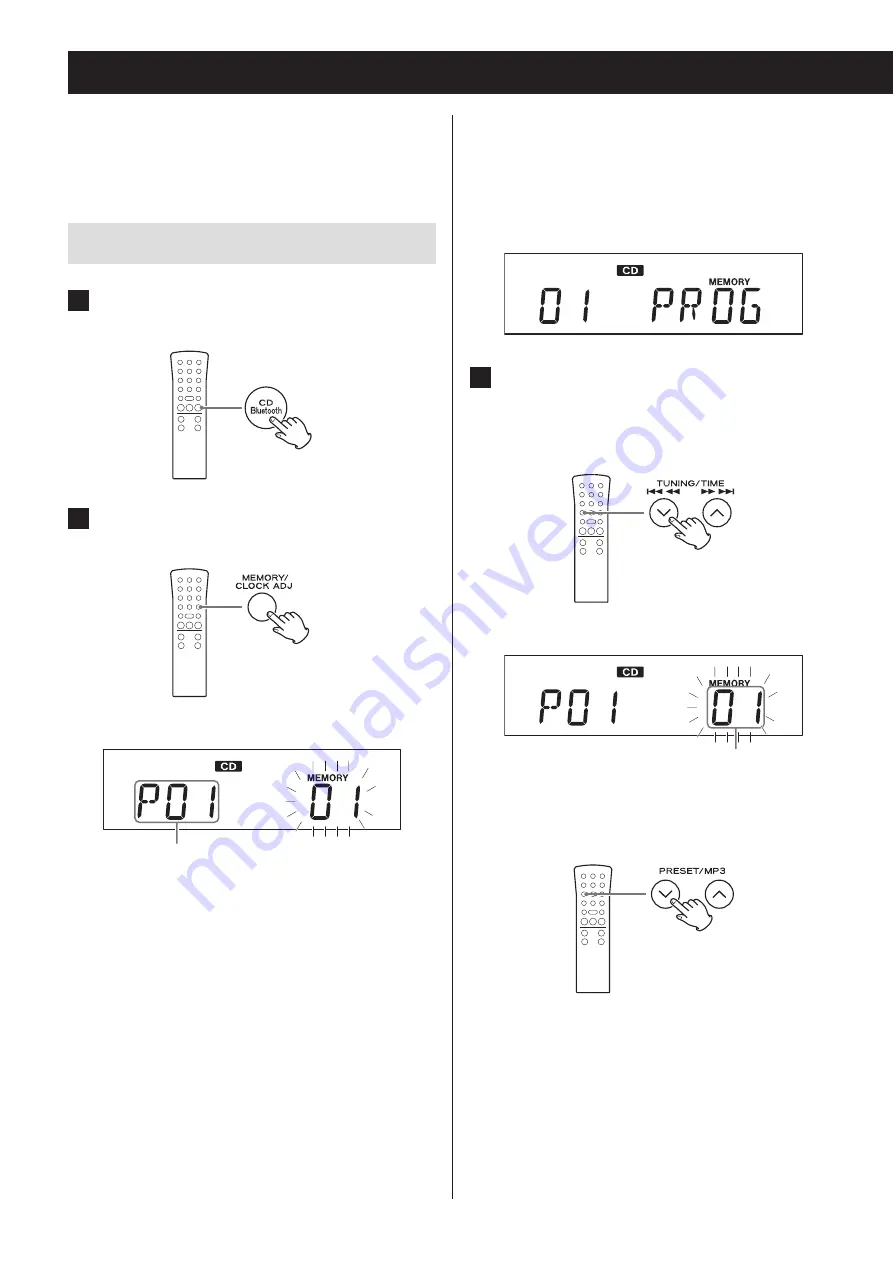
Up to 32 tracks/files can be programmed in the desired 
order.
Program tracks when playback is stopped. 

Programming tracks/files

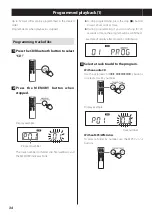
Press the CD/Bluetooth button to select 
“CD”.

Press the MEMORY button when 
stopped.

Display example


Program number

The track number (or folder and file numbers) and 
the MEMORY indicator blink.


o

To stop programming, press the stop (

8

) button 

or wait 20 seconds or more.


o

During programming if you do nothing for 20 
seconds or more, the program will be confirmed.

Example of display after program confirmation

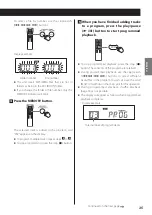
Select a track to add to the program. 

With an audio CD

Use the skip/search (

.m

/

,/

) buttons 

to select a track by number. 

Display example


Track number 

With an MP3/WMA disc 

To select a folder by number, use the MP3 (

j

/

k

buttons.

Summary of Contents for LP-P1000

Page 1: ...ENGLISH FRAN AIS TURNTABLE AUDIO SYSTEM OWNER S MANUAL MODE D EMPLOI LP P1000 Z 77 20L100001000...

Page 2: ...riangle is intended to alert the user to the presence of important operating and maintenance servicing instructions in the literature accompanying the appliance WARNING TO PREVENT FIRE OR SHOCK HAZARD...

Page 3: ...rning batteries Misuse of batteries could cause them to rupture or leak leading to fire injury or the staining of nearby things Please read and observe the following precautions carefully o o Be sure...

Page 4: ...into the apparatus the apparatus has been exposed to rain or moisture does not operate normally or has been dropped o o The apparatus draws nominal non operating power from the AC outlet with its POWE...

Page 5: ...een the radiator and your body Statement of compliance Model for USA This device complies with FCC radiation exposure lim its set forth for an uncontrolled environment Model for Canada The device meet...

Page 6: ...try to correct the interference by one or more of the following measures o o Reorient or relocate the equipment and or the receiving antenna o o Increase the separation between the equipment and recei...

Page 7: ...7 ENGLISH...

Page 8: ...eference Warranty card 1 Wireless equipment precautions 5 Bluetooth notes 6 Before use 8 Discs 10 MP3 WMA files 12 Handling records 13 Connections 14 Replacing the stylus 17 Names and functions of par...

Page 9: ...cat ing or moving this unit Moving the unit with a disc inside or a record on the turntable could damage the disc the record the stylus and the cartridge or could cause a malfunction o o The voltage s...

Page 10: ...e CD stabilizers Doing so could make the disc unplayable or damage the unit o o Never use CDs with irregular shapes including heart shaped and octagonal discs because such discs could damage the unit...

Page 11: ...o Do not leave discs in places that are exposed to direct sunlight or that are very humid or hot Long exposure to such conditions could warp or degrade discs mak ing them unplayable o o Since CD R CD...

Page 12: ...d can be played by this unit o o MP3 and WMA files are recognized by their file exten sions mp3 for MP3 files and wma for WMA files Always include the extension in the file name o o Files without exte...

Page 13: ...o o Do not leave records in places that are exposed to direct sunlight or are very hot or very humid Leaving a record in such a condition for a long time could result in warping or other damage o o Do...

Page 14: ...re the reception is best on a window frame or wall for example B AM antenna connector Assemble the included AM loop antenna and con nect it to the AM antenna jack on the back of the unit Place the ant...

Page 15: ...log audio input jacks on both the front and rear panels If cables are connected to both the front panel AUX 2 IN and the rear panel AUX 1 IN jacks the audio input through the front panel jack AUX 2 IN...

Page 16: ...cable into the black speaker terminal o o Gently pull the cables to make sure they are con nected firmly o o Confirm that only the exposed part of the wire is inserted into the terminal and that the c...

Page 17: ...ords after about 50 hours of use and a diamond stylus for SP records after about every 100 hours CAUTION o o Since loud noises could suddenly occur put the unit into standby before changing the stylus...

Page 18: ...select CD To listen to a Bluetooth device press the CD Bluetooth button and select Bluetooth To listen to the radio press the FM AM button Press the FM AM button again to switch between FM and AM band...

Page 19: ...adphones jack no sound will be output from the speakers L Analog audio input jack AUX 2 IN Use to input analog audio signals To connect the headphones jack of a portable music player or similar device...

Page 20: ...TUNING TIME j k buttons Skip search m buttons When listening to the radio use for manual and auto station tuning page 49 When listening to an MP3 WMA disc use to select file numbers page 34 When setti...

Page 21: ...e bass and treble as well as the left right volume balance page 28 k MUTE button Use to temporarily silence the output page 29 l PAIRING button Use this when pairing with other Bluetooth devices and w...

Page 22: ...r devices that can be controlled by infrared rays Installing batteries Remove the cover from the back of the remote control Insert two AA batteries into the compartment accord ing to the indications T...

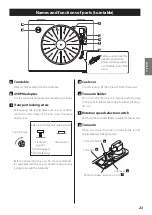
Page 23: ...move residences for example turn the screw counterclockwise until it stops to secure the turntable d Cue lever Use this lever to lift the tone arm from the record e Tone arm holder This is a rest for...

Page 24: ...over Hold both edges of the turntable cover and lift it slowly to remove it along with the hinges from the unit Then remove the hinges from the turntable cover Opening and closing the turntable cover...

Page 25: ...the unit is on 2 Press and hold the CLOCK ADJUST but ton for at least two seconds Press and hold for at least 2 seconds SET CLOCK scrolls across the display 3 Press the TIME j k buttons to switch bet...

Page 26: ...ings will be erased if a power outage occurs or the power cord is unplugged from an outlet Current time display The clock is always shown when the unit is in standby mode off and when the function is...

Page 27: ...oises could damage your hear ing or cause other harm Set the volume to minimum After sound output begins adjust the volume to a suitable level o o When not using this unit press the STANDBY ON button...

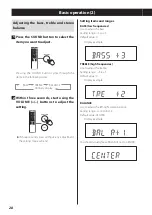
Page 28: ...tons to adjust the setting o o If three seconds pass without any adjustment the setting mode will end Setting items and ranges BASS low frequencies Use to adjust the bass Setting range 5 to 5 Default...

Page 29: ...s reset to ordinary brightness Muting the output Press the MUTE button to temporarily silence the out put Press the MUTE button again to resume output at the previously set volume level o o When the m...

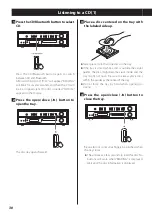
Page 30: ...red on the tray with the labeled side up o o Never place more than one disc on the tray o o If the tray is closed while a disc is outside the center guides the disc might become stuck inside and the t...

Page 31: ...ause y 9 button Playback will start from the first track and y will appear on the display Track number Playback elapsed time o o If you press the play pause y 9 button without closing the disc tray th...

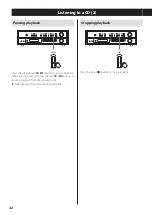
Page 32: ...e y 9 button to pause playback When paused press the play pause y 9 button to resume playback from the paused point o o When paused the playback time will blink Listening to a CD 2 Stopping playback P...

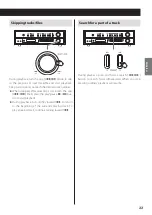
Page 33: ...after selecting a track with the skip knob press the play pause y 9 but ton to start playback o o During playback turn slightly toward to return to the beginning of the currently playing track To pla...

Page 34: ...folder and file numbers and the MEMORY indicator blink o o To stop programming press the stop 8 button or wait 20 seconds or more o o During programming if you do nothing for 20 seconds or more the pr...

Page 35: ...ramming press the stop 8 button 5 When you have finished adding tracks to a program press the play pause y 9 button to start programmed playback o o To stop programmed playback press the stop 8 button...

Page 36: ...Y indicator will blink When using a MP3 WMA disc the folder number file number and MEMORY indicator will blink 2 Press the m or button to select a track 3 Press the MEMORY button The track file is add...

Page 37: ...and hold the stop 8 button for at least two sec onds when stopped The contents of the program are cleared When the contents of the program are cleared PROGRAM CLEAR scrolls across the display o o The...

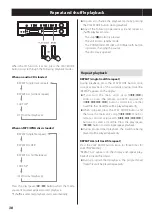
Page 38: ...th button is pressed changing the source The disc tray is opened Repeat playback REPEAT single track file repeat During playback press the PLAY MODE button once to repeat playback of the currently pla...

Page 39: ...rch m button to return to the beginning of the current track file o o Shuffle playback is not possible during programmed playback About MP3 WMA files 1 File playback order A disc that contains MP3 WMA...

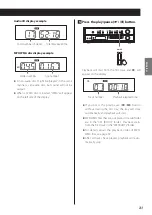
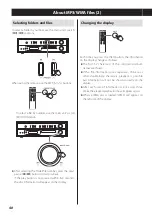
Page 40: ...ch item of information scrolls across three times the elapsed playback time will appear again o o When a WMA disc is loaded WMA will appear on the left side of the display Selecting folders and files...

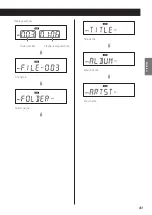
Page 41: ...41 ENGLISH Display example Track number Playback elapsed time c File name c Folder name c Title name c Album name c Artist name...

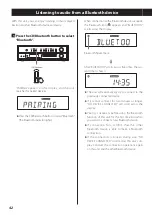
Page 42: ...ark c After BLUETOOTH scrolls across five times the cur rent time is shown o o The unit will automatically try to connect to the previously connected device o o If it cannot connect for two minutes or...

Page 43: ...etooth device must support AVRCP Some Bluetooth devices however have different func tions depending on their specifications o o Depending on the Bluetooth device skipping tracks might not be possible...

Page 44: ...ooth button to select Bluetooth After BLUETOOTH scrolls across the display PAIRING appears showing that the unit is ready to be paired with another device Bluetooth indicator c If it cannot connect fo...

Page 45: ...andby mode the next time the unit is turned on the last connected Bluetooth device will automatically connect again assuming it is in range and has its Bluetooth function activated o o If you disconne...

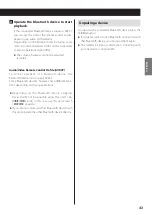
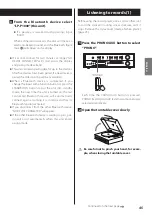
Page 46: ...d or the track where you want to start playback When you move the tone arm toward the record the turntable will begin to turn Listening to records 2 3 Place a record on the turntable When playing a 45...

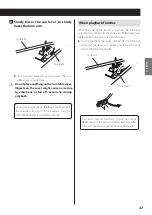
Page 47: ...ur if the volume is too loud If this happens turn the VOLUME knob left to lower the volume When playback finishes When the end of the record is reached the tone arm automatically returns to the tone a...

Page 48: ...ay example o o When a radio station is received automatic station selection ends o o To cancel automatic station selection press a j k button again o o If the reception is poor or the antenna is disco...

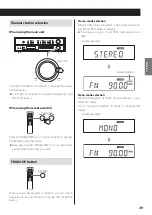
Page 49: ...E j k button until you find the station that you want FM MODE button When a stereo FM program is tuned in you can switch between stereo and mono by pressing the FM MODE button Stereo mode selection Wh...

Page 50: ...s a preset 3 After selecting a radio station press the MEMORY button The preset number and the MEMORY indicator blink on the display Display example Preset number 4 Use the PRESET buttons to select th...

Page 51: ...old the MEMORY button for at least two seconds AUTO appears on the display and the unit auto matically adds presets for the stations that it can receive o o After 20 presets have been added automatica...

Page 52: ...by 2 Press and hold the TIMER button for at least two seconds Press and hold for at least 2 seconds The timer indicator blinks and SET TIMER scrolls across the display once ON TIME appears and then th...

Page 53: ...and the hour value blinks c 5 Repeat steps 3 and 4 to set the TIMER OFF time Display example The hour value blinks o o If no action is taken for 10 seconds timer setting will end automatically 3 Press...

Page 54: ...ge occurs or the power cord is unplugged from an outlet o o At the TIMER ON time operation starts and the timer indicator blinks Prepare the playback source before the wakeup timer turns the unit on I...

Page 55: ...imer Turn the wakeup timer on and off when the unit is in standby mode Turning the timer off When you do not want to use the wakeup timer press the TIMER button to turn it off TIMER OFF scrolls across...

Page 56: ...e connected device o o If the volume is not raised on an audio player when its headphones jack is connected to this unit no sound will be output from this unit o o If you raise the volume level of the...

Page 57: ...to the operation of this unit s remote control In this case turn the other device off while using this unit s remote control There is noise e e Place the unit as far away as possible from TVs microwav...

Page 58: ...device and this unit during use e e Try moving the other Bluetooth device and this unit Radio A station cannot be received The reception is poor e e Tune in the station properly e e If FM broadcast re...

Page 59: ...air Headphones output jack 3 5 mm stereo mini 1 Power supply AC 120 V 60 Hz Power consumption 25 W Dimensions W H D including protrusions 460 215 380 mm 18 1 8 8 1 2 15 Weight including turn table cov...

Page 60: ...60...

Page 61: ...de l metteur radio et brouillage Mod le pour le Canada Le pr sent appareil est conforme aux CNR d Industrie Canada applicables aux appareils radio exempts de licence L exploitation est autoris e aux d...

Page 62: ...iquide sur l appareil comme par exemple un vase o o N installez pas cet appareil dans un espace confin comme une biblioth que ou un meuble similaire o o L appareil tire un courant nominal de veille de...

Page 63: ...de prolong e plus d un mois retirez ses piles pour viter qu elles ne coulent o o Si les piles coulent essuyez le liquide dans le com partiment des piles et remplacez les piles par des neuves o o N uti...

Page 64: ...Notes pour la technologie sans fil Bluetooth 62 Avant l utilisation 64 Disques 66 Fichiers MP3 WMA 68 Manipulation des disques 69 Branchements 70 Remplacement de la pointe 73 Nomenclature et fonction...

Page 65: ...te la cellule ou l unit o o Retirez toujours le CD ou le disque avant de d placer ou de transporter cette unit Transporter cette unit avec un CD l int rieur ou un disque sur le plateau peut endommager...

Page 66: ...e CD ayant une forme irr gu li re dont des CD en forme de c ur ou octogonaux car ils peuvent endommager l unit Disques Disques lisibles par cette unit Les CD qui portent le logo Compact disc Digital A...

Page 67: ...i re du soleil ou qui sont tr s humides ou tr s chauds Une exposition prolong e de telles conditions pourrait d former ou d grader les disques les rendant illisibles o o Comme les CD R CD RW sont plus...

Page 68: ...tte unit o o Les fichiers MP3 et WMA sont reconnus par leur extension de fichier mp3 pour les fichiers MP3 et wma pour les fichiers WMA Incluez toujours l extension dans le nom de fichier o o Les fich...

Page 69: ...ez pas les disques dans des lieux expos s directement la lumi re du soleil ou qui sont tr s humides ou tr s chauds Laisser longtemps un disque dans de telles conditions peut le faire gondo ler ou lui...

Page 70: ...ception est meilleure sur un cadre de fen tre ou un mur par exemple B Connecteur d antenne AM Montez l antenne cadre AM fournie et branchez la la prise pour antenne AM l arri re de l unit Placez l ant...

Page 71: ...dio analogique sur les faces avant et arri re Si des c bles sont connect s la fois aux prises de la face avant AUX 2 IN et celles de la face arri re AUX 1 IN c est l entr e audio de la face avant AUX...

Page 72: ...ent sur les c bles pour vous assurer qu ils sont fermement connect s o o V rifiez que seule la partie d nud e du c ble est ins r e dans le bornier et que la gaine du c ble ne touche pas le bornier o o...

Page 73: ...sation et une pointe diamant pour 45t apr s environ 100 heures ATTENTION o o Comme de forts bruits pourraient soudainement se produire mettez l unit en veille avant de changer la pointe o o Faites att...

Page 74: ...lectionnez CD Pour couter un appareil Bluetooth appuyez sur la touche CD Bluetooth et s lectionnez Bluetooth Pour couter la radio appuyez sur la touche FM AM Appuyez nouveau sur la touche FM AM pour...

Page 75: ...le casque o o Quand une fiche est enfonc e dans la prise pour casque aucun son ne sort par les enceintes L Prise d entr e audio analogique AUX 2 IN Sert recevoir les signaux audio analogiques Pour con...

Page 76: ...de saut recherche m En coute de la radio servent la recherche manuelle et automatique de stations page 105 Lors de l coute d un disque MP3 WMA servent s lectionner les num ros de fichier page 90 Lors...

Page 77: ...UND Sert r gler les graves et les aigus ainsi que la balance de volume gauche droite page 84 k Touche MUTE Sert temporairement couper le son de la sortie page 85 l Touche PAIRING Sert l appairage avec...

Page 78: ...d autres appareils pouvant tre contr l s par rayons infrarouges Installation des piles Ouvrez le compartiment situ l arri re de la t l commande Ins rez 2 piles AA dans le compartiment en respectant l...

Page 79: ...m nager par exemple tournez la vis dans le sens anti horaire jusqu ce qu elle s arr te pour bloquer la platine tourne disque d L ve bras Utilisez ce levier pour soulever le bras de lecture du disque e...

Page 80: ...du couvercle de la platine et soulevez le lentement pour l extraire avec les char ni res de l unit Ensuite retirez les charni res du couvercle de la platine Ouverture et fermeture du couvercle de la p...

Page 81: ...fonction 2 Maintenez press e la touche CLOCK ADJUST au moins 2 secondes Maintenez la press e au moins 2 secondes SET CLOCK r gler l horloge d file l cran 3 Appuyez sur une touche TIME j k pour alterne...

Page 82: ...don d alimen tation est d branch les r glages d horloge et de r veil de l unit s effacent Affichage de l heure L horloge est toujours affich e quand l unit est en veille Standby et quand la fonction e...

Page 83: ...mager votre audition ou causer d autres dommages R glez le volume au minimum Apr s le d but de production du son r glez le volume un niveau ad quat o o Quand vous n utilisez pas l unit appuyez sur la...

Page 84: ...le r glage o o Si 3 secondes s coulent sans aucun r glage le mode de r glage prend fin Param tres et plages de r glage BASS basses fr quences Sert r gler les graves Plage de r glage 5 5 Valeur par d...

Page 85: ...n en sortie Appuyez sur la touche MUTE pour temporairement couper le son de la sortie Appuyez nouveau sur la touche MUTE pour r tablir la sortie avec le niveau de volume ant rieur o o Quand la fonctio...

Page 86: ...le haut o o Ne placez jamais plusieurs disques sur le tiroir o o Si le tiroir est referm alors qu un disque est en dehors des guides de centrage le disque peut tre coinc l int rieur et le tiroir risq...

Page 87: ...Pause y 9 La lecture commencera la premi re piste et y s affichera Num ro de piste Temps de lecture coul o o Si vous appuyez sur la touche Lecture Pause y 9 sans fermer le tiroir du disque le tiroir s...

Page 88: ...pour mettre la lecture en pause En pause appuyez sur la touche Lecture Pause y 9 pour reprendre la lecture depuis le point de mise en pause o o En pause le temps de lecture clignote coute d un CD 2 Ar...

Page 89: ...lection d une piste avec la molette de saut appuyez sur la touche Lecture Pause y 9 pour lancer la lecture o o Durant la lecture tournez l g rement vers pour revenir au d but de la piste actuellement...

Page 90: ...er et de fichier et l indicateur MEMORY clignotent o o Pour arr ter la programmation appuyez sur la touche Stop 8 ou attendez 20 secondes ou plus o o Pendant la programmation si vous ne faites rien pe...

Page 91: ...la programmation appuyez sur la touche Stop 8 5 Quand vous avez fini d ajouter des pistes au programme appuyez sur la touche Lecture Pause y 9 pour lan cer la lecture programm e o o Pour arr ter la l...

Page 92: ...MEMORY clignotent Si vous utilisez un disque MP3 WMA le num ro de dossier le num ro de fichier et l indicateur MEMORY clignotent 2 Avec la touche m ou s lectionnez une piste 3 Appuyez sur la touche M...

Page 93: ...tenu du programme Maintenez press e la touche Stop 8 au moins deux secondes l arr t Le contenu du programme est effac Lorsque le contenu du programme est effac PROGRAM CLEAR d file l cran o o Le progr...

Page 94: ...rce est chang e au moyen de la touche PHONO AUX FM AM ou CD Bluetooth Le tiroir de disque est ouvert Lecture en boucle REPEAT lecture en boucle d un fichier piste Durant la lecture appuyez une fois su...

Page 95: ...touche de saut recherche m de la t l commande pour retourner au d but du fichier piste actuel o o La lecture al atoire Shuffle n est pas possible durant la lecture programm e propos des fichiers MP3 W...

Page 96: ...fil trois fois le temps de lecture coul r appara t o o Lorsqu un disque WMA est charg WMA appara t sur le c t gauche de l cran S lection de dossiers et de fichiers Pour s lectionner un dossier par so...

Page 97: ...97 FRAN AIS Exemple d affichage Num ro de piste Temps de lecture coul c Nom du fichier c Nom du dossier c Nom du morceau c Nom de l album c Nom de l artiste...

Page 98: ...ETOOTH a d fil 5 fois l heure actuelle s affiche o o L unit essaiera automatiquement d entrer en liai son avec le dernier appareil connect o o Apr s deux minutes sans avoir pu se connec ter NO DEVICE...

Page 99: ...e l AVRCP Certains appareils Bluetooth ont cependant des fonc tions diff rentes selon leurs sp cifications o o Selon l appareil Bluetooth le saut de piste peut ne pas r pondre la molette de saut de ce...

Page 100: ...Bluetooth pour s lectionner Bluetooth Apr s que BLUETOOTH ait d fil l cran PAIRING s affiche indiquant que l unit est pr te tre appair e avec un autre appareil Indicateur Bluetooth c Apr s deux minute...

Page 101: ...il Bluetooth connect se reconnecte automatiquement condi tion d tre port e et que sa fonction Bluetooth soit activ e o o Si vous mettez fin la connexion depuis l autre appareil Bluetooth NO DEVICE CON...

Page 102: ...souhaitez lancer la lecture Lorsque vous d placez le bras de lecture vers le disque la platine tourne disque commence tourner coute de disques vinyle 2 3 Placez un disque sur la platine Pour lire un 4...

Page 103: ...se produire si le volume est trop fort Si cela se produit tournez le bouton VOLUME vers la gauche pour baisser le volume Lorsque la lecture est termin e Lorsque la fin du disque est atteinte le bras d...

Page 104: ...u une station de radio est re ue la s lection automatique de station prend fin o o Pour annuler la s lection automatique de station appuyez nouveau sur une touche j k o o Si la r ception est mauvaise...

Page 105: ...TUNING TIME j k jusqu ce que vous trouviez la station que vous voulez Touche FM MODE Quand un programme FM st r o est capt vous pou vez choisir entre st r o et mono en appuyant sur la touche FM MODE...

Page 106: ...ser comme preset 3 Apr s la s lection d une station de radio appuyez sur la touche MEMORY Le num ro de preset et l indicateur MEMORY cli gnotent l cran Exemple d affichage Num ro de preset pr r glage...

Page 107: ...ress e la touche MEMORY au moins 2 secondes AUTO s affiche et l unit ajoute automatique ment comme presets les stations qu elle peut recevoir o o Apr s ajout automatique de 20 presets PROG FULL s affi...

Page 108: ...le 2 Maintenez press e la touche TIMER au moins 2 secondes Maintenez la press e au moins 2 secondes L indicateur de r veil clignote et SET TIMER d file une fois l cran ON TIME heure de r veil appara t...

Page 109: ...s clignote c 5 R p tez les tapes 3 et 4 pour r gler l heure d arr t du r veil OFF Exemple d affichage La valeur des heures clignote o o Si aucune action n est men e durant 10 secondes le r glage du r...

Page 110: ...s de r veil s effacent o o l heure programm e pour le r veil l unit se met en service et l indicateur de r veil clignote Pr parez la source de lecture avant que le r veil ne mette l unit en service Si...

Page 111: ...rie d extinction Le r veil s active et se d sactive quand l unit est en veille Standby D sactivation du r veil Si vous ne souhaitez pas utiliser le r veil appuyez sur la touche TIMER pour l arr ter TI...

Page 112: ...appareil connect o o Si le volume n est pas mont sur le lecteur audio alors que c est sa prise casque qui est branch e aucun son ne sortira de cette unit o o Si vous montez trop le niveau de volume d...

Page 113: ...sans fil Dans ce cas teignez l autre appareil quand vous utilisez la t l commande de cette unit Il y a du bruit e e loignez autant que possible l unit des t l vi seurs fours micro ondes et autres app...

Page 114: ...Bluetooth et cette unit durant l utilisation e e Essayez de d placer l autre unit Bluetooth et cette unit Radio Une station ne peut pas tre capt e La r ception est mauvaise e e R glez correctement la...

Page 115: ...ack 3 5 mm st r o 1 Prises de sortie Analogiques RCA 1 paire Prise de sortie casque Mini jack 3 5 mm st r o 1 Alimentation lectrique CA 120 V 60 Hz Consommation lectrique 25 W Dimensions L H P 460 215...

Page 116: ...AC AMERICA INC 7733 Telegraph Road Montebello California 90640 U S A Phone 1 323 726 0303 TEAC MEXICO S A DE C V R o Churubusco 364 Colonia Del Carmen Delegaci n Coyoac n CP 04100 M xico DF M xico Pho...

Reviews: