background image

Thanks for buying a TEAC. Read this manual carefully to get the best performance
from your new TEAC products.

CAUTION:

Use of controls or adjustments or performance of procedures other than those
specified herein may result in hazardous radiation exposure.

MV-4094G

4HEAD VIDEO CASSETTE RECORDER WITH G-CODE

OWNER’S MANUAL

This appliance has a serial number located on the rear
panel.    Please record the model number and serial
number and remain for your records. 

model number

serial number

PAL

WARNING - DANGEROUS VOLTAGE INSIDE

WARNING - TO PREVENT FIRE OR SHOCK HAZARD, DO NOT EXPOSE

THIS UNIT TO RAIN OR MOISTURE.

DVST4D1D-HB/H(148*210)  01.4.6 11:24 AM  ˘

`

25

Summary of Contents for MV-4094G

Page 1: ...n hazardous radiation exposure MV 4094G 4HEAD VIDEO CASSETTE RECORDER WITH G CODE OWNER S MANUAL This appliance has a serial number located on the rear panel Please record the model number and serial number and remain for your records model number serial number PAL WARNING DANGEROUS VOLTAGE INSIDE WARNING TO PREVENT FIRE OR SHOCK HAZARD DO NOT EXPOSE THIS UNIT TO RAIN OR MOISTURE DVST4D1D HB H 148...

Page 2: ...2 8845 1122 QLD OFFICE 335 Montague Road West End QLD 4101 Phone 07 3844 9060 WA OFFICE 273 Great Eastern Highway Belmont WA 6104 Phone 08 9479 6522 SA OFFICE Cnr Burbridge Marion Roads Cowandilla SA 5033 Phone 08 8234 1044 T E AC TO TAL CARE i n fo teac com au or visit our website at http www teac com au Freecall telephone 1 800 656 700 between Monday to Friday EST 9am to 5pm New Zealand TOLL FRE...

Page 3: ...pliances or the obstacles to get sufficient ventillation you clean the recorder only with a soft lint free cloth do not use aggressive or alcohol based cleaning agents you disconnect the power supply if the recorder appears to be working incorrectly is making an unusual sound has a strange smell has smoke emitting from it or liquids have got inside it Have a qualified technician check the recorder...

Page 4: ... ON OFF 7 Playing cassettes Playing back 8 Still Variable picture search Variable slow motion Accessing new recordings index scan CM Skip 9 Recording cassettes Simple recording One touch recording OTR 10 Timer recording using G CODE 11 More functions Normal timer recording 12 Timer Review changing and erasing Setting time and date 13 Clock Counter display Remaining time and Cassette length Accessi...

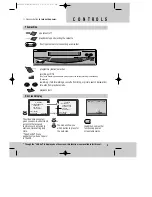
Page 5: ... 20 clock counter on screen display CM skip button to cue the tape for 30 seconds to eject the cassette the variable slow motion button this button is not available for this set to search the beginnings of records index a button that doubles the maximum recording time for very long recordings the record or OTR button One Touch Recording means each time you press the button recording is extended by...

Page 6: ...example The menus show you which button to press for the next step In addition some other functions appear on screen temporarily REW SP PR04 EURO The video s menu system gives you easy to understand access to the less used functions such as tuning to stations clock setting and more Tape Control Menu appears only when a tape is in the VCR 2x MENU PR TIMER PROGRAM PR PRESET VCR SETUP TAPE CONTROL PR...

Page 7: ...the video and the AV socket on the TV if available This connection will provide best picture and sound quality Ask your dealer for an appropriate cable if you do not have one Without a RCA cable you need to follow the steps described under If you are not using a RCA cable right page and page 19 Make sure the rating of the household mains supply matches the rating shown on the back of the video Now...

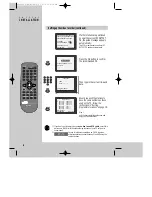
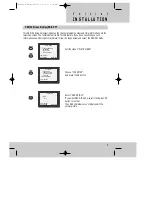
Page 8: ...ure the first time you switch on the TV and video Choose your language OK for Auto Search PR AUTO SEARCH tunes in all the stations you can receive in your country and sorts them in an order common for your country LANGUAGE SET ENGLISH DEUTSCH ITALIANO ESPAÑOL FRANÇAIS NEDERLANDS SVENSKA SUOMI PR SELECT OK CONFIRM MENU END AUTO SEARCH OK CONFIRM MENU END AUTO SEARCH MENU END PR03 V L 76 PLEASE WAIT...

Page 9: ...8 P 08 PR02 P 02 PR09 P 09 PR03 P 03 PR10 P 10 PR04 P 04 PR11 P 11 PR05 P 05 PR12 PR06 P 06 PR13 PR07 P 07 PR14 PR SELECT OK CONFIRM MENU END ONE OR MORE STATIONS ARE CLOSE TO THE VIDEO PICTURE PLEASE SELECT ANOTHER Press the OK button to confirm the recommended PR PLEASE CHANGE THE TV PR TO 36 0 9 SELECT 21 69 OK CONFIRM MENU END CURRENT PR 26 RECOMMENDED PR 36 IMPORTANT Then type in the current ...

Page 10: ...eps below and select the OSD OFF mode Call the video s MAIN MENU Choose VCR SETUP And press the OK button Select OSD ON OFF If you want OSD OFF mode select it and press OK button to confirm Then OSD characters are not displayed in the normal picture MENU MENU MAIN MENU TIMER PROGRAM PR PRESET VCR SETUP TAPE CONTROL PR SELECT OK CONFIRM MENU END VCR SETUP CLOCK SET LANGUAGE SET RF OUTPUT SET 16 9 S...

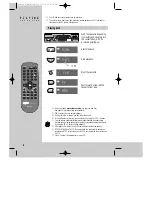
Page 11: ... VCR VCR VCR VCR VCR EJECT When you load a protected cassette e g pre recorded film see page 15 playback starts automatically PLAY switches back to normal playback During still slow or search you don t hear the sound If the still picture is jittering you can steady it by using the PR buttons You can reduce horizontal interference stripes resulting from inaccurate tracking when playing tapes of poo...

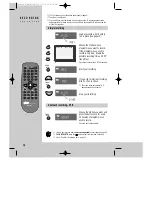
Page 12: ...ess repeatedly PLAY switches back to normal playback Select INDEX or INDEX to search forwards or backwards The video will now wind to the beginning of the first recording play it for about 6 seconds then wind on to the next one When you see the recording you want press PLAY Access the beginning of recordings in the middle of the tape using the Index function The video recorder automatically sets a...

Page 13: ...ding If you wish to interrupt recording briefly then continue Stop your recording Choose the station whose programme you want to record If the programme you wish to record is very long double the possible recording time with LP Long Play Up to eight hours with an E 240 cassette If you want to record from a source connected to your video see page 22 To CANCEL OTR press the button stop for more than...

Page 14: ...ATE HOW OFTEN DO YOU WANT TO RECORD THIS PROGRAM PR SELECT OK CONFIRM MENU END ONCE WEEKLY ONCE A WEEK DAILY MON FRI DAILY MON SAT DAILY MON SUN TIMER PROGRAM ONCE PR 03 START TIME 21 20 END TIME 22 20 START DATE 14 04 SAT TAPE SPEED SP PR SET AV 0 9 SETUP PR CORRECT OK CONFIRM MENU END If you don t have the G CODE numbers see page 12 for the normal timer If you have made a mistake move back to th...

Page 15: ... if you wish to make a very long recording TMR 2x MENU OPERATE 1 2 3 4 5 6 7 8 9 0 PR HOW OFTEN DO YOU WANT TO RECORD THIS PROGRAM PR SELECT OK CONFIRM MENU END ONCE WEEKLY ONCE A WEEK DAILY MON FRI DAILY MON SAT DAILY MON SUN PR SET AV 0 9 SETUP PR CORRECT MENU END PR START TIME END TIME START DATE TAPE SPEED SP TIMER PROGRAM ONCE TIMER PROGRAM ONCE PR 01 START TIME 18 10 END TIME 20 30 START DAT...

Page 16: ...D DATE 03 21 20 22 20 14 04 01 18 30 20 20 12 04 PR SELECT OK CONFIRM MENU END MENU PR PR MENU 1 2 3 4 5 6 7 8 9 0 Setting time and date Call the video s MAIN MENU choose VCR Setup then Clock Set Move to the position you want to change and type in the new values Wait a few seconds after typing a one digit number Store with OK button and exit with MENU button 2x 2x MENU MENU 1 2 3 4 5 6 7 8 9 0 PR ...

Page 17: ...t doesn t appear the tape remain time When you want the video to show the time remaining from the current video tape position to find out if there is sufficient space for a recording for example To ensure the remaining time shown is accurate select the length of cassette currently loaded by selecting this function until you reach the correct length Remaining time display is only possible when the ...

Page 18: ...tched to stand by mode Auto power off Your video recorder switches to stand by when no tape is played and no station is received for more than 5 minutes Use only good quality tape cassettes with the VHS logo Keep cassettes away from excessive moisture or dust magnetic and electrical fields loudspeakers and computer monitors for example Always wind the tape to the beginning when you have finished S...

Page 19: ...confirm Tune in the station you want Press button to see the picture If it isn t the station you want or the picture is disturbed carry on tuning Once you see the station you want store it Tune in further stations from step 3 onwards or exit tuning mode MENU MENU PR PR PR PR PR PR PR PRESET AUTO SEARCH MANUAL SET PR ERASE PR ALIGN PR SELECT OK CONFIRM MENU END MANUAL SET PR01 P 01 PR08 P 08 PR02 P...

Page 20: ...IEW OK CONFIRM MENU END MANUAL SET PR NAME CHANGE NAME CREATE OK CONFIRM MENU END PR01 P 01 MANUAL SET PR SELECT CHARACTER SELECT POSITION OK CONFIRM MENU END PR01 E 01 MANUAL SET PR01 E 01 PR08 P 08 PR02 P 02 PR09 P 09 PR03 P 03 PR10 P 10 PR04 P 04 PR11 P 11 PR05 P 05 PR12 PR06 P 06 PR13 PR07 P 07 PR14 PR SELECT OK CONFIRM MENU END The video s automatic tuning system usually produces the best res...

Page 21: ...to the desired location number Confirm PR ALIGN PR ALIGN PR VIEW OK CONFIRM MENU END PR01 P 01 PR08 P 08 PR02 P 02 PR09 P 09 PR03 P 03 PR10 P 10 PR04 P 04 PR11 P 11 PR05 P 05 PR12 PR06 P 06 PR13 PR07 P 07 PR14 MENU PR PR PR MENU PR PR PR Clearing programme locations PR ERASE PR SELECT PR VIEW OK ERASE MENU END Call the video s MAIN MENU choose PR Preset then PR Erase Select the station location nu...

Page 22: ...ture Tune the TV to the test picture using the channel pre set functions of your TV as described in its manual Once you have found the test picture follow this instructions within your television manual to store this new channel into a programme location Press the OK button of the video s remote control again longer than 5 seconds to release the test picture Call the video s MAIN MENU choose VCR S...

Page 23: ...n the other video select its AV input and set the machine to record Switch your video to play back at the position you want copying to start TV other VCR ANT OUT ANT IN AUDIO VIDEO OUT IN Other VCR Decoder for Pay TV Camcorder Video Player AV Assembling For the best results the source cassette from which you are recording should already be playing back when you start recording Should you wish to a...

Page 24: ...ow wind to the beginning of the first recording play it for about 6 seconds then wind on to the next one When you see the recording you want press PLAY INDEX Simple recording One touch recording OTR The TV stations on the video have been tuned in page 5 The video is switched on You can either watch the picture from the video on the TV by pressing the station button reserved for video input or the ...

Page 25: ...nfirm in the last line Confirm G CODE 1 2 3 4 5 6 7 8 9 0 OPERATE For timer recordings clock date and stations must be set correctly Load a cassette with safety tab in place page 15 and with sufficient free space for the recording Call the video s MAIN MENU choose Timer Program Decide if you want to record Once Weekly or Daily and confirm If you wish to make changes Move to the position you want t...

Page 26: ...uttons to adjust tracking if horizontal stripes appear Is the cassette of poor quality or worn out Test with another cassette If you are not using a RCA cable have you tuned the location for video input on the TV properly pages 5 19 Try a different cassette The video head drum may need cleaning ask your dealer Press pause several times Adjust with the PR buttons until you get the best picture are ...

Page 27: ...dard Play 10 12 Stand by Precautions Station 5 16 19 Still frame adjustment 8 Test picture 19 Tracking 8 Dimensions W x H x D 360 x 90 x 288 mm Weight 3 85 kg Power supply Voltage AC 240 V 50 Hz Power consumption 14 Watt System Video PAL B G Channel range VHF 2 12 UHF 21 69 CATV S1 S41 x y z Hyperband Channel locations 99 AUX RF Out UHF CH 21 69 26 Video System VHS Speeds SP LP General Temperature...

Page 28: ...n hazardous radiation exposure MV 4094G 4HEAD VIDEO CASSETTE RECORDER WITH G CODE OWNER S MANUAL This appliance has a serial number located on the rear panel Please record the model number and serial number and remain for your records model number serial number PAL WARNING DANGEROUS VOLTAGE INSIDE WARNING TO PREVENT FIRE OR SHOCK HAZARD DO NOT EXPOSE THIS UNIT TO RAIN OR MOISTURE DVST4D1D HB H 148...

Page 29: ...2 8845 1122 QLD OFFICE 335 Montague Road West End QLD 4101 Phone 07 3844 9060 WA OFFICE 273 Great Eastern Highway Belmont WA 6104 Phone 08 9479 6522 SA OFFICE Cnr Burbridge Marion Roads Cowandilla SA 5033 Phone 08 8234 1044 T E AC TO TAL CARE i n fo teac com au or visit our website at http www teac com au Freecall telephone 1 800 656 700 between Monday to Friday EST 9am to 5pm New Zealand TOLL FRE...

Reviews: