background image

ES

75

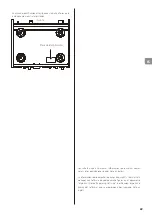
Conexiones (panel frontal)

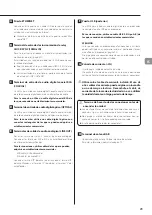
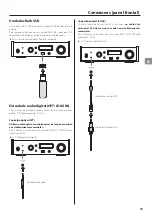
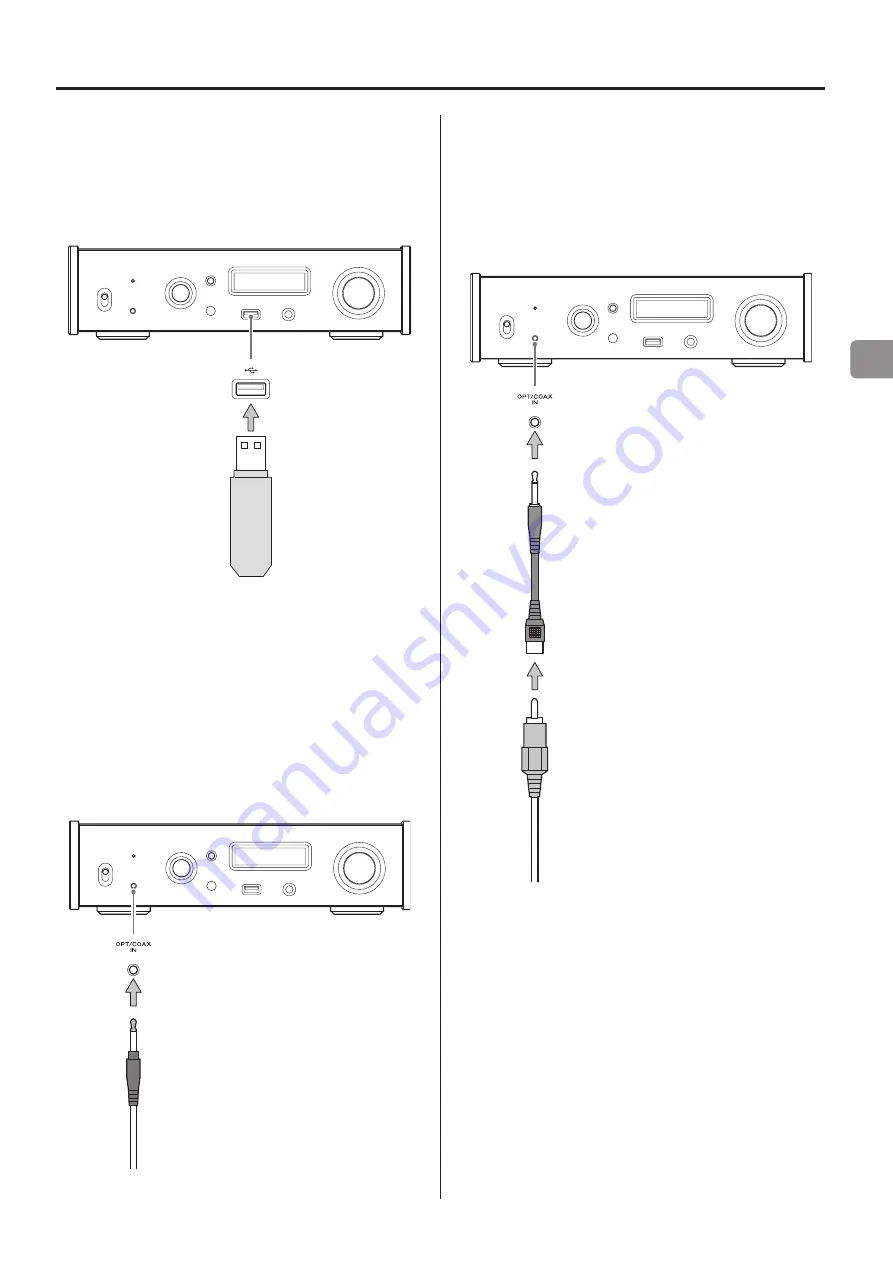
Unidades flash USB

Las unidades flash USB se conectan al puerto USB del frontal de la 
unidad.
Para reproducir archivos de una unidad flash USB, seleccione NET 
como fuente de entrada y utilice la app para la reproducción.


o

Para más información, consulte el Manual de red.

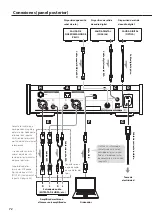
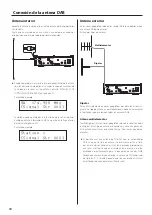
Entrada de audio digital (OPT/COAX IN)

Este terminal de entrada se puede utilizar tanto para conexiones 
ópticas (OPT) como coaxiales (COAX).

Conexión óptica (OPT)

Utilice un cable óptico con miniconector de los que se venden 
en establecimientos comerciales.

Para habilitar esta entrada, gire el mando INPUT SELECTOR para 
seleccionar OPTf.


o

La “f” indica el panel frontal.

Miniconector óptico

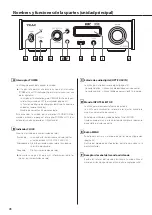
Conexión coaxial (COAX)

Utilice el cable de conversión RCA incluido y 

un cable digi-

tal coaxial RCA de los que se venden en establecimientos 
comerciales

.

Para habilitar esta entrada, gire el mando INPUT SELECTOR para 
seleccionar COAXf.


o

La “f” indica el panel frontal.

Cable de conversión RCA

Cable digital coaxial RCA

Summary of Contents for NT-503DAB

Page 1: ...ns see the Network Manual The Owner s Manual and Network Manual can be downloaded from the TEAC Global Site http www teac global com To play back files on USB flash drives and to use the unit connecte...

Page 2: ...is either a registered trademark or a trademark of Microsoft Corporation in the United States and or other countries Mac Mac OS OS X iPad iPhone and iPod touch are trademarks of Apple Inc registered...

Page 3: ...the laws and regulations of the country or region where you want to use the unit before use Radiation Exposure requirements This equipment meets the regulation which is recognized interna tionally fo...

Page 4: ...isters stoves or other apparatus including amplifiers that produce heat 9 Do not defeat the safety purpose of the polarized or grounding type plug A polarized plug has two blades with one wider than t...

Page 5: ...eries with other metallic objects The batteries could short circuit leak or explode o o Never recharge a battery unless it is confirmed to be a recharge able type For European Customers Disposal of el...

Page 6: ...lied to the unit should match the voltage printed on the rear panel If you are in any doubt regarding this matter consult an electrician o o Do not move the unit during use o o Do not open the body of...

Page 7: ...If the desired language does not appear click Other Languages 3 Click the product name in the Products section 4 Select and download the updates that are needed Maintenance Downloading the remote app...

Page 8: ...Audio input LINE IN etc Stereo amplifier or powered speakers Computer Connect cables for the pair set for line output page 20 Sound will only be output from the selected pair If headphones are connec...

Page 9: ...wered speakers Use commercially available cables for connections XLR balanced XLR cables RCA RCA audio cables Connect this unit s R connector to the R connector of the amplifier and its L connector to...

Page 10: ...als are weak use an outdoor DAB antenna There are two main types of antennas available Multi element Dipole Dipole For use in marginal signal areas This type of antenna is omnidirec tional and should...

Page 11: ...or both optical OPT and coaxial COAX connections Optical OPT connection Use a commercially available optical cable with a mini plug To enable this input turn the INPUT SELECTOR knob to select OPTf o o...

Page 12: ...IN Blinking No clock is being input or the unit is not being synchronized Unlit No clock sync is occurring o o See page 20 for clock sync settings C Digital audio input OPT COAX IN Use this to input...

Page 13: ...one output Using the remote control Precautions for use V V Misuse of batteries could cause them to rupture or leak which might result in fire injury or the stain ing of nearby materials Please carefu...

Page 14: ...brightness of the main unit s display h INFO PROGRAM and CLEAR buttons Use these buttons when in DAB mode INFO button Use to change the text shown on the bottom line of the display page 26 PROGRAM bu...

Page 15: ...1 44 1 44 1 88 2 176 4 352 8 11 2 88 2 88 2 88 2 88 2 176 4 352 8 11 2 176 4 176 4 176 4 176 4 176 4 352 8 11 2 352 8 352 8 352 8 352 8 352 8 11 2 48 48 48 96 192 384 12 2 96 96 96 96 192 384 12 2 192...

Page 16: ...ol ume will appear to the right of the input signal status Input source name This shows the name of the selected source The names shown on the display correspond to the selected con nectors as follows...

Page 17: ...port but no USB flash drive is connected to the unit READY The input source is USB rear USB port NET or USBf front USB port and a device is connected but no audio signal is being received PCM 32kHz P...

Page 18: ...to USB you must first install a dedicated driver on the computer before connecting them page 29 o o DSD data can only be played back using the front and rear USB ports or a DoP format digital input o...

Page 19: ...the up and down k j buttons on the remote control o o Press the MENU button to return to setting item selection 5 When you are done changing settings press the MENU button to show the input source sta...

Page 20: ...the audio band FIR SLOW An FIR filter with a slow roll off is used to gently cut signals out side the audio band SDLY SHARP A short delay filter with a steep roll off is used to sharply cut sig nals o...

Page 21: ...the VOLUME knob Select this if you want to adjust the volume using this unit o o No sound will be output if headphones are connected OFF No sound is ever output Display brightness DIMMER DIMMER 3 DIM...

Page 22: ...not select the codec to be used by pressing a button for example Due to characteristics of Bluetooth wireless technology playback from a Bluetooth device will be slightly delayed compared to play back...

Page 23: ...22 4 Press the INPUT SELECTOR knob to connect o o If there are multiple paired devices turn the INPUT SELECTOR knob to show other devices When the name of the device that you want to connect is shown...

Page 24: ...to create a station list The unit will scan for broadcast services in the local area and add them to the station list as they are found The scan should take about 20 seconds SCANNING xxx xxx MHz Afte...

Page 25: ...knob to show stations in the station list on the bottom line of the display Display example STATION LIST Station 1 o o You can also use the remote control ENTER button 4 Turn the INPUT SELECTOR knob u...

Page 26: ...wn changes as follows o o You can also use the INFO button or up and down k j but tons on the remote control o o Some time might be necessary before the information is acquired DLS Message Program Typ...

Page 27: ...seful when adjusting or positioning an antenna for better reception 1 When the DAB menu is open select MANUAL TUNE and press the INPUT SELECTOR knob 2 Turn the INPUT SELECTOR knob until the station yo...

Page 28: ...sec onds of selecting the preset the selection will be canceled o o If you store a new station to a preset the station previously stored as that preset will be overwritten To store more station preset...

Page 29: ...ions about driver installation procedures access the Downloads page from the TEAC Global site http teac global com o o Depending on the combination of hardware and software proper operation might not...

Page 30: ...e VOLUME knob counterclockwise to minimize the volume before putting them on Then gradually increase it o o The computer and this unit cannot control each other o o Do not do any of the following when...

Page 31: ...s inserted completely Clock sync The CLOCK indicator does not stop blinking e e Set clock synchronization to OFF when not using it e e Synchronization with the clock signal being input might not be po...

Page 32: ...at the antenna is correctly connected to the unit A long time passes with DAB STARTING SCANNING or RECEIVING shown on the display or the signal is interrupted intermittently e e Communication with the...

Page 33: ...approximate o o Illustrations in this manual might differ slightly from production models Analog audio outputs Connectors XLR connectors 1 pair RCA connectors 1 pair Output impedance XLR 188 RCA 150 M...

Page 34: ...fage po les ou autres appa reils y compris des amplificateurs d gageant de la chaleur 9 Ne neutralisez pas la fonction de s curit de la fiche polaris e ou de terre Une fiche polaris e a deux broches l...

Page 35: ...dans de l eau o o Ne conservez et ne transportez pas les piles avec d autres objets m talliques Les piles pourraient entrer en court circuit couler ou exploser o o Ne rechargez jamais une batterie san...

Page 36: ...vigueur dans le pays ou la r gion dans lequel vous voulez employer l unit Exigences pour l exposition aux rayonnements Cet quipement est conforme la r glementation reconnue inter nationalement en mati...

Page 37: ...uniquement Des informations sur les droits d auteur et les licences en rapport avec les logiciels libres Open source sont fournies dans le document Important Notice Regarding Software en anglais uniq...

Page 38: ...imprim e sur son panneau arri re Si vous avez des doutes ce sujet consultez un lectricien o o Ne d placez pas l unit durant l utilisation o o N ouvrez pas le bo tier de l unit car cela pourrait endom...

Page 39: ...ur cette langue NOTE Si la langue d sir e n appara t pas cliquez sur Other Languages autres langues 3 Cliquez sur le nom du produit dans la section Products produits 4 S lectionnez et t l chargez les...

Page 40: ...urni Entr e audio LINE IN etc Amplificateur st r o ou enceintes amplifi es Ordinateur Branchez les c bles la paire choisie comme sortie ligne page 52 Le son ne sera produit que par la paire s lectionn...

Page 41: ...commerce pour les branchements XLR c bles XLR sym triques RCA c bles audio RCA Reliez la prise R droite de cette unit la prise R de l amplifica teur et sa prise L gauche la prise L de l amplificateur...

Page 42: ...ux principaux types d antenne sont disponibles Antenne rateau Antenne dipolaire Antenne dipolaire Pour une utilisation dans les zones o le signal est tr s faible Ce type d antenne est omnidirectionnel...

Page 43: ...n optique OPT que coaxiale COAX Connexion optique OPT Utilisez un c ble optique mini fiche du commerce Pour activer cette entr e tournez le bouton INPUT SELECTOR afin de s lectionner OPTf o o Le f ind...

Page 44: ...Clignotant aucune horloge n est re ue ou l unit n est pas en cours de synchronisation teint il n y a aucune synchronisation d horloge o o Voir page 52 les r glages de synchronisation d horloge C Entr...

Page 45: ...s par ment pour la sortie audio analogique et la sortie casque Emploi de la t l commande Pr cautions d emploi V V Un mauvais emploi des piles peut entra ner leur rupture ou leur fuite avec pour cons q...

Page 46: ...ert r gler la luminosit de l cran de l unit principale h Touches INFO PROGRAM et CLEAR Utilisez ces touches en mode DAB Touche INFO Sert changer de texte affich dans la ligne du bas de l cran page 58...

Page 47: ...ons entre les fr quences d chantillonnage en entr e et celles apr s conversion ascendante sont les suivantes Source d entr e R glage de conversion ascendante Entr e audio num rique USB OFF 2Fs 4Fs 8Fs...

Page 48: ...elui ci appara tra droite de l indication de statut du signal entrant Nom de la source d entr e Affiche le nom de la source s lectionn e Les noms affich s correspondent aux connecteurs s lectionn s co...

Page 49: ...e cl USB n est branch e l unit READY La source d entr e est r gl e sur USB port USB arri re NET ou USBf port USB avant et un appareil est connect mais aucun signal audio n est re u PCM 32kHz PCM 44 1k...

Page 50: ...devez installer un pilote d di sur l ordinateur avant de les relier page 61 o o Les donn es DSD ne peuvent tre lues qu en utilisant les ports USB avant et arri re ou une entr e num rique au for mat D...

Page 51: ...as k j de la t l commande o o Appuyez sur la touche MENU pour revenir la s lection de param tres de r glage 5 Quand vous avez fini vos r glages appuyez sur la touche MENU pour r afficher le statut de...

Page 52: ...ire brutalement les signaux ext rieurs la bande audio FIR SLOW Un filtre FIR RIF en fran ais pente douce est utilis pour r duire progressivement les signaux ext rieurs la bande audio SDLY SHARP Un fil...

Page 53: ...ue Optez pour ce r glage si vous souhaitez utiliser cette unit pour r gler le volume o o Aucun son ne sortira si un casque est branch OFF Aucun son n est produit Luminosit de l cran DIMMER DIMMER 3 DI...

Page 54: ...ation NOTE Vous ne pouvez pas s lectionner le codec utiliser par exemple en appuyant sur un bouton De par les caract ristiques de la technologie sans fil Bluetooth la lecture depuis un appareil Blueto...

Page 55: ...Appuyez sur la touche INPUT SELECTOR pour ta blir la connexion o o S il existe plusieurs appareils appair s tournez le bouton INPUT SELECTOR pour afficher les autres Lorsque le nom de l appareil auqu...

Page 56: ...les services de diffusion locaux et les ajoutera la liste des stations au fur et mesure de leur d tection Le balayage devrait prendre environ 20 secondes SCANNING xxx xxx MHz Apr s d tection des serv...

Page 57: ...ATION LIST 3 Appuyez sur le bouton INPUT SELECTOR pour affi cher les stations de la liste dans la ligne du bas de l cran Exemple d affichage STATION LIST Station 1 o o Vous pouvez aussi utiliser la to...

Page 58: ...le bouton INPUT SELECTOR les infor mations affich es changent comme suit o o Vous pouvez aussi utiliser la touche INFO ou les touches Haut et Bas k j de la t l commande o o Un certain temps peut tre n...

Page 59: ...gler ou positionner une antenne en vue d une meil leure r ception 1 Avec le menu DAB ouvert s lectionnez MANUAL TUNE syntonisation manuelle puis appuyez sur le bouton INPUT SELECTOR 2 Tournez la mole...

Page 60: ...des apr s avoir s lectionn le preset sa s lec tion est annul e o o Si vous m morisez une nouvelle station dans un preset celle qui tait auparavant m moris e dans ce dernier est remplac e Pour m morise...

Page 61: ...ownloads t l chargements du site mondial TEAC http teac global com o o Selon la combinaison ordinateur et logiciel un bon fonction nement peut ne pas tre possible m me avec les syst mes d exploitation...

Page 62: ...on VOLUME dans le sens antihoraire pour r duire le volume au minimum avant de mettre le casque Ensuite montez le progressivement o o L ordinateur et cette unit ne peuvent pas se contr ler l un l autre...

Page 63: ...esse pas de clignoter e e R glez l horloge de synchronisation sur OFF lorsque vous ne l utilisez pas e e La synchronisation avec le signal d horloge entrant peut ne pas tre possible V rifiez les conne...

Page 64: ...t s coule avec DAB STARTING SCANNING ou RECEIVING l cran ou le signal s interrompt par intermittence e e La communication avec le module DAB n a pas t possible Appuyez sur la touche ENTER pour quitter...

Page 65: ...ce mode d emploi peuvent l g rement diff rer des mod les de production Sorties audio analogiques Prises Prises XLR 1 paire Prises RCA 1 paire Imp dance de sortie XLR 188 RCA 150 Niveau maximal de sort...

Page 66: ...os si ha sido derramado alg n l quido sobre la unidad o alg n objeto ha sido introducido en ella si ha quedado expuesto a la lluvia o la humedad si no funciona nor malmente o si ha ca do al suelo en a...

Page 67: ...ortocircuitos perder l quido o explotar o o Nunca recargue una pila si no est completamente seguro de que es una pila recargable Para consumidores europeos Deshacerse de aparatos el ctricos electr nic...

Page 68: ...s del pa s o regi n donde vaya a uti lizar la unidad antes de hacerlo Requerimientos acerca de la exposici n a radiaciones Este equipo cumple con la regulaci n internacionalmente reco nocida para los...

Page 69: ...tor copyright y licencias rela cionados con software de c digo abierto figuran en el documento Important Notice Regarding Software notificaci n importante acerca del software que se proporciona por se...

Page 70: ...ncidir con el voltaje impreso en el panel posterior Si tiene dudas al respecto consulte a un electricista o o No mueva la unidad mientras est en uso o o No abra la carcasa porque podr a causar da os e...

Page 71: ...ioma NOTA Si no aparece el idioma que desea haga clic en Other Languages otros idiomas 3 Haga clic en el nombre del producto en la secci n Products productos 4 Seleccione y descargue las actualizacion...

Page 72: ...est reo o altavoces autoamplificados Ordenador Conecte los cables que correspondan a la pareja de terminales fijada como salida de l nea p gina 84 El sonido solo saldr por la pareja de terminales sele...

Page 73: ...cados Para las conexiones utilice cables de los que se pueden adquirir en establecimientos comerciales XLR cables XLR balanceados RCA cables de audio RCA Conecte el terminal R derecha de esta unidad a...

Page 74: ...les utilice una antena DAB para exterior Existen dos tipos de antenas Multielementos Dipolar Dipolar Para utilizar solamente en zonas geogr ficas donde la se al sea mar ginal Este tipo de antena es om...

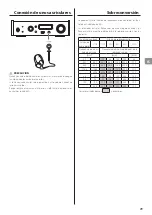
Page 75: ...xiones pticas OPT como coaxiales COAX Conexi n ptica OPT Utilice un cable ptico con miniconector de los que se venden en establecimientos comerciales Para habilitar esta entrada gire el mando INPUT SE...

Page 76: ...loj o la unidad no se est sincronizando Apagado No hay sincronizaci n de reloj o o Consulte la p gina 84 para m s informaci n sobre los ajustes de sincronizaci n de reloj C Entada de audio digital OPT...

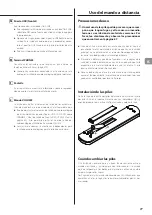
Page 77: ...so del mando a distancia Precauciones de uso V V Un mal uso de las pilas podr a provocar que se rom pan o que tengan fugas y ello causar un incendio lesiones u oxidaci n de materiales cercanos Por fav...

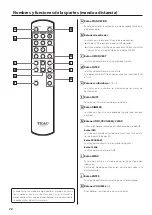
Page 78: ...nosidad de la pantalla de la unidad principal h Botones INFO PROGRAM y CLEAR Utilice estos botones cuando est seleccionado el modo DAB Bot n INFO Se utiliza para cambiar el texto que se muestra en la...

Page 79: ...iones entre las frecuencias de muestreo de entrada y las frecuencias de muestreo despu s de la sobreconversi n son las siguientes Fuente de entrada Ajuste de sobreconversi n Entada de audio digital US...

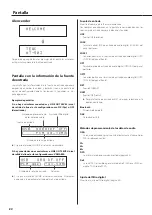
Page 80: ...umen cambiar El volumen aparecer a la derecha del estado de la se al de entrada Fuente de entrada Muestra el nombre de la fuente seleccionada Los nombres que aparecen en la pantalla se corresponden co...

Page 81: ...ro no hay ninguna unidad flash USB conectada a la unidad READY preparado La fuente de entrada es USB puerto USB posterior NET o USBf puerto USB frontal y hay un dispositivo conectado pero no se est re...

Page 82: ...ontrolador driver espec fico en el ordenador antes de conectarlo a esta unidad p gina 93 o o Los datos DSD solo pueden reproducirse utilizando los puertos USB frontal y posterior o una entrada digital...

Page 83: ...mando a distancia o o Pulse el bot n MENU para volver a la selecci n de los ele mentos de configuraci n 5 Cuando haga cambios en los ajustes pulse el bot n MENU para que vuelva a mostrarse en pantalla...

Page 84: ...OW Se utiliza un filtro FIR con pendiente de ca da lenta para cortar suavemente las se ales que queden fuera de la banda de audio SDLY SHARP Se utiliza un filtro de retardo corto con pendiente de ca d...

Page 85: ...i nela si desea ajustar el volumen utilizando esta unidad o o No saldr sonido si hay unos auriculares conectados OFF No saldar sonido en ning n caso Brillo de la pantalla DIMMER DIMMER DIMMER 3 DIMMER...

Page 86: ...o se puede seleccionar el c dec que se va a utilizar pulsando un bot n por ejemplo Debido a las caracter sticas de la tecnolog a inal mbrica Bluetooth la reproducci n desde un dispositivo Bluetooth te...

Page 87: ...a entrar en el modo de emparejamiento p gina 86 4 Pulse el mando INPUT SELECTOR para conectar o o Si hay varios dispositivos emparejados gire el mando INPUT SELECTOR para mostrar otros dispositivos Cu...

Page 88: ...diodifusi n en su zona geogr fica y los a adir a la lista de emisoras seg n se vayan encontrando La exploraci n deber durar unos 20 segundos SCANNING xxx xxx MHz Despu s de haber encontrado los servic...

Page 89: ...TOR para mostrar las emisoras de la lista en la l nea inferior de la pantalla Pantalla de ejemplo STATION LIST Station 1 o o Tambi n se puede utilizar el bot n ENTER del mando a distancia 4 Gire el ma...

Page 90: ...los botones arriba abajo k j del mando a distancia o o La informaci n puede tardar un cierto tiempo en obtenerse DLS Message Program Type Ensemble Name Channel Freq Bitrate Mode Time Date Signal Str D...

Page 91: ...tar muy til cuando se est ajustando o colocando la antena para con seguir una mejor recepci n 1 Con el men DAB abierto seleccione MANUAL TUNE y pulse el mando INPUT SELECTOR 2 Gire el mando INPUT SELE...

Page 92: ...10 segundos despu s de seleccionar la presinton a se can celar la selecci n o o Si almacena una nueva emisora en una presinton a la emisora anteriormente almacenada en esa presinton a se borrar Para a...

Page 93: ...gina de descargas Downloads de la web global de TEAC http teac global com o o Dependiendo de la combinaci n de hardware y software podr a darse el caso de que el funcionamiento no sea posible incluso...

Page 94: ...imo antes de pon rselos y luego s balo gradualmente o o El ordenador y esta unidad no pueden controlarse el uno al otro o o No lleve a cabo ninguna de las acciones indicadas a continua ci n cuando rep...

Page 95: ...LOCK no deja de parpadear e e Configure la sincronizaci n de reloj en OFF desactivada cuando no se utilice e e No es posible la sincronizaci n con la se al de reloj que est entrando Compruebe las cone...

Page 96: ...que los mensajes DAB STARTING iniciando DAB SCANNING explorando o RECEIVING recibiendo des aparezcan de la pantalla o la se al se interrumpe intermitentemente e e No ha sido posible la comunicaci n c...

Page 97: ...ados o o Las ilustraciones de este manual pueden diferir ligeramente de los modelos de producci n Salidas de audio anal gico Terminales XLR 1 par RCA 1 par Impedancia de salida XLR 188 RCA 150 Nivel d...

Page 98: ...contacter le revendeur chez qui vous avez achet le produit Las condiciones de garant a de este aparato est n sujetas a las disposiciones legales sobre garant a del pa s en el que ha sido adquirido En...

Page 99: ...99...
Page 100: ...C 1834 Gage Road Montebello California 90640 U S A Phone 1 323 726 0303 TEAC AUDIO EUROPE Gutenberg Str 3 82178 Puchheim Germany Phone 49 8142 4208 141 This device has a serial number located on its r...

Reviews: