background image

68

WARRANTY/GARANTIE/GARANTÍA

Warranty provisions (United States and 
Canada only)

Length of Warranty

The parts and labor warranty will be effective for one (1) year from 
the date of the original purchase for products not used for com-
mercial purposes. For products used commercially, the warranty 
is ninety (90) days for magnetic heads and optical pickups, one (1) 
year for all other parts and ninety (90) days for labor.

Who Is Covered Under This Warranty

This warranty is valid only in the United States or Canada, depen-
dent upon the country in which original purchase was made, and 
enforceable only by the original purchaser within the country in 
which the purchase was made.
This warranty is not valid if the product was purchased through an 
unauthorized dealer.

What Is Not Covered Under This Warranty


o

Damage to or deterioration of the external cabinet.


o

Damage resulting from accident, misuse, abuse, or neglect.


o

Damage resulting from failure to follow instructions contained 
in the products owners’ manual or otherwise provided with the 
product.


o

Damage occurring during shipment of the product (Claims must 
be presented to the carrier).


o

Damage resulting from the repair or attempted repair by anyone 
other than TEAC or an authorized TEAC service station.


o

Damage resulting from modification or attempted modification 
of product not authorized by TEAC.


o

Damage resulting from causes other than product defects, 
including lack of technical skills, competence, or experience of 
the user.


o

Damage to any unit that has been altered or which the serial 
number has been defaced, modified or removed.

What TEAC Will Pay For

TEAC will pay all labor and material expenses for items covered by 
the warranty. Payment of shipping charges is covered in the next 
section.

How To Obtain Warranty Service

Your unit must be serviced by an authorized TEAC service station 
within the country in which the product was purchased. If you are 
unable to locate an authorized service station in your area, please 
contact TEAC at the applicable address shown at the end of this 
warranty statement. PLEASE DO NOT RETURN YOUR UNIT TO TEAC 
WITHOUT OUR PRIOR AUTHORIZATION. You must pay shipping 
charges if it is necessary to ship the product for service. However, if 
the necessary repairs are covered by warranty, we will pay the return 
shipping charges to any destination within the country in which the 
product was purchased. Whenever warranty service is required, you 
must present the original dated sales receipt, or other proof indicat-
ing the purchase place and date, as proof of warranty coverage.

LIMITATION OF IMPLIED WARRANTIES

ALL IMPLIED WARRANTIES, INCLUDING WARRANTIES OF 
MERCHANTABILITY AND FITNESS FOR A PARTICULAR PURPOSE, ARE 
LIMITED IN DURATION TO THE LENGTH OF THIS WARRANTY.

EXCLUSION OF DAMAGES

TEAC’S LIABILITY FOR ANY DEFECTIVE PRODUCT IS LIMITED TO 
REPAIR OR REPLACEMENT OF THE PRODUCT, AT TEAC’S OPTION. 
TEAC SHALL NOT BE LIABLE FOR DAMAGE BASED UPON 
INCONVENIENCE, LOSS OF USE OF THE PRODUCT, INTERRUPTED 
OPERATION, COMMERCIAL LOSS OR LOST PROFITS, OR ANY OTHER 
DAMAGES, WHETHER INCIDENTAL, CONSEQUENTIAL, PUNITIVE OR 
OTHERWISE.
SOME STATES OR PROVINCES DO NOT ALLOW LIMITATIONS ON 
HOW LONG AN IMPLIED WARRANTY LASTS AND/OR DO NOT 
ALLOW THE EXCLUSION OR LIMITATION OF INCIDENTAL OR 
CONSEQUENTIAL DAMAGES, SO THE ABOVE LIMITATIONS AND 
EXCLUSIONS MAY NOT APPLY TO YOU.
THIS WARRANTY GIVES YOU SPECIFIC RIGHTS, AND MAY VARY FROM 
SOME OF THE RIGHTS PROVIDED BY LAW. THESE RIGHTS MAY VARY 
FROM STATE TO STATE OR PROVINCE TO PROVINCE.

Conditions de garantie (États-Unis et 
Canada uniquement)

Durée de la garantie

La garantie pièces et main d’oeuvre sera valable un (1) an à compter 
de la date d’achat initial des produits non utilisés dans un but com-
mercial. Pour les produits à utilisation commerciale, la garantie des 
têtes magnétiques et capteurs optiques est de quatre-vingt dix (90) 
jours, elle est d’un (1) an pour les autres pièces et quatre-vingt dix 
(90) jours pour la main d’oeuvre.

Bénéficiaire de la garantie

Cette garantie n’est valable qu’aux États-Unis et au Canada, selon le pays 
d’achat initial, et ne s’applique qu’à l’acquéreur initial dans le pays d’achat.
Cette garantie n’est pas valable si le produit a été acheté auprès d’un 
revendeur non autorisé.

Ce qui n’est pas couvert par cette garantie


o

Les dommages ou détériorations du boîtier externe.


o

Les dommages résultant d’un accident, d’une mauvaise utilisa-
tion, d’un abus ou d’une négligence.


o

Les dommages résultant du non-respect des instructions conte-
nues dans le mode d’emploi du produit ou fournies avec le produit.


o

Les dommages survenus durant le transport du produit (les 
réclamations doivent être adressées au transporteur).


o

Les dommages résultant d’une réparation ou tentative de 
réparation effectuée par toute personne extérieure au service 
après-vente TEAC ou agréé par TEAC.


o

Les dommages résultant d’une modification ou tentative de 
modification de produit non autorisée par TEAC.


Summary of Contents for PD-505T

Page 1: ...D01413621A Z PD 505T CD Transport OWNER S MANUAL MODE D EMPLOI MANUAL DEL USUARIO ENGLISH FRAN AIS ESPA OL...

Page 2: ...les and the point where they exit from the apparatus 11 Only use attachments accessories specified by the manufacturer 12 Use only with the cart stand tripod bracket or table specified by the manufac...

Page 3: ...is confirmed to be a recharge able type o o Do not expose batteries to extremely low air pressure as it could result in an explosion or leakage of flammable liquids or gases Laser information This la...

Page 4: ...ada Innovation Science and Economic Development Canada s Compliance Statement This Class B digital apparatus complies with Canadian ICES 003 Model for Europe This product complies with the European Di...

Page 5: ...or choosing TEAC Read this manual carefully to get the best performance from this unit After reading it keep it in a safe place for future reference IMPORTANT SAFETY INSTRUCTIONS 2 Floating mounting o...

Page 6: ...ibration during transportation Transportation locking screws Before installing the unit Before installing the unit remove the two transportation locking screws o o Save the transportation locking scre...

Page 7: ...stions about how to handle a CD R or CD RW disc contact the seller of the disc directly Precautions for use o o Do not use cracked discs because they could damage the unit o o When writing something o...

Page 8: ...could harm the surface of the disc Discs continued Check to be sure the box includes all the supplied accessories shown below Please contact the store where you purchased this unit if any of these ac...

Page 9: ...ving the power plug from the wall outlet always pull directly on the plug never yank on the cord Note about placement The steel feet are loosely attached to the bottom of the unit leaving slight gaps...

Page 10: ...nectors Use these to output digital audio Connect digital audio input connectors of audio devices here Use commercially available RCA coaxial digital cables or rectangular optical digital cables for c...

Page 11: ...Skip buttons up down k j buttons Use these to skip to the previous or next track Press and hold these buttons during playback to search backward forward When the menu screen is open Use these buttons...

Page 12: ...nit is trying to synchronize with the clock signal Unlit External clock is not being used o o See page 19 for clock sync settings C Remote control signal receiver This receives signals from the remote...

Page 13: ...y turns off when not being operated o o NO DISC and other warnings will stay lit Display When on Z After the display appears as above it will show the status When no disc is available NO DISC Display...

Page 14: ...t cannot be played is loaded 6 Press the play pause 7 9 button Playback starts from the first track Display example TRACK 7 1 0 02 Number of track being played Elapsed time of track being played minut...

Page 15: ...them until the desired track is selected After a track is selected it will start playing back from the beginning o o During playback press the button once to return to the beginning of the current tra...

Page 16: ...ck number press the 10 button as many times as necessary and then press the corresponding number button for the second digit Playback starts after the track number is input Operation examples Track 7...

Page 17: ...tton when finished checking Changing programmed tracks Pressing the skip buttons when playback is stopped causes the program step to blink showing the program editing mode is active Press the stop 8 b...

Page 18: ...ting NOTE Pressing the CLEAR button when stopped will clear the track on the last step added to the program Clearing the entire program Do any of the following to clear the program o o Press the PLAY...

Page 19: ...one making settings press the MENU button to show disc playback status again o o If no operation is conducted for about seven seconds the display will return to showing disc playback status Clock sync...

Page 20: ...automatically when the unit is turned on ON Playback will start automatically when the unit is turned on Shuffle and random playback Shuffle and random playback modes can be selected MENU SHUFFLE_RAN...

Page 21: ...is near a power cord fluorescent light or similar cause of interference increase the distance between them as much as possible No sound is output e e If a stereo amplifier is connected to this unit a...

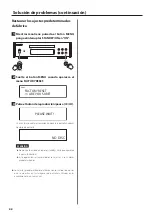
Page 22: ...he play pause 7 9 button PLEASE WAIT The usual screen will appear after resetting completes Display example NO DISC ATTENTION o o Do not put the unit in standby until the usual screen appears o o This...

Page 23: ...m production models Playable disc types Audio CD including CD R and CD RW Clock sync input Connector BNC Input sampling frequency 10 MHz Input impedance 50 Input level Rectangle wave equivalent to TTL...

Page 24: ...rtie de l appareil 11 N utilisez que des fixations accessoires sp cifi s par le fabricant 12 Utilisez le uniquement avec des cha riots socles tr pieds supports ou tables sp cifi s par le fabricant ou...

Page 25: ...s les piles Ne jetez jamais les piles dans un feu ou dans de l eau o o Ne conservez et ne transportez pas les piles avec d autres objets m talliques Les piles pourraient entrer en court circuit couler...

Page 26: ...ectro niques et piles accumulateurs hors d usage peut avoir des effets graves sur l environnement et la sant humaine en raison de la pr sence de substances dangereuses dans les quipements d Le symbole...

Page 27: ...de d emploi avec attention pour tirer les meilleures per formances de cette unit Apr s l avoir lu gardez le en lieu s r pour vous y r f rer ult rieurement INSTRUCTIONS DE S CURIT IMPORTANTES 24 Montag...

Page 28: ...canisme du CD des vibrations durant le transport Vis de verrouillage de transport Avant d installer l unit Avant d installer l unit retirez les deux vis de verrouillage de transport o o Conservez les...

Page 29: ...D RW contactez directement son vendeur Pr cautions d emploi o o N utilisez pas de disques fendus car ils pourraient endommager l unit o o Pour crire sur le c t inscriptible du disque employez un mar q...

Page 30: ...s disques De tels produits chimiques pourraient ab mer la sur face du disque Disques suite V rifiez que vous disposez bien de tous les accessoires indiqu s ci dessous Veuillez contacter le magasin dan...

Page 31: ...cordon d alimentation de la prise secteur sai sissez toujours la prise ne tirez jamais sur le cordon Note sur le placement Les pieds en acier sont fix s de mani re l che sous l unit autorisant un cert...

Page 32: ...les prises d entr e audio num rique d appareils audio Pour le branchement utilisez des c bles num riques coaxiaux RCA ou des c bles num riques optiques fiches rectangulaires du commerce D Prise d entr...

Page 33: ...sauter la piste pr c dente ou suivante Maintenez une de ces touches press e durant la lecture pour une recherche en arri re avant Quand l cran de menu est ouvert Utilisez ces touches pour s lectionne...

Page 34: ...erne n est pas utilis e o o Voir page 41 les r glages de synchronisation d horloge C Capteur de signal de t l commande Re oit les signaux de la t l commande Pour utiliser la t l com mande pointez la v...

Page 35: ...s teint en cas de non utilisation o o Le message d absence de disque NO DISC et les autres avertis sements resteront allum s Affichage la mise sous tension Z Apr s l apparition de l cran ci dessus l...

Page 36: ...rg 6 Appuyez sur la touche Lecture Pause 7 9 La lecture d marre depuis la premi re piste Exemple d affichage TRACK 7 1 0 02 Num ro de la piste lue Temps coul sur la piste lue minutes secondes 1 Bascul...

Page 37: ...fois qu une piste est s lectionn e la lecture commence depuis son d but o o Durant la lecture appuyez une fois sur la touche pour revenir au d but de la piste actuelle Appuyez autant de fois que n ces...

Page 38: ...puyez autant de fois que n cessaire sur la touche 10 pour obtenir le chiffre des dizaines puis appuyez sur la touche num rique correspondant au deuxi me chiffre La lecture d marre une fois le num ro d...

Page 39: ...gement de la programmation des pistes Si vous appuyez sur les touches de saut lorsque la lec ture est arr t e le num ro de rang dans le programme clignote ce qui indique que le mode de modification du...

Page 40: ...fin la modification NOTE Appuyer l arr t sur la touche CLEAR efface la piste du dernier rang ajout au programme Effacement de la totalit du programme Effectuez l une des actions suivantes pour effacer...

Page 41: ...termin s appuyez sur la touche MENU pour r afficher l tat de lecture du disque o o Sans aucune op ration durant environ sept secondes l cran retourne l affichage de l tat de lecture du disque Synchro...

Page 42: ...s ten sion de l unit ON La lecture d marre automatiquement la mise sous tension de l unit Lecture en d sordre et al atoire Il est possible de s lectionner les modes de lecture en d sordre et al atoire...

Page 43: ...une cause de parasites simi laire cartez les autant que possible l un de l autre Aucun son n est produit e e Si un amplificateur st r o est branch cette unit r glez son volume e e Rev rifiez les branc...

Page 44: ...puyez sur la touche Lecture Pause 7 9 PLEASE WAIT L cran habituel appara t une fois la r initialisation termin e Exemple d affichage NO DISC ATTENTION o o Ne faites pas passer l unit en veille tant qu...

Page 45: ...d emploi peuvent l g rement diff rer des mod les de production Types de disque lisibles CD audio CD R et CD RW compris Entr e de synchronisation d horloge Connecteur BNC Fr quence d chantillonnage d e...

Page 46: ...entos especificados por el fabricante 12 Utilice este aparato solo con un soporte tr pode o bastidor especificado por el fabri cante o que se venda con el propio aparato Cuando utilice un bastidor con...

Page 47: ...cargable o o No exponga las pilas a una presi n atmosf rica extremadamente baja ya que esto podr a causar una explosi n o fuga de l quidos o gases inflamables Informaci n sobre el l ser Este producto...

Page 48: ...o a utilizar el equipo Modelo para Europa Este producto cumple con las exigencias de las directivas europeas y con los reglamentos de la Comisi n Europea Para consumidores europeos Deshacerse de apara...

Page 49: ...este manual atentamente para obtener el mejor rendimiento de esta unidad Despu s de leerlo gu rdelo en un lugar seguro para futuras consultas INSTRUCCIONES IMPORTANTES DE SEGURIDAD 46 Montaje flotant...

Page 50: ...ansporte Tornillos de bloqueo para el transporte Antes de instalar la unidad Antes de instalar la unidad quite los dos tornillos de bloqueo para el transporte o o Guarde los tornillos de bloqueo para...

Page 51: ...nstrucciones del dispositivo que est utilizando o o Si tiene dudas sobre c mo utilizar un disco CD R o CD RW p n gase en contacto con el vendedor del disco directamente Precauciones de uso o o No util...

Page 52: ...uaci n Compruebe que todos los accesorios enumerados a continuaci n est n incluidos en la caja Por favor p ngase en contacto con el establecimiento donde adquiri esta unidad en caso de que alguno de e...

Page 53: ...acero est n acopladas sin apretar en la parte inferior de la unidad dejando peque os espacios de movimiento Por este motivo la patas se mover n ligeramente de la parte inferior al levan tar la unidad...

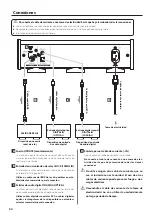
Page 54: ...digital Conecte aqu los terminales de entrada de audio digital de dispositivos de audio Utilice cables digitales coaxiales RCA o cables digitales pticos rectangulares de los disponibles en estableci m...

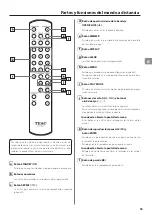
Page 55: ...reproducci n progra mada y aleatoria j Botones de salto y botones arriba abajo k j Se utilizan para saltar a la pista anterior o siguiente Pulse y mantenga pulsados estos botones durante la reproduc c...

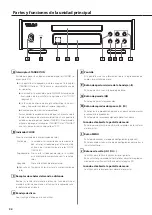
Page 56: ...do No se est utilizando reloj externo o o Consulte en la p gina 63 los ajustes de sincronizaci n de reloj C Receptor de se ales del mando a distancia Recibe las se ales del mando a distancia Cuando ut...

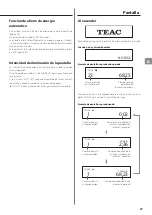
Page 57: ...pantalla se apagar cuando no se realicen operaciones o o NO DISC no hay disco y otros avisos permanecer n iluminados Pantalla Al encender Z Despu s de que aparezca la pantalla de arriba se mostrar el...

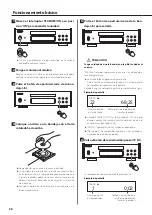
Page 58: ...ir 6 Pulse el bot n de reproducci n pausa 7 9 La reproducci n comenzar desde la primera pista Ejemplo de pantalla TRACK 7 1 0 02 N mero de pista en reproducci n Tiempo transcurrido de la pista en repr...

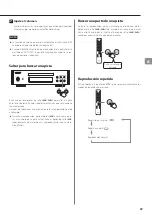
Page 59: ...e seleccione la pista deseada Despu s de seleccionar una pista empezar su reproducci n desde el principio o o Durante la reproducci n pulse el bot n una vez para regre sar al principio de la pista act...

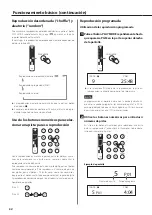
Page 60: ...o de pista de dos d gitos pulse el bot n 10 tantas veces como sea necesario y luego pulse el bot n num rico correspondiente al segundo d gito La reproducci n comenzar despu s de introducir el n mero d...

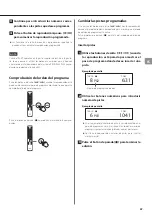
Page 61: ...cuando haya terminado la compro baci n Cambiar las pistas programadas Si se pulsan los botones de salto con la reproducci n parada el paso de programa parpadear para mostrar que el modo de edici n de...

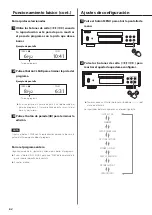
Page 62: ...Si pulsa el bot n CLEAR con la reproducci n parada se borrar la pista del ltimo paso a adido al programa Borrar el programa entero Haga cualquiera de las siguientes acciones para borrar el programa o...

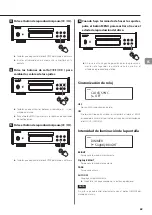
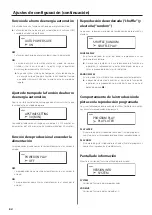
Page 63: ...tra vez el estado de reproducci n del disco o o Si no se realiza ninguna operaci n durante aproximada mente siete segundos la pantalla volver a mostrar el estado de reproducci n del disco Sincronizaci...

Page 64: ...producci n comenzar autom ticamente al encender la unidad Reproducci n desordenada shuffle y aleatoria random Se pueden seleccionar modos de reproducci n desordenada y aleatoria MENU SHUFFLE_RANDOM SH...

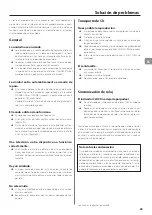
Page 65: ...de un cable de corriente de un fluorescente o de otra causa de interferen cias similar aumente la distancia entre ellos todo lo que sea posible No sale sonido e e Si hay un amplificador est reo conect...

Page 66: ...PLEASE WAIT Una vez terminada la restauraci n aparecer la pantalla habitual Ejemplo de pantalla NO DISC ATENCI N o o No ponga la unidad en reposo standby hasta que aparezca la pantalla habitual o o Es...

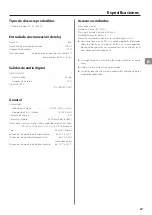
Page 67: ...pos de discos reproducibles CD Audio incluidos CD R y CD RW Entrada de sincronizaci n de reloj Terminal BNC Frecuencia de muestreo de entrada 10 MHz Impedancia de entrada 50 Nivel de entrada onda rect...

Page 68: ...in which the product was purchased Whenever warranty service is required you must present the original dated sales receipt or other proof indicat ing the purchase place and date as proof of warranty c...

Page 69: ...LA RESPONSABILIT DE TEAC VIS VIS DE TOUT PRODUIT D FECTUEUX EST LIMIT E LA R PARATION OU AU REMPLACEMENT DU PRODUIT AU GR DE TEAC TEAC NE POURRA TRE TENU POUR RESPONSABLE DE QUELCONQUES DOMMAGES SE R...

Page 70: ...70...

Page 71: ...71...

Page 72: ...ere and retain this for your records Model name PD 505T Serial number Z WARRANTY GARANTIE United States and Canada only tats Unis et Canada uniquement Model Mod le PD 505T Serial No N de s rie Date of...

Reviews: