background image

Important Safety Instructions

_ 2 _

CAUTION:

••

Read all of these Instructions.

••

Save these Instructions for later use.

••

Follow all Warnings and Instructions marked on the audio 

equipment.

1) Read Instructions

— All the safety and operating instructions

should be read before the product is operated.

2) Retain Instructions 

— The safety and operating instructions

should be retained for future reference.

3) Heed Warnings

— All warnings on the product and in the

operating instructions should be adhered to.

4) Follow Instructions 

— All operating and use instructions should

be followed.

5) Cleaning

— Unplug this product from the wall outlet before

cleaning. Do not use liquid cleaners or aerosol cleaners. Use a
damp cloth for cleaning.

6) Attachments

— Do not use attachments not recommended by

the product manufacturer as they may cause hazards.

7) Water and Moisture

— Do not use this product near water _ for

example, near a bath tub, wash bowl, kitchen sink, or laundry tub; in
a wet basement; or near a swimming pool; and the like.

8) Accessories

— Do not place this product on an unstable cart,

stand, tripod, bracket, or table. The product may fall, causing serious
injury to a child or adult, and serious damage to the product. Use
only with a cart, stand, tripod, bracket, or table recommended by the
manufacturer, or sold with the product. Any mounting of the product
should follow the manufacturer’s instructions, and should use a
mounting accessory recommended by the manufacturer.

9)

A product and cart combination should be moved with care.

Quick stops, excessive force, and uneven surfaces may cause the
product and cart combination to overturn.

10) Ventilation

— Slots and openings in the cabinet are provided

for ventilation and to ensure reliable operation of the product  and to
protect it from overheating, and these openings must not be
blocked or covered. The openings should never be blocked by
placing the product on a bed, sofa, rug, or other similar surface.
This product should not be placed in a built-in installation such as a
bookcase or rack unless proper ventilation is provided or the
manufacturer’s instructions have been adhered to.

11) Power Sources

— This product should be operated only from

the type of power source indicated on the marking label. If you are
not sure of the type of power supply to your home, consult your
product dealer or local power company. For products intended to
operate from battery power, or other sources, refer to the operating
instructions.

12) Grounding or Polarization 

— This product may be equipped

with a polarized alternating-current line plug (a plug having one
blade wider than the other). This plug will fit into the power outlet
only one way. This is a safety feature. If you are unable to insert the
plug fully into the outlet, try reversing the plug. If the plug should still
fail to fit, contact your electrician to replace your obsolete outlet. Do
not defeat the safety purpose of the polarized plug.

13) Power-Cord Protection

— Power-supply cords should be

routed so that they are not likely to be walked on or pinched by
items placed upon or against them, paying particular attention to
cords at plugs, convenience receptacles, and the point where they
exit from the product.

14) Outdoor Antenna Grounding 

— If an outside antenna or

cable system is connected to the product, be  sure the antenna or
cable system is grounded so as to provide some protection against
voltage surges and built-up static charges. Article 810 of the
National Electrical Code, ANSI/NFPA 70, provides information with
regard to proper grounding of the mast and supporting structure,
grounding of the lead-in wire to an antenna discharge unit, size of
grounding conductors, location of antenna-discharge unit,
connection to grounding electrodes, and requirements for the
grounding electrode.

"Note to CATV system installer:

This reminder is provided to call the CATV system installer’s
attention to Section 820-40 of the NEC which provides guidelines
for proper grounding and, in particular, specifies that the cable
ground shall be connected to the grounding system of the building,
as close to the point of cable entry as practical.

ANTENNA
LEAD IN
WIRE

ANTENNA
DISCHARGE UNIT
(NEC SECTION 810-20)

G

ROUNDING CONDUCTORS

(NEC SECTION 810-21)

GROUND CLAMPS

POWER SERVICE GROUNDING
ELECTRODE SYSTEM
(NEC ART 250. PART H)

NEC - NATIONAL ELECTRICAL CODE

ELECTRIC
SERVICE
EQUIPMENT

Example of Antenna Grounding as per
National Electrical Code, ANSI/NFPA 70

GROUND
CLAMP

15) Lightning 

— For added protection for this product during a

lightning storm, or when it is left unattended and unused for long
periods of time, unplug it from the wall outlet and disconnect the
antenna or cable system. This will prevent damage to the product
due to lightning and power-line surges.

16) Power Lines 

— An outside antenna system should not be

located in the vicinity of overhead power lines or other electric light
or power circuits, or where it can fall into such power lines or
circuits. When installing an outside antenna system, extreme care
should be taken to keep from touching such power lines or circuits
as contact with them might be fatal.

17) Overloading 

— Do not overload wall outlets, extension cords,

or integral convenience receptacles as this can result in risk of fire
or electric shock.

18) Object and Liquid Entry 

— Never push objects of any kind into

this product through openings as they may touch dangerous voltage
points or short-out parts that could result in a fire or electric shock.
Never spill liquid of any kind on the product.

19) Servicing

— Do not attempt to service this product yourself as

opening or removing covers may expose you to dangerous voltage
or other hazards. Refer all servicing to qualified service personnel.

20) Damage Requiring Service

— Unplug this product from the

wall outlet and refer servicing to qualified service personnel under
the following conditions:

a)

when the power-supply cord or plug is damaged.

b)

if liquid has been spilled, or objects have fallen into the product.

c)

if the product has been exposed to rain or water.

d)

if the product does not operate normally by following the

operating instructions. Adjust only those controls that are covered
by the operating instructions as an improper adjustment of other
controls may result in damage and will often require extensive work
by a qualified technician to restore the product to its normal
operation.

e)

if the product has been dropped or damaged in any way.

f )

when the product exhibits a distinct change in performance _

this indicates a need for service.

21) Replacement Parts 

— When replacement  parts are required,

be sure the ser vice technician has used replacement par ts
specified by the manufacturer or have the same characteristics as
the original part. Unauthorized substitutions may result in fire,
electric shock, or other hazards.

22) Safety Check

— Upon completion of any service or repairs to

this product, ask the service technician to perform safety checks to
determine that the product is in proper operating condition.

23) Wall or Ceiling Mounting 

— The product should be mounted

to a wall or ceiling only  as recommended by the manufacturer.

24) Heat

— The product should be situated away from heat sources

such as radiators, heat registers, stoves, or other products
(including amplifiers) that produce heat.

Summary of Contents for PD-H570

Page 1: ...CAUTION TO REDUCE THE RISK OF ELECTRIC SHOCK DO NOT REMOVE COVER OR BACK NO USER SERVICEABLE PARTS INSIDE REFER SERVICING TO QUALIFIED SERVICE PERSONNEL Thanks for buying a TEAC Read this manual care...

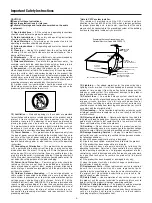
Page 2: ...of the mast and supporting structure grounding of the lead in wire to an antenna discharge unit size of grounding conductors location of antenna discharge unit connection to grounding electrodes and r...

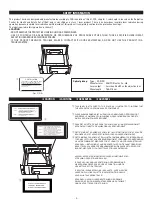
Page 3: ...MAKE A CONTACT WITH OUR SERVICEMAN AND DO NOT USE THE PRODUCT IN A TROUBLED STATE Optical pickup Type SF 91PQ Manufacturer SANYO Electric Co Ltd Laser output Less than 0 5 mW on the objective lens Wav...

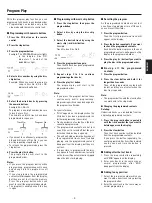
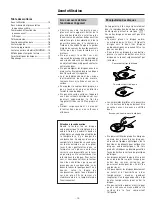
Page 4: ...s 6 Display 6 Remote Control 7 Basic Operation 8 Repeat Play 8 Program Play 9 Shuffle Play 10 Time Display 10 Specifications 10 Troubleshooting 11 Before Use _ 4 _ Read This Before Operating Handling...

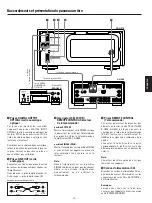
Page 5: ...H500 amplifier SINGLE position Set to this position when you operate this unit alone with the optional remote control unit not provided Note If set to the SINGLE position this unit cannot be operated...

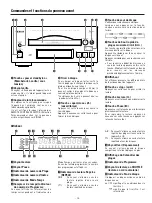
Page 6: ...engaged A B This lights up when the A B section repeat play is engaged TTL This lights up when the repeat play of all discs is engaged 8Over mark This indicator lights up when the total number of trac...

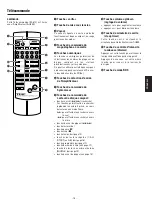
Page 7: ...red position quickly during play or in the pause mode for forward search for backward search music skip buttons play button pause button stop button time button see page 10 repeat 1 ALL A B play butto...

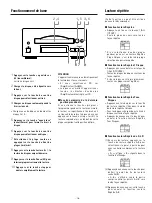
Page 8: ...B section will be played repeatedly 3 Press the button once more to cancel the A B repeat play function Repeat Play _ 8 _ Basic Operation 1 Press the open close button The disc tray will slide out 2 L...

Page 9: ...been programmed no further programming is possible Track numbers not actually on the disc cannot be programmed The programmed contents are not lost even if the unit is turned off but they are lost wh...

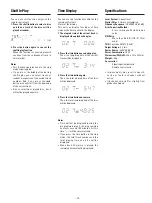
Page 10: ...ess the button during shuffle play you can select tracks at random irrespective of the current track number And if you press the button play will start from the beginning of the current track A once s...

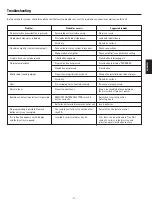
Page 11: ...ion position of player Disc dirty Clean disc surface Hum Pin cord plug not connected securely Re connect plug securely Noise in tuner Player too near tuner Keep a reasonable distance between them or s...

Page 12: ...ouvrir le coffret car ceci risquerait de provoquer des dommages aux circuits ou des chocs lectriques Si un objet rentre dans l appareil contacter votre revendeur Ne pas manipuler les disques avec des...

Page 13: ...ur sur la position SINGLE si vous utilisez cet appareil seul avec la t l commande non fournie avec le lecteur Nota Quand l interrupteur est sur la position SINGLE l appareil ne peut pas fonctionner m...

Page 14: ...ue vous appuyez sur la touche chaque num ro sera s lectionn dans l ordre 7Touches de Saut rapide de plages musicales Ces touches permettent de s lectionner le morceau d sir sur le disque Appuyez sur p...

Page 15: ...Pause pour effectuer une recherche vers l avant pour effectuer une recherche vers l arri re touches de saut de plages touche lecture touche pause touche stop touche temps voir page 18 touches de lectu...

Page 16: ...3 Appuyez de nouveau sur cette touche pour annuler la fonction Lecture R p t e A B _ 16 _ Lecture r p t e Fonctionnement de base 1 Appuyez sur la touche open close ouvert ferm Le tiroir disque sort 2...

Page 17: ...on du trente troisi me morceau Il n est pas possible de programmer au del Les plages dont le num ro ne se trouve pas sur le disque ne peuvent pas tre programm es Le contenu du programme n est pas effa...

Page 18: ...mm Poids 5 kg Accessoires Cordon de signal audio 1 Cordon de t l commande 1 Des am liorations peuvent apporter des changements dans les caract ristiques techniques et g n rales sans avis pr alable Les...

Page 19: ...soumis des vibrations Changez le lecteur de place le son saute ou des chocs Le disque est sale Nettoyez la surface du disque Bourdonnement Le cordon de raccordement est mal V rifier le contact au nive...

Page 20: ...h use ffnen da hierdurch Sch den an der Elektronik und oder elektrische Schl ge verursacht werden k nnen Falls ein Fremdk rper in das Ger teinnere gelangen sollte wenden Sie sich bitte an Ihren Fachh...

Page 21: ...ediglich den CD Player mittels einer Fernbedienung nicht im Lieferum fang steuern wollen Hinweis Falls sich der CD Player im Systemverbund befindet jedoch auf SINGLE Betrieb eingestellt ist kann das G...

Page 22: ...aufend 7Titel Sprungtasten Diese Tasten dienen zur direkten Anwahl des gew nschten Titels einer CD Bet tigen Sie diese Taste um zum Titelanfang des folgenden St ckes zu gelangen Bet tigen Sie diese Ta...

Page 23: ...der Wiedergabe oder im Pausemodus erreichen vorw rts Suchen r ckw rts Suchen Sprung Tasten Wiedergabe Taste Pause Taste Stop Taste Spielzeit Taste siehe Seite 26 Wiederholungsfunktion 1 Gesamt A B sie...

Page 24: ...ngezeigt und der soeben ausgew hlte Abschnitt wird wiederholt wiedergegeben 3 Ein erneutes Bet tigen der Taste beendet die Wiederholungsfunktion _ 24 _ Wiederholungsfunktion Grundlegende Funktionen 1...

Page 25: ...grammiert werden Der Inhalt einer programmierten Titelfolge wird nicht gel scht selbst dann nicht wenn das System zwischenzeitlich abgeschaltet wird Erst das ffnen der CD Schublade l scht den Programm...

Page 26: ...dus und Sie bet tigen die Taste wird automatisch zum Anfang eines anderen zuf llig ermittelten Titels gesprungen Bet tigen Sie die Taste beginnt die Wiedergabe des momentanen Titels erneut Eine bereit...

Page 27: ...auf Die CD ist verschmutzt Reinigen Sie die CD Brummen Das Cinchkabel wurde nicht richtig Stecken Sie die Stecker der Cinchkabel angeschlossen richtig in die daf r vorgesehenen Buchsen Ger usche w hr...

Page 28: ...e scariche elettriche Se un qualche oggetto estraneo dovesse essere entrato nell apparecchio ste sso rivolgersi al rivenditore Accertarsi di non maneggiare i CD con le dita sporche Non inserire mai un...

Page 29: ...il selettore in posizione SINGLE il lettore non pu essere azionato tramite l amplificatore nemmeno se questo azionato manualmente o puntando il telecomando nella sua direzione 4Prese REMOTE CONTROL Se...

Page 30: ...sc skip di salto dei dischi Usarlo per selezionare un disco Ad ogni successiva pressione del tasto i dischi vengono selezionati nell ordine indicato 7Tasti Skip Servono per scegliere il brano desidera...

Page 31: ...la ricerca all indietro Tasti skip salto di uno o pi brani Tasto play ascolto Tasto pause pausa Tasto stop Tasto time vedi pagina 34 Tasti per ascolto ripetuto 1 brano tutti i brani sezione A B vedi p...

Page 32: ...rr letta ripetutamente solo la porzione A B del disco 3 Premere il tasto ancora una volta per porre fine a questa funzione _ 32 _ Ascolto ripetuto Operazioni fondamentali 1 Premere il tasto open close...

Page 33: ...r e subentrer la funzione Program Recall Informazioni supplementari Sul display appare la scritta FULL dopo che stato letto il 33esimo brano non possibile inserirne altri Non si possono programmare nu...

Page 34: ...ndo si preme il tasto durante la lettura Shuffle il brano viene scelto casualmente senza tener conto del numero del brano in corso Quando invece si preme il tasto la lettura partir dall inizio del bra...

Page 35: ...icie del disco Ronzio La spina del cavo di collegamento non Inserire di nuovo la spina a fondo ben inserita Rumore proveniente dal sintonizzatore Il lettore di CD troppo vicino al Tenere i due apparec...

Page 36: ...que esto podr a producir da os en los circuitos o electrochoques Si entrara alg n objeto en el interior del aparato p ngase en contacto con su concesionario No toque los discos con los dedos sucios N...

Page 37: ...o desee controlar nicamente este componente desde el mando a distancia opcional no incluido Nota En la posici n SINGLE el reproductor no podr ser controlado manualmente desde el amplificador ni desde...

Page 38: ...9Calendario musical 0Indicador de programa qIndicador de reproducci n al azar wIndicador de No de disco Esto indica si hay un disco o no en la bandeja ej Significa que hay un disco en la bandeja No 1...

Page 39: ...a reproducci n o en el modo de pausa b squeda hacia adelante b squeda hacia atr s botones de salto de pista bot n de reproducci n bot n de pausa bot n de parada bot n de contador v ase p gina 42 boton...

Page 40: ...A y B 3 Pulse de nuevo el bot n para cancelar la repetici n A B Repetici n Funcionamiento b sico 1 Pulse el bot n de apertura cierre La bandeja de disco se deslizar hacia afuera 2 Cargue un disco con...

Page 41: ...en la pantalla despu s de programar la pista n 33 ya no es posible incluir m s pistas en el programa No se pueden programar n meros de pista que no existan en el disco El contenido del programa no se...

Page 42: ...285 x 131 x 327 mm Peso 5 kg Accesorios Cable entrada salida se al 1 Cable de control remoto 1 Posibles mejoras puede originar cambios en las especificaciones o caracter sticas sin aviso Las ilustrac...

Page 43: ...nes Cambie la unidad de emplazamiento o impactos El disco est sucio Limpie la superficie del disco Se percibe un zumbido Clavija mal conectada Con ctela debidamente Ruido en el sintonizador El reprodu...

Page 44: ...OF PLUG TO WIDE SLOT FULLY INSERT CORDE DE CONNEXION CA ATTENTION POUR VITER LES CHOCS LECTRIQUES INTRODUIRE LA LAME LA PLUS LARGE DE LA FICHE DANS LA BORNE CORRESPONDANTE DE LA PRISE ET POUSSER JUSQU...

Reviews: