background image

6

Contents

Read this before attempting any
operations

<

As the unit may become warm during
operation, always leave sufficient space
around the unit for ventilation.

<

The voltage supplied to the unit should
match the voltage as printed on the rear
panel. If you are in any doubt regarding
this matter, consult an electrician.

<

Choose the installation location of your
unit carefully. Avoid placing it in direct
sunlight or close to a source of heat. Also
avoid locations subject to vibrations and
excessive dust, heat, cold or moisture.

<

Do not place the unit on an
amplifier/receiver.

<

Do not open the cabinet as this might
result in damage to the circuitry or
electrical shock. If a foreign object should
get into the unit, contact your dealer or
service company.

<

When removing the power plug from the
wall outlet, always pull directly on the
plug, never yank the cord.

<

To keep the laser pickup clean, do not
touch it. Always close the disc
compartment lid when not in use.

<

Do not attempt to clean the unit with
chemical solvents as this might damage
the finish. Use a clean, dry cloth.

<

Keep this manual in a safe place for
future reference.

Thank you for choosing TEAC. Read this
manual carefully to get the best
performance from this unit.

Before Using the Unit . . . . . . . . . . . . . . . . 6

Discs . . . . . . . . . . . . . . . . . . . . . . . . . . . . . 8

Connections . . . . . . . . . . . . . . . . . . . . . . 10

Unit Functions. . . . . . . . . . . . . . . . . . . . . 12

Unit Functions (Remote Control Unit) . . . 14

Display . . . . . . . . . . . . . . . . . . . . . . . . . . 15

Remote Control Unit. . . . . . . . . . . . . . . . 16

Setting the Clock . . . . . . . . . . . . . . . . . . 17

Basic Operation. . . . . . . . . . . . . . . . . . . . 18

Listening to CD . . . . . . . . . . . . . . . . . . . . 20

Programmed Playback. . . . . . . . . . . . . . . 22

Repeat Playback . . . . . . . . . . . . . . . . . . . 25

Shuffle Playback . . . . . . . . . . . . . . . . . . . 26

Listening to the Radio . . . . . . . . . . . . . . . 26

Preset Tuning . . . . . . . . . . . . . . . . . . . . . 28

Listening to an External Source . . . . . . . . 29

Timer . . . . . . . . . . . . . . . . . . . . . . . . . . . 30

Sleep Timer. . . . . . . . . . . . . . . . . . . . . . . 33

Troubleshooting . . . . . . . . . . . . . . . . . . . 34

Specifications . . . . . . . . . . . . . . . . . . . . . 35

Before Using the Unit

Summary of Contents for SR-L100

Page 1: ...ENGLISH Z 9A10358600 SR L100 CD Music System OWNER S MANUAL MANUEL DU PROPRIÉTAIRE MANUAL DEL USUARIO FRANÇAIS ESPAÑOL ...

Page 2: ...may cause hazards 7 Water and Moisture Do not use this product near water for example near a bath tub wash bowl kitchen sink or laundry tub in a wet basement or near a swimming pool and the like 8 Accessories Do not place this product on an unstable cart stand tripod bracket or table The product may fall causing serious injury to a child or adult and serious damage to the product Use only with a c...

Page 3: ... NATIONAL ELECTRICAL CODE ELECTRIC SERVICE EQUIPMENT Example of Antenna Grounding as per National Electrical Code ANSI NFPA 70 GROUND CLAMP 15 Lightning For added protection for this product during a lightning storm or when it is left unattended and unused for long periods of time unplug it from the wall outlet and disconnect the antenna or cable system This will prevent damage to the product due ...

Page 4: ...nding connection e if the product has been dropped or damaged in any way f when the product exhibits a distinct change in performance _ this indicates a need for service 21 Replacement Parts When replacement parts are required be sure the service technician has used replacement parts specified by the manufacturer or have the same characteristics as the original part Unauthorized substitutions may ...

Page 5: ...he receiving antenna Increase the separation between the equipment and receiver Connect the equipment into an outlet on a circuit different from that to which the receiver is connected Consult the dealer or an experienced radio TV technician for help CAUTION Changes or modifications to this equipments not expressly approved by TEAC CORPORATION for compliance will void the user s warranty For U S A...

Page 6: ...your dealer or service company When removing the power plug from the wall outlet always pull directly on the plug never yank the cord To keep the laser pickup clean do not touch it Always close the disc compartment lid when not in use Do not attempt to clean the unit with chemical solvents as this might damage the finish Use a clean dry cloth Keep this manual in a safe place for future reference T...

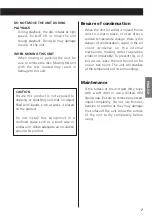
Page 7: ...id completely Do not use thinner benzine or alcohol as they may damage the surface of the unit Allow the surface of the unit to dry completely before using DO NOT MOVE THE UNIT DURING PLAYBACK During playback the disc rotates at high speed Do NOT lift or move the unit during playback Doing so may damage the disc or the unit WHEN MOVING THIS UNIT When moving or packing the unit be sure to remove th...

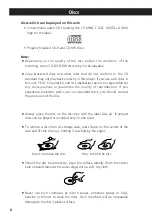
Page 8: ...e quality of reproduction If you experience problems with such non standard discs you should contact the producers of the disc Always place the disc on the disc tray with the label side up Compact discs can be played or recorded only on one side To remove a disc from its storage case press down on the center of the case and lift the disc out holding it carefully by the edges How to hold the disc S...

Page 9: ...s radiators or heat generating electrical devices Printable CD R and CD RW discs aren t recommended as the label side might be sticky and damage the unit Do not stick papers or protective sheets on the discs and do not use any protective coating spray Use a soft oil based felt tipped pen to write the information on the label side Never use a ball point or hard tipped pen as this may cause damage t...

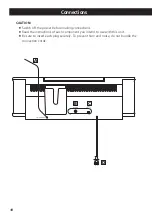
Page 10: ...Switch off the power before making connections Read the instructions of each component you intend to use with this unit Be sure to insert each plug securely To prevent hum and noise do not bundle the connection cords A B C D ...

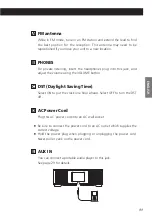
Page 11: ...d adjust the volume using the VOLUME button DST Daylight Saving Time Select ON to put the clock one hour ahead Select OFF to turn the DST off AC Power Cord Plug this AC power cord into an AC wall socket Be sure to connect the power cord to an AC outlet which supplies the correct voltage Hold the power plug when plugging or unplugging the power cord Never pull or yank on the power cord AUX IN You c...

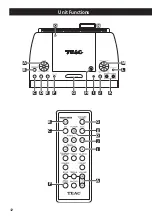
Page 12: ...12 Unit Functions B C F E G D J I A B A D C E F G I H J L M N K O ...

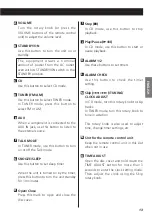
Page 13: ...o open and close the disc cover H G F E D C The equipment draws a nominal amount of power from the AC outlet even with its STANDBY ON switch in the STANDBY position B A Stop H In CD mode use this button to stop playback Play Pause y J In CD mode use this button to start or pause playback ALARM 1 2 Use these buttons to set timers ALARM CHECK Use this button to check the timer setting Skip TUNING CL...

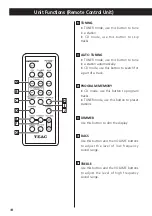
Page 14: ...ode use this button to search for a part of a track PROGRAM MEMORY In CD mode use this button to program tracks In TUNER mode use this button to preset stations DIMMER Use this button to dim the display BASS Use this button and the VOLUME buttons to adjust the level of low frequency sound range TREBLE Use this button and the VOLUME buttons to adjust the level of high frequency sound range F E D C ...

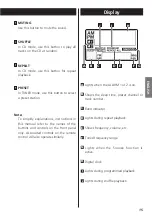
Page 15: ...ck Lights during shuffle playback J I H G F E D C B A Display MUTING Use this button to mute the sound SHUFFLE In CD mode use this button to play all tracks on the CD at random REPEAT In CD mode use this button for repeat playback PRESET In TUNER mode use this button to select a preset station Note To simplify explanations instructions in this manual refer to the names of the buttons and controls ...

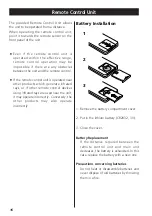
Page 16: ...generate infrared rays or if other remote control devices using infrared rays are used near the unit it may operate incorrectly Conversely the other products may also operate incorrectly 1 2 3 1 Remove the battery compartment cover 2 Put in the lithium battery CR2032 3V 3 Close the cover Battery Replacement If the distance required between the remote control unit and main unit decreases the batter...

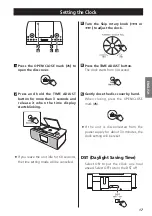
Page 17: ...the time display starts blinking 2 If you leave the unit idle for 60 seconds the time setting mode will be cancelled Press the OPEN CLOSE mark L to open the disc cover 1 4 3 5 1 2 If the unit is disconnected from the power supply for about 30 minutes the clock setting will be reset Press the TIME ADJUST button The clock starts from 00 second 4 DST Daylight Saving Time Select ON to put the clock on...

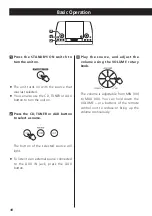
Page 18: ...it turns on with the source that was last selected You can also use the CD TUNER or AUX button to turn the unit on Press the CD TUNER or AUX button to select a source 2 The volume is adjustable from MIN 00 to MAX 40 You can hold down the VOLUME or buttons of the remote control unit to reduce or bring up the volume continuously Play the source and adjust the volume using the VOLUME rotary knob 3 2 ...

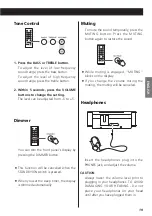
Page 19: ...To mute the sound temporarily press the MUTING button Press the MUTING button again to restore the sound Dimmer Tone Control 1 Press the BASS or TREBLE button To adjust the level of low frequency sound range press the bass button To adjust the level of high frequency sound range press the treble button 2 Within 5 seconds press the VOLUME buttons to change the setting The level can be adjusted from...

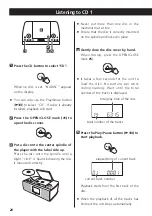
Page 20: ...ne disc in the mechanism at a time Ensure that the disc is correctly mounted on the spindle and locked in place Listening to CD 1 Gently close the disc cover by hand When closing press the OPEN CLOSE mark L 4 It takes a few seconds for the unit to load the disc No buttons will work during loading Wait until the total number of the tracks is displayed Press the Play Pause button y J to start playba...

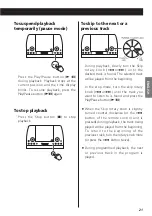
Page 21: ...til the desired track is found The selected track will be played from the beginning In the stop mode turn the skip rotary knob or until the track you want to listen to is found and press the Play Pause button G J When the Skip rotary knob is slightly turned counter clockwise or the button of the remote control unit is pressed during playback the track being played will be played from the beginning...

Page 22: ...n in the stop mode 2 The PROGRAM indicator blinks on the display To cancel the program mode press the Stop button H Programmed Playback 1 program number track number Listening to CD 2 Search for a part of a track During playback hold down the SEARCH button m or of the remote control unit and release it when the part you want to listen to is found ...

Page 23: ...n memory until the disc cover is opened or the STANDBY ON button is pressed You can return to the programmed playback by pressing the PROGRAM button and the Play Pause button G J in the stop mode If another source was selected select the CD mode by pressing the CD button beforehand When the selection of track numbers is completed press the Play Pause button G J to start programmed playback 4 The t...

Page 24: ... press the PROGRAM button repeatedly The track number and program number will be shown on the display To add a track to the end of the program In the stop mode press the PROGRAM button repeatedly until 00 appears on the display Select a track number using the Skip button or and then press the PROGRAM button The track is added to the end of the program To overwrite the program In the stop mode pres...

Page 25: ...e track being played will be played repeatedly If you turn the Skip rotary knob or and select another track the track you selected will be played repeatedly It is also possible to select a track to be repeated in the stop mode Press the REPEAT button select a track using the Skip rotary knob or and then press the Play Pause button G J to start playback Repeat all the tracks Press the REPEAT button...

Page 26: ...ffle Playback The tracks can be played randomly Press the SHUFFLE button during playback or when in the stop mode The SHUFFLE indicator appears on the display If you turn the Skip rotary knob clockwise or press the button of the remote control unit during shuffle playback the next track will be randomly selected and played If you turn the Skip rotary knob counter clockwise or press the button the ...

Page 27: ...he AM antenna is built in within the cabinet so rotating the cabinet may improve the reception If the FM reception is poor For the best reception rotate the antenna until you get stations clearly Talk Mode This function suppresses bass sound so that you can hear the voice clearly In TUNER mode press the TALK MODE button to turn on or off the Talk mode When the Talk mode is on the TALK MODE button ...

Page 28: ...he MEMORY button 2 3 1 1 Within 5 seconds press the MEMORY button 4 Within 5 seconds select a preset channel to store the station using the PRESET button 3 How to select preset stations To select FM or AM press the TUNER FM AM button 1 To store more stations repeat steps to 4 1 Press the PRESET button repeatedly until the desired preset station is found 2 ...

Page 29: ... SR L100 and the audio player 3 Press the AUX button 2 When using the PHONES jack of your mini player you must adjust the volume of the mini player or you may hear no sound from your SR L100 Turning the volume of the mini player up too high may cause the sound from your SR L100 to be distorted If this is the case reduce the volume of the mini player until the distortion stops and then adjust the v...

Page 30: ...inks and the ALARM indicator or appears on the display If no button is pressed for 60 seconds the timer setting mode will be cancelled 1 Turn the Skip rotary knob or to set the start time and then press the ALARM button From step through make sure to press the same ALARM button you selected in step Turn the Skip rotary knob or to select a source CD TUNER or BUZZ and then press the ALARM button You...

Page 31: ...tart time 7 00 Source CD ALARM 2 Start time 7 30 Source TUNER The unit turns on at 7 00 with CD and turns off at 8 00 ALARM 2 doesn t work at all Note that if the unit is in the snooze mode at the start time of ALARM 2 ALARM 2 will work the source will switch to TUNER at 7 30 and the unit will turn off at 8 30 Playback volume will gradually increase till your set volume when the unit is turned on ...

Page 32: ...LAY TUNER AUX CD the active ALARM button Note that during timer playback you have to press the ALARM button twice to turn the timer off The ALARM button will not work if no setting is stored in memory To turn on or off the timer To check the timer setting Press the ALARM CHECK button repeatedly to check your timer setting The settings of ALARM 1 and ALARM 2 will be displayed one by one The corresp...

Page 33: ...e that if you press the ALARM button twice the timer is also turned off Sleep Timer SLEEP 90 60 or 30 The power will be switched off 90 60 or 30 minutes later Normal display The sleep timer is off When you set the sleep timer the display is dimmed automatically If you want to check the remaining time press the SLEEP button once The remaining time will be displayed for 3 seconds and then return to ...

Page 34: ...ce it with a new one e Use remote control unit within the range 5 m and point at the remote sensor on the front panel e Clear obstacles between the remote control unit and the main unit e If a strong light is near the unit turn it off CD Player Will not play e Load a disc with the playback side facing away e If the disc is dirty clean the surface of the disc e A blank disc has been loaded Load a p...

Page 35: ...wer 4 W 4 W Power Requirement AC 120 V 60 Hz Power Consumption 28 W Dimension W x H x D 340 x 125 x 249 mm 13 3 8 x 4 15 16 x 9 13 16 Weight Net 3 3 kg 7 1 4 lb Standard Accessories Remote Control Unit RC 1075 x 1 Battery for Remote Control Unit x 1 Stereo mini plug cable x 1 Owner s Manual x 1 Warranty Card x 1 Design and specifications are subject to change without notice Weight and dimensions a...

Page 36: ...ez d espace autour pour la ventilation La tension fournie à l appareil doit correspondre à celle imprimée sur sa face arrière En cas de doute dans ce domaine consultez un électricien Choisissez soigneusement le lieu d installation de votre appareil Evitez de l exposer directement au soleil ou de le placer près d une source de chaleur Evitez aussi les emplacements sujets aux vibrations et à une pou...

Page 37: ...rature il y a un risque de condensation la vapeur de l air peut se condenser sur le mécanisme interne rendant le fonctionnement correct erratique voire impossible Pour empêcher cela ou si cela se produit laissez l appareil allumé durant une ou deux heures L appareil s acclimatera à la température de son environnement Maintenance Si la surface de l appareil est sale essuyez la avec un chiffon doux ...

Page 38: ...trez des problèmes avec de tels disques non standards vous devez contacter les fabricants du disque Placez toujours le disque dans le lecteur avec ses inscriptions sur le dessus Les Compact Discs ne peuvent être lus ou enregistrés que sur une face Pour retirer un disque de son boîtier appuyez sur la rosace au centre du boîtier et sortez le disque en le tenant soigneusement par la tranche Comment t...

Page 39: ...ls électriques producteurs de chaleur Les CD R et CD RW imprimables ne sont pas recommandés car la face avec étiquette peut être collante et risque d endommager l appareil Ne collez pas de papiers ou de feuillets de protection sur les disques et n employez aucune bombe diffusant un revêtement protecteur Utilisez un stylo feutre doux à base d huile pour inscrire les informations du côté inscriptibl...

Page 40: ...l avant de faire les connexions Lisez les instructions de chaque élément que vous désirez employer avec cet appareil Veillez à bien insérer chaque fiche Pour éviter ronflements et bruit ne regroupez pas ensemble les cordons de connexion A B C D ...

Page 41: ...E Heure d été DST ou Daylight Saving Time Choisissez ON pour avancer l horloge d une heure Choisissez OFF pour désactiver l heure d été Cordon d alimentation électrique Branchez ce cordon d alimentation électrique dans une prise secteur murale Veillez à brancher le cordon dans une prise fournissant la tension correcte Saisissez la fiche du cordon pour le brancher ou le débrancher Ne tirez jamais s...

Page 42: ... volume STANDBY ON Utilisez cette touche pour allumer ou mettre en veille l appareil CD Utilisez cette touche pour sélectionner le mode CD C Cet équipement tire une quantité d électricité nominale de la prise secteur même avec son commutateur STANDBY ON en position STANDBY veille B A B C F E G D J I A B A D C E F G I H J L M N K O ...

Page 43: ...lisez cette touche pour arrêter la lecture Lecture Pause y J En mode CD utilisez cette touche pour lancer la lecture ou la mettre en pause J I H G F E D Réveil 1 2 ALARM 1 2 Utilisez ces touches pour régler les réveils Contrôle de réveil ALARM CHECK Utilisez cette touche pour contrôler le réglage de réveil Défilement syntonisation réglage d horloge TUNING CLOCK ADJUST En mode CD tournez cette mole...

Page 44: ...uver automatiquement une station En mode CD utilisez cette touche pour rechercher une partie de plage Programme mémoire PROGRAM MEMORY En mode CD utilisez cette touche pour programmer des plages En mode syntoniseur utilisez cette touche pour prérégler des stations Atténuateur d afficheur DIMMER Utilisez cette touche pour atténuer l affichage BASS Utilisez cette touche et les touches VOLUME pour ré...

Page 45: ...simplifier les explications les instructions de ce manuel ne se réfèrent qu aux noms et commandes de la face avant Sur la télécommande les commandes associées fonctionneront de façon similaire J I H G F 45 FRANÇAIS E D C B A F G J I H S allume quand le réveil ALARM 1 ou 2 est activé Affiche le réglage de minuterie d extinction le canal préréglé ou le numéro de plage Indicateur de bande S allume du...

Page 46: ...ou si d autres télécommandes à infrarouges sont employées près de l appareil le fonctionnement peut être incorrect De même les autres produits peuvent du coup aussi mal fonctionner 1 2 3 1 Retirez le couvercle du compartiment de pile 2 Placez la pile au lithium CR2032 3V 3 Refermez le couvercle Remplacement de la pile Si la portée de la télécommande vis à vis de l appareil diminue la pile est déch...

Page 47: ...orloge commence à clignoter 2 Si on n appuie sur aucune touche durant 60 secondes le mode de réglage d horloge est annulé Appuyez sur le symbole OUVRIR FERMER L pour ouvrir le compartiment du disque 1 4 3 5 1 2 Si l appareil est débranché du secteur durant environ 30 minutes le réglage d heure s efface Appuyez sur la touche TIME ADJUST L horloge part de 00 seconde 4 Heure d été DST ou Daylight Sav...

Page 48: ...s allume sur la source sélectionnée en dernier Vous pouvez aussi employer les touches CD TUNER ou AUX pour allumer l appareil Appuyez sur la touche CD TUNER ou AUX pour sélectionner une source 2 Le volume se règle de MIN 00 à MAX 40 Vous pouvez maintenir les touches VOLUME ou de la télécommande pour réduire ou augmenter le volume de façon continue Faites reproduire la source et réglez le volume av...

Page 49: ... Appuyez à nouveau sur la touche MUTING pour réactiver le son Atténuateur Commandes de tonalité 1 Appuyez sur la touche BASS ou TREBLE Pour régler le niveau des basses fréquences graves du son appuyez sur la touche BASS Pour régler le niveau des hautes fréquences aigus du son appuyez sur la touche TREBLE 2 Dans les 5 secondes appuyez sur les touches VOLUME pour changer le réglage Le niveau se règl...

Page 50: ... L pour ouvrir le compartiment de disque 2 Placez un disque avec sa face imprimée vers le haut sur l axe central du lecteur Appuyez le disque sur l axe jusqu à ce que vous entendiez un petit clic indiquant que le disque est correctement en place 3 Ne placez jamais plus d un disque à la fois dans le mécanisme Assurez vous que le disque est correctement en place sur l axe et qu il est bien bloqué Ec...

Page 51: ...e défilement ou jusqu à ce que la plage désirée soit trouvée La plage sélectionnée sera lue de son début A l arrêt tournez la molette de défilement ou jusqu à ce que la plage désirée soit trouvée et appuyez sur la touche Lecture Pause G J Quand la molette de défilement est légèrement tournée dans le sens inverse des aiguilles d une montre ou quand on appuie sur la touche de la télécommande durant ...

Page 52: ...che PROGRAM 2 L indicateur PROGRAM clignote dans l afficheur Pour sortir du mode programme appuyez sur la touche Stop H Lecture programmée 1 numéro de programme numéro de plage Recherche d une partie de plage Durant la lecture maintenez appuyée la touche SEARCH m ou de la télécommande et relâchez la quand vous avez trouvé la partie que vous voulez entendre Ecoute de CD 2 ...

Page 53: ... ou pression de la touche STANDBY ON Vous pouvez revenir en lecture programmée en appuyant sur la touche PROGRAM puis sur la touche Lecture Pause G J alors que l appareil est à l arrêt Si une autre source a été sélectionnée sélectionnez le mode CD en appuyant au préalable sur la touche CD Quand la sélection des numéros de plage est terminée appuyez sur la touche Lecture Pause G J pour lancer la le...

Page 54: ...touche PROGRAM Le numéro de plage et le numéro de programme s afficheront Pour ajouter une plage à la fin du programme A l arrêt appuyez répétitivement sur la touche PROGRAM jusqu à ce que 00 s affiche Sélectionnez un numéro de plage avec les boutons de défilement ou puis appuyez sur la touche PROGRAM La plage est ajoutée à la fin du programme Pour changer le programme A l arrêt appuyez répétitive...

Page 55: ...ra La plage sera lue en boucle Si vous tournez la molette de défilement ou et sélectionnez une autre piste la plage sélectionnée sera lue en boucle Il est aussi possible de sélectionner à l arrêt une plage à lire en boucle Appuyez sur la touche REPEAT sélectionnez une piste avec la molette de défilement ou puis appuyez sur la touche Lecture Pause G J pour lancer la lecture Répétition de toutes les...

Page 56: ...Les plages peuvent être lues en ordre aléatoire Appuyez sur la touche SHUFFLE durant la lecture ou à l arrêt L indicateur SHUFFLE s affichera Si vous tournez la molette de défilement dans le sens des aiguilles d une montre ou si vous appuyez sur la touche de la télécommande durant la lecture aléatoire la plage suivante sera choisie au hasard et reproduite Si vous tournez la molette de défilement d...

Page 57: ...îtier aussi le tourner peut améliorer la réception Si la réception FM est mauvaise Pour la meilleure réception tournez l antenne jusqu à réception nette des stations Mode paroles Talk Cette fonction supprime les graves pour que vous puissiez entendre clairement la voix En mode syntoniseur appuyez sur la touche TALK MODE pour activer ou désactiver le mode Paroles Talk Quand ce mode est activé la to...

Page 58: ...s les 5 secondes appuyez sur la touche MEMORY 4 Dans les 5 secondes sélectionnez une mémoire où conserver la station à l aide de la touche PRESET 3 Comment sélectionner les stations préréglées Appuyez sur la touche TUNER FM AM Pour sélectionner FM ou AM 1 Pour mémoriser d autres stations répétez les étapes à 4 1 Appuyez répétitivement sur la touche PRESET jusqu à l obtention de la station préréglé...

Page 59: ... L100 et du lecteur audio 3 Appuyez sur la touche AUX 2 Si vous utilisez la prise PHONES casque de votre mini lecteur vous devez régler le volume de ce dernier sous peine de n entendre aucun son sur votre SR L100 Trop monter le volume du mini lecteur peut causer une distorsion du son de votre SR L100 Dans ce cas réduisez le volume du mini lecteur jusqu à disparition de la distorsion puis réglez le...

Page 60: ...Si on n appuie sur aucune touche durant 60 secondes le mode de réglage de réveil est annulé 1 Tournez la molette de défilement ou pour régler l heure de réveil puis appuyez sur la touche ALARM Entre l étape et la veillez à appuyer sur la même touche ALARM que celle choisie à l étape Tournez la molette de défilement ou pour sélectionner une source CD TUNER ou BUZZ sonnerie ou Buzzer puis appuyez su...

Page 61: ...1 Heure 7 00 Source CD ALARM 2 Heure 7 30 Source TUNER L appareil s allume à 7 00 avec le CD et s éteint à 8 00 ALARM 2 ne fonctionne pas du tout Notez que si l appareil est mode de report de réveil à l heure prévue pour ALARM 2 ALARM 2 fonctionnera la source passera sur le syntoniseur à 7 30 et l appareil s éteindra à 8 30 A la mise en route de l appareil par le réveil le volume de lecture augmen...

Page 62: ...ARM active Notez que durant la lecture déclenchée par le réveil vous devez appuyer deux fois sur la touche ALARM pour couper le réveil La touche ALARM ne fonctionnera pas si aucun réglage de réveil n a été mémorisé Pour activer désactiver le réveil Pour vérifier le réglage de réveil Appuyez répétitivement sur la touche ALARM CHECK pour vérifier votre réglage de réveil Les réglages d ALARM 1 et d A...

Page 63: ... la touche ALARM pour arrêter ce report le réveil est désactivé Minuterie d extinction SLEEP 90 60 ou 30 L appareil s éteindra 90 60 ou 30 minutes plus tard Affichage normal La minuterie d extinction est désactivée Quand vous réglez la minuterie d extinction l affichage s atténue automatiquement Si vous désirez vérifier le temps restant appuyez une fois sur la touche SLEEP Le temps restant sera af...

Page 64: ...sez la télécommande dans le rayon prévu 5 m et pointez la vers le capteur de la face avant e Eliminez les obstacles entre la télécommande et l unité principale e Si une lumière forte se trouve près de l appareil éteignez la Lecteur de CD La lecture ne fonctionne pas e Placez un disque avec sa surface à reproduire vers le bas e Si le disque est sale nettoyez sa surface e Un disque vierge a été char...

Page 65: ...nce totale de sortie 4 W 4 W Puissance requise 120 Vca 60 Hz Consommation électrique 28 W Dimensions L x H x P 340 x 125 x 249 mm Poids net 3 3 kg Accessoires fournis Télécommande RC 1075 x 1 Pile pour télécommande x 1 Câble stéréo à mini connecteur x 1 Manuel du propriétaire x 1 Carte de garantie x 1 La conception et les spécifications sont sujettes à modification sans préavis Le poids et les dim...

Page 66: ...rededor para su ventilación La tensión suministrada a la unidad deberá coincidir con el valor indicado en el panel posterior En caso de duda consulte a un electricista Elija cuidadosamente el emplazamiento de la unidad No coloque la unidad a la luz solar directa ni cerca de fuentes de calor Evite también los lugares expuestos a vibraciones o a un exceso de suciedad frío calor o humedad No coloque ...

Page 67: ... el riesgo de condensación el vapor del aire se podría condensar en el mecanismo interno y provocar errores de funcionamiento Para evitarlo o en caso de que suceda deje la unidad encendida una o dos horas Así se estabilizará a la temperatura ambiental Mantenimiento Si se ensucia la superficie del equipo pase un paño suave o utilice jabón líquido normal diluido Limpie cualquier resto líquido que pu...

Page 68: ...n la calidad de la reproducción Si tiene problemas con tales discos póngase en contacto con sus fabricantes Coloque el disco en la bandeja siempre con la cara de la etiqueta hacia arriba Los discos compactos sólo se graban y reproducen por una cara Para extraer un disco de su estuche presione en el centro de la caja levante el disco y sosténgalo con cuidado por los bordes Cómo sostener el disco Si...

Page 69: ...etc o dispositivos eléctricos que generen calor No se recomiendan los discos CD R y CD RW imprimibles ya que la cara de la etiqueta podría adherirse y dañar la unidad No adhiera papeles ni láminas de protección a los discos ni aplique ningún tipo de aerosol de revestimiento Utilice un rotulador de punta blanda para escribir en el lado de la etiqueta No emplee nunca bolígrafos ni lápices de punta d...

Page 70: ... de realizar las conexiones Lea las instrucciones de cada uno de los componentes que tiene intención de usar con esta unidad Inserte correctamente los conectores Para evitar zumbidos y ruidos no tienda los cables de conexión en el mismo mazo A B C D ...

Page 71: ... botón VOLUME DST horario de verano invierno Seleccione ON para adelantar el reloj una hora Seleccione OFF para cancelar el horario de verano Cable de alimentación Conecte este cable a una toma de corriente Asegúrese de conectar el cable de alimentación a una toma de red que suministre la tensión adecuada Sostenga siempre el cable de alimentación por el conector No tire nunca del propio cable de c...

Page 72: ...cender o apagar la unidad CD Use este botón para seleccionar el modo de CD TUNER FM AM Use este botón para seleccionar el modo TUNER En el modo TUNER pulse este botón para seleccionar FM o AM D C El equipo consume una pequeña cantidad de corriente incluso estando apagado interruptor en STANDBY B A B C F E G D J I A B A D C E F G I H J L M N K O ...

Page 73: ...tón para iniciar o detener momentáneamente la reproducción ALARM 1 2 Use estos botones para programar los temporizadores ALARM CHECK COMPROBACIÓN DE ALARMA Use este botón para comprobar el ajuste del temporizador L K J I H G F E SALTO TUNING CLOCK ADJUST En el modo de CD gire este mando para saltar pistas En el modo TUNER gire este mando para sintonizar emisoras Este mando giratorio también se uti...

Page 74: ...una emisora automáticamente En el modo de CD use este botón para localizar una sección concreta de la pista PROGRAM MEMORY En el modo de CD use este botón para programar pistas En el modo TUNER use este botón para presintonizar emisoras DIMMER Use este botón para atenuar la pantalla BASS Use este botón y VOLUME para regular el nivel de los graves TREBLE Use este botón y VOLUME para regular el nive...

Page 75: ...tones y controles del panel frontal Los botones y controles correspondientes del mando a distancia funcionan de la misma manera J I H G Pantalla 75 ESPAÑOL E D C B A F G J I H Se ilumina cuando está activada la alarma 1 ó 2 Indica el tiempo de desconexión automática el canal presintonizado o el número de pista Indicador de banda Se ilumina en el modo de repetición Información de frecuencia volumen...

Page 76: ...trol remoto que emitan rayos infrarrojos es posible que no funcione correctamente Y a la inversa los otros productos también podrían funcionar de manera anómala 1 2 3 1 Retire la tapa del compartimento de las pilas 2 Introduzca la pila de litio CR2032 3 V 3 Cierre el compartimento Sustitución de la pila Si observa que cada vez tiene que acercar más el mando a la unidad principal para que reciba la...

Page 77: ...parpadear 2 Si no realiza ninguna operación en 60 segundos el modo de puesta en hora quedará cancelado Pulse OPEN CLOSE L para abrir la tapa del compartimento de disco 1 Si la unidad permanece desconectada de la alimentación en torno a media hora el reloj se reiniciará Pulse el botón TIME ADJUST El reloj comenzará a funcionar desde 00 segundos 4 DST horario de verano invierno Seleccione ON para ad...

Page 78: ... se enciende con la última fuente de sonido seleccionada También puede usar los botones CD TUNER o AUX para encender la unidad Pulse CD TUNER o AUX para seleccionar una fuente 2 El volumen se puede ajustar entre MIN 00 y MAX 40 Si desea reducir o elevar el volumen de forma continuada mantenga pulsado VOLUME o en el mando a distancia Ponga en marcha la fuente y regule el volumen con el mando girato...

Page 79: ...se el botón MUTING Pulse de nuevo MUTING para restablecer el sonido Intensidad luminosa Control de tono 1 Pulse BASS o TREBLE Para ajustar el nivel de las bajas frecuencias pulse el botón BASS Para ajustar el nivel de las altas frecuencias pulse el botón TREBLE 2 Antes de 5 segundos use los botones VOLUME para modificar el ajuste El nivel se puede regular entre 5 y 5 Puede atenuar la luminosidad d...

Page 80: ...a reproducción Pulse OPEN CLOSE L para abrir la tapa del compartimento de disco 2 Deposite un disco en el centro de la bandeja con la etiqueta hacia arriba Presione el disco en el centro hasta que oiga un clic señal de que está bien encajado 3 No coloque más de un disco al mismo tiempo en el mecanismo de carga Compruebe que el disco está perfectamente centrado y encajado Audición de CD 1 Cierre le...

Page 81: ...n gire lentamente el mando Salto o hasta localizar la pista deseada La pista seleccionada se reproducirá desde el principio Desde la posición de parada gire el mando Salto o hasta localizar la pista que desea oír y pulse el botón de reproducción pausa G J Durante la reproducción si gira ligeramente el mando Salto en sentido contrario o pulsa el botón del mando a distancia la pista en curso comenza...

Page 82: ...ión de parada 2 El indicador PROGRAM parpadea en la pantalla Para cancelar el modo de programa pulse el botón de parada H Reproducción programada 1 número de programa número de pista Audición de CD 2 Búsqueda de un fragmento de la pista Durante la reproducción mantenga pulsado SEARCH m o en el mando a distancia y libérelo cuando encuentre el fragmento que desea oír ...

Page 83: ...e abra la compuerta del disco o se pulse el botón STANDBY ON Puede reproducir de nuevo el programa pulsando PROGRAM y Play Pause G J desde la posición de parada Si hay seleccionada otra fuente primero active el modo CD pulsando el botón CD Una vez completada la selección de los números de pista pulse el botón Play Pause G J para dar comienzo a la reproducción programada 4 La pista queda programada...

Page 84: ... el botón PROGRAM repetidas veces En la pantalla aparecerán el número de pista y el número de programa Para añadir una pista al final del programa Desde la posición de parada pulse PROGRAM repetidas veces hasta que 00 aparezca en la pantalla Seleccione un número de pista con el botón Salto o y después pulse PROGRAM La pista se incorpora al final del programa Para cambiar un programa Desde la posic...

Page 85: ...cirá de forma continua Si acciona el mando giratorio Salto o y selecciona otra pista la pista seleccionada se reproducirá de forma ininterrumpida También es posible seleccionar una pista para la repetición desde la posición de parada Pulse el botón REPEAT seleccione una pista con el mando giratorio Salto o y pulse Play Pause G J para iniciar la reproducción Repetición de todas las pistas Pulse dos...

Page 86: ...den aleatorio Pulse el botón SHUFFLE durante la reproducción o desde la posición de parada El indicador SHUFFLE aparece en la pantalla Si acciona el mando giratorio hacia la derecha o pulsa el botón del mando a distancia durante la reproducción al azar la siguiente pista se seleccionará de forma aleatoria y se reproducirá Si acciona el mando giratorio Salto hacia la izquierda o pulsa el botón la p...

Page 87: ...modo Talk el botón TALK MODE permanece iluminado El modo Talk no funciona en los modos CD y AUX Con el mando a distancia pulse repetidas veces o mantenga pulsado el botón TUNING ascendente o descendente Si la recepción de AM es de baja calidad Busque la mejor posición de la unidad para recibir emisoras de AM La antena de AM está integrada en el interior de la carcasa de manera que la recepción pue...

Page 88: ...Antes de 5 segundos pulse el botón MEMORY 4 Antes de 5 segundos seleccione con PRESET un número de presintonía para asignarle la emisora 3 Cómo seleccionar presintonías Pulse el botón TUNER FM AM para seleccionar FM o AM 1 Para almacenar otras emisoras repita los pasos a 4 1 Pulse el botón PRESET repetidas veces hasta localizar la presintonía deseada 2 ...

Page 89: ...l volumen con el botón VOLUME del SR L100 y el reproductor de audio 3 Pulse el botón AUX 2 Cuando use el jack PHONES del minirreproductor deberá ajustar su volumen o es posible que no oiga el sonido del SR L100 Si eleva demasiado el volumen del minirreproductor es posible que distorsione el sonido del SR L100 En tal caso reduzca el nivel hasta que desaparezca la distorsión y después seleccione un ...

Page 90: ...al parpadea y en la pantalla aparece el indicador ALARM o Si no pulsa ningún botón en 60 segundos el modo de temporizador quedará cancelado 1 Gire el mando Salto o para especificar la hora de comienzo y a continuación pulse ALARM En los pasos a asegúrese de pulsar el mismo botón ALARM que seleccionó en el paso Gire el mando Salto o para seleccionar una fuente de sonido CD TUNER o BUZZ y a continua...

Page 91: ...se enciende a las 7 00 con el sonido del CD y se apaga a las 8 00 La ALARMA 2 no entra en funcionamiento Advierta que si la unidad se encuentra en modo SNOOZE retardo a la hora de comienzo de la ALARMA 2 ésta entrará en funcionamiento la fuente de sonido cambiará a TUNER a las 7 30 y la unidad se apagará a las 8 30 Cuando el temporizador encienda la unidad el volumen de reproducción se elevará gra...

Page 92: ...ón ALARM activo Tenga en cuenta que durante la reproducción temporizada deberá pulsar dos veces el botón ALARM para desactivar el temporizador El botón ALARM no estará operativo si no hay ningún ajuste memorizado Para activar o desactivar el temporizador Para comprobar el ajuste del temporizador Pulse repetidas veces el botón ALARM CHECK para comprobar el ajuste del temporizador Los ajustes de las...

Page 93: ...én se desactiva Desconexión programada SLEEP 90 60 ó 30 La unidad se apagará cuando transcurran 90 60 ó 30 minutos respectivamente Pantalla normal Desactivado el temporizador de desconexión automática La pantalla se atenuará automáticamente siempre que programe el temporizador SLEEP Si quiere saber el tiempo que falta para la desconexión pulse una vez el botón SLEEP El tiempo restante se visualiza...

Page 94: ... Pulse el interruptor STANDBY ON para encender la unidad e Si la pila se ha agotado sustitúyala por una nueva e Utilice el mando a distancia dentro del radio de acción 5 m y apunte al sensor remoto del panel frontal e Retire cualquier obstáculo existente entre el mando a distancia y la unidad principal e Apague cualquier fuente luminosa intensa que haya en las proximidades de la unidad Reproductor...

Page 95: ...ida total de potencia 4 W 4 W Alimentación 120 V c a 60 Hz Consumo 28 W Dimensiones anch x alt x prof 340 x 125 x 249 mm Peso neto 3 3 kg Accesorios estándar Unidad de control remoto RC 1075 x 1 Batería para control remoto x 1 Cable estéreo con tapón mini x 1 Manual del usuario x 1 Póliza de garantía x 1 El diseño y las especificaciones están sujetas a cambio sin previo aviso El peso y las dimensi...

Page 96: ...Street Mississauga Ontario L4Z 1Z8 Canada Phone 905 890 8008 TEAC MEXICO S A De C V Campesinos N 184 Colonia Granjas Esmeralda Delegacion Iztapalapa CP 09810 México DF Phone 525 581 5500 TEAC UK LIMITED Unit 19 20 The Courtyards Hatters Lane Watford Hertfordshire WD18 8TE U K Phone 0845 130 2511 TEAC EUROPE GmbH Bahnstrasse 12 65205 Wiesbaden Erbenheim Germany Phone 0611 71580 TEAC ITALIANA S p A ...

Reviews: