7673,
6933*
6681
6951
6936
6515
B A G G
REMOVE THESE
PARTS FOR:
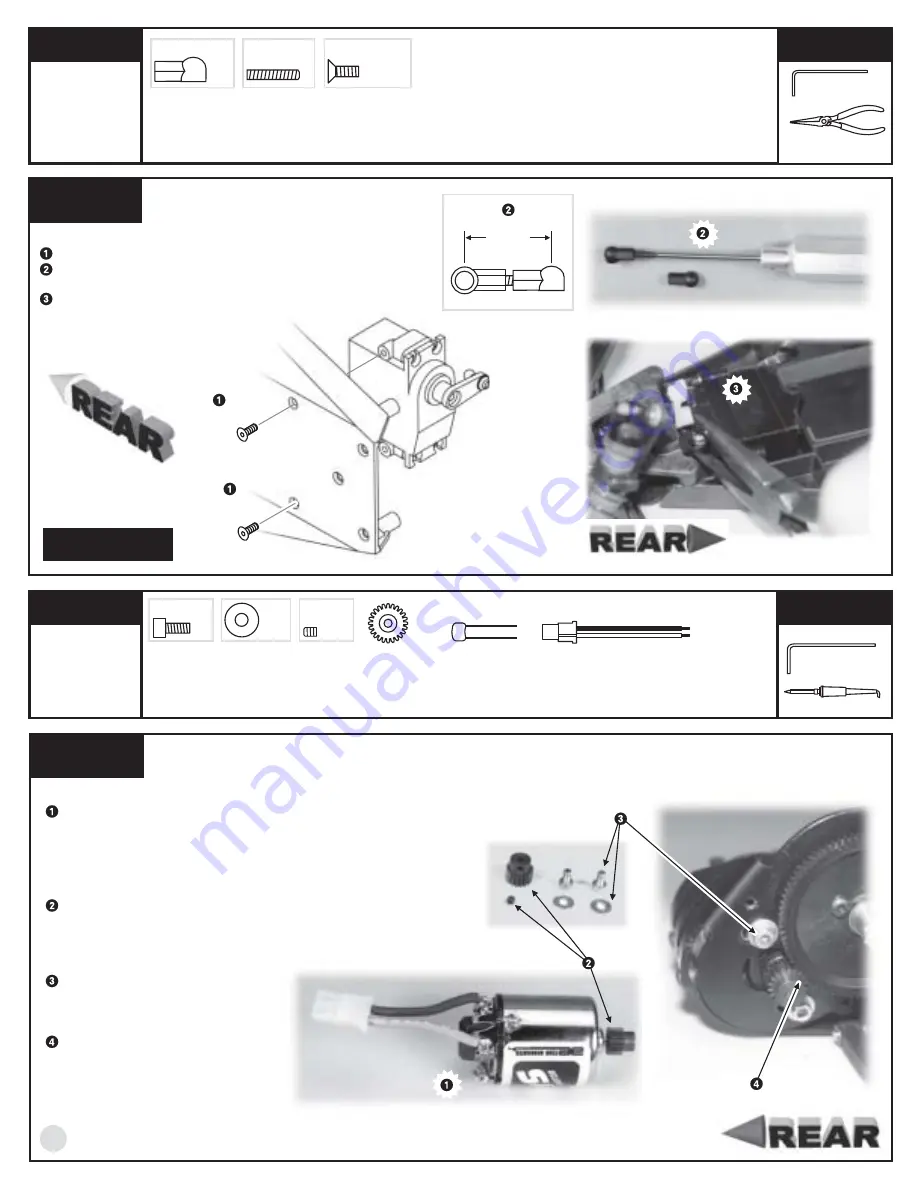
Step 2
9170, qty 2
servo link cup
9170, qty 1
servo link
MOUNT THE SERVO
Mount the servo with two #7673 (6933*) screws.
Assemble the #9170 servo link, matching the length to the
true scale drawing.
Use needle-nose pliers to attach link to ball ends.
7673, 6933*, qty 2
4-40 x 5/16
1:1
13/16"
.812"
20.4mm
9170
9170
B A G G
6515, qty 2
3mm x 6mm
gold
1:1
INSTALL THE MOTOR
Attach three capacitors to your motor according to the
instructions that came with your motor, if they are not on
already. For the Sport kit, solder the colored plug wire to a
positive tab on the motor and the black wire to a negative tab.
For the Basic, Team & Factory Team kits, you must buy
your own motor, then follow this step.
Install the #6681 gear with the #6951 set screw going to the
flat side of the shaft. For the
Basic, Team & Factory Team kits
,
you must buy your own pinion gear. If you use an electonic
speed control, see its directions for installing motor
capacitors.
Use two #6515 screws and two #6936 washers to mount the
motor as shown so the gears mesh.
SET THE GEAR MESH
You should be able to rock the spur gear back and forth in the
teeth of the pinion gear without making the pinion gear move.
If the plastic gear is tight, then loosen the #6515 screws and
move the motor away, then try again. A gear mesh that is too
tight or too loose will reduce power and damage the gear
1:1
6936, qty 2
#4 washer
1:1
6951, qty 1
4-40 x 1/8
set screw
SPORT ONLY
6681, qty 1
23 tooth
pinion gear
SPORT ONLY
6742, qty 1
motor connection plug
SPORT ONLY
580, qty 1
motor
SPORT ONLY
6520, qty 3
.1uf capacitor
1:1
1:1
PARTS REMOVED
TO IMPROVE CLARITY
9170
T O O L S U S E D
18
.050", 1/16"
s t e p 2
R I G H T S I D E
s t e p 3
R I G H T S I D E
T O O L S U S E D
.050", 3/32"
1:1
REMOVE THESE
PARTS FOR:
Step 3
7673,
6933*


