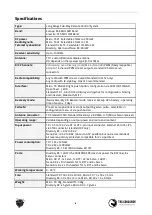
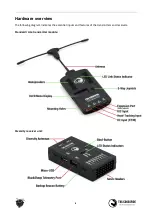
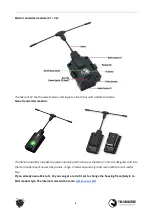
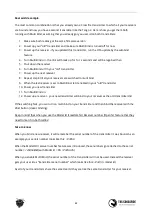
background image


Hardware overview 

The following diagram indicates the essential inputs and features of the transmitters and receivers. 

Standard/ Lite transmitter module: 


Diversity receiver unit: 


8 


Summary of Contents for CROSSFIRE

Page 1: ... board noise Two way communication link with real time link vitals and telemetry Self healing frequency hopping link Receiver beacon mode to recover your downed aircraft Super easy binding and configuration via built in OLED display OpenTX LUA or TBS TANGO remote Low latency control for perfect immersive feeling Free output mappable outputs diversity Ability to fly with multiple friends at the sam...

Page 2: ...enna cover Adapter boards FrSky inverter mod Which transmitter is affected by this How to install the inverter mod Software mod General functions Binding General note model match When do i need to bind again Binding issue Double green flashing Transmitter Receiver Receiver Update OTA Auto Bind Multi bind How to set it up Failsafe setup General setup 2 ...

Page 3: ...iver LED status indicator MyVTX RC over MAVLink Special functions Standard Lite TX only External power Status display Up and downlink status Oled Menu Find Mode Real time telemetry by Bluetooth Head tracking Receiver functions Output map CRSf Serial SBUS N i SBUS MAVLink PWM Ch X PPM DSMX RSSI LQ RSSI LQ Smart Audio 3 ...

Page 4: ...e LQ warning in OpenTX Model match in OpenTX and FreedomTx on Tango 2 Vtx connection by CRSF Vtx connection by SmartAudio Smart Audio or CRSF for the VTx VTx button is not working Connection to an FC General wiring CRSF with BetaFlight and similar firmwares CRSF with KISS FETTEC Any other FC BST to Eagletree Vector Mavlink with MAV FC s Wireless configuration with ArduPilot PX4 by Bluetooth Wirele...

Page 5: ... BF 4 1 and DJI OSD Signal strength in Betaflight BF 4 1 and later Signal strength in INav Link States LQ RSSI SNR Warning levels What should i use in my OSD or radio Racing environment Factory reset Emergency Update FLARM What you need Getting a license Activation of a license Status display Settings OSD Flarm in action FAQ 5 ...

Page 6: ...backup LiPo battery operating time of approx 2 days Failsafe Pre set servo positions or stops outputting servo pulse selectable in configuration menu or via push button Antenna connector TX Standard SMA Standard Diversity rx RP SMA U fl Micro Nano receiver Operating range Variable depending on output power and radio environment Input power TX 3 5 to 12 6V via RC or HT 3 pin input connector Externa...

Page 7: ...when using TBS equipment FAQ If you got any question after reading this manual you should visit the TBS FAQ section Note This manual is written based on Crossfire FW 4 00 If some functions are not available for you please update your Crossfire to this Beta or a later version Updating In order to update and configure your Crossfire you need the TBS Agent X which you can download from the TBS shop T...

Page 8: ...Hardware overview The following diagram indicates the essential inputs and features of the transmitters and receivers Standard Lite transmitter module Diversity receiver unit 8 ...

Page 9: ...ter includes the same internals and functions as the Micro Tx V2 It is designed to fit into the mini modul bay of newer FrSky radios Tango 2 modul bay and any other radio with the mini modul bay If you already own a Micro Tx V2 you can get a retro fit set to change the housing from JR style to Mini modul style The internals remain the same Get yours at TBS 9 ...

Page 10: ...Micro receiver Nano receiver 10 ...

Page 11: ...Nano receiver pwm version This Rx is the same as the Nano Rx but with 6 servo connectors installed This Saves you the need for the PWM adapter board Nano Diversity rx Standard Tx pinout 11 ...

Page 12: ...the Crossfire transmitters into them JR bay issue When you have set up everything properly in OpenTX but your module still stays off the radio pins did not slide into the Crossfire Tx In this case you can bend all the pins in the JR bay just a little bit to the right or left side and plug the module bag in 12 ...

Page 13: ... trainer port connectors which you then connect to the RC In plug Note over this connection you can not use CRSF between your radio and the Crossfire Tx If your radio supports CRSF you need to feed the signal wire in the plug on the right Check the Tx pinout for details Hitec Graupner JR cable Futaba cable Custom PPM cable 13 ...

Page 14: ...with your devices work fine and don t need to be replaced in general Depending on your environment your drone and your purpose you can change them anyway Here are some of them Flexible antenna MicroVee antenna PCB Race antenna Other antennas can be found at the TBS webshop or on VideoAerialSystems 14 ...

Page 15: ... will notice a cover over the antenna The antenne can be turned by 90 both directions to align it with your receiver antenne If you want to use a different one or just detach it after the flight you need to unscrew the cover and break it This will not void your warranty 15 ...

Page 16: ...hardware mod that you can build into your FrSky radio to use the full communication speed between your radio and the Crossfire Tx as some of them only have a slow transistor instead of an inverter chip included This mod is not necessary for the Crossfire to operate properly with your radio but it helps with Sensor lost messages on certain radios as well as not properly working LUA scripts This mod...

Page 17: ...w to install the inverter mod There is a detailed how to available at phillip seidels blog Software mod Instead of installing the hardware mod you can simply lower the speed on which the radio communicates with your radio Navigate in your radio settings to the Hardware tab and set the Max Baud setting from 400000 to 115000 If your radio is know to not need this soft hardware mod the BaudRate setti...

Page 18: ...receivers Model matching with the Crossfire and OpenTX is being tested When do i need to bind again There are a few cases when you need to rebind your transmitter to the receiver You changed the region frequency setting You updated your transmitter firmware You enabled multi bind You did a factory reset on the receiver you can avoid a rebind if you change these settings while the receiver is bound...

Page 19: ...our radio 2 Hold the rocker switch to enter the main menu 3 Scroll down to Devices 4 Under Crossfire Transmitter 5 Click on Bind Agent X 1 Connect your transmitter to the Agent X by USB 2 Open the Crossfire Transmitter Manage 3 Navigate to the Configure tab 4 Under Device click on Bind Button Micro TX 1 Power up the transmitter 2 Push the button of the Micro TX once Oled Display Standard Lite TX 1...

Page 20: ...uto Bind When you update your transmitter firmware you need to rebind the receiver in order to run the OTA update In this case you don t need to hit the bind button on the receiver again when he was bound before 1 Power up your transmitter 2 Set it in bind mode 3 Power up the receiver 4 Wait a few seconds 5 Now you should get the update prompt without pressing the receiver bind button again Multi ...

Page 21: ...tspot or create a temporary one on your phone Wait for it to switch to Online under XF WIFI About After a few seconds you can navigate back to XF Transmitter About Now you should see your user id This user ID will be the unique binding ID Each transmitter with this user ID can now bind to your receivers on the same firmware version Enable the multi bind option under XF Transmitter General Repeat t...

Page 22: ...ble Multi Bind To disable the multi bind option you just need to set the Multi Bind option to disable If the link is running just switch it off and wait a moment till the link regains Otherwise rebind the receiver by the button Wrong ID new ID It may occur that you need a new id To get a new ID simply connect your Crossfire to the Agent X with the new correct user account and let it synchronice wi...

Page 23: ... it enabled in your old transmitter 10 Power you new Transmitter 11 Turn Multi Bind on 12 Power up a receiver your new transmitter will bind to your receiver as the old transmitter did If the switching fails you can turn on multi bind on your transmitter and then bind the receiver with the Bind button classic binding Keep in mind that when you use the Model Id FreedomTx Receiver number OpenTx feat...

Page 24: ...that requires a special stick position e g DJI NAZA failsafe position is what you need With this setting the receiver will output a previously teached position for all channels Important If you have set up failsafe position and did not teach a position afterwards the receiver will output the last position before the link broke up Teaching a position This may require the help of a second person as ...

Page 25: ...econds Failsafe Set will appear Failsafe test When you have set up or changed the failsafe behavior it s important to test the correct function on the ground To test it 1 Remove the propeller of your aircraft 2 Power up the radio and the model 3 Arm the model with fc or move your sticks in to certain position no fc 4 Shut down your radio 5 Depending on the failsafe type and model check if the beha...

Page 26: ... depending on your local regulation Below is a general overview of the primary frequency segmentation General area Frequency ITU Region 1 Europe Africa Middle East yellow 868 MHz SRD band ITU Region 2 America Greenland blue 915 MHz ISM band ITU Region 3 Asia Oceania purple 915 MHz ISM band 26 ...

Page 27: ...er menu 3 Navigate to the General menu 4 Change the Frequency setting according to your location The frequency change is instant and affects transmitter and receiver It can even be changed in flight if necessary If you change the frequency or region setting without the receiver being powered up you need to rebind the receiver Region settings In the region settings you can set your Crossfire accord...

Page 28: ... 1W Please check if your Radio is capable of providing enough power for the 1 2 W option Otherwise you might break the electronics inside of your radio The TBS TANGO can handle these power levels the Tango II can only be used up to 500mW Standard tx or 1w Micro Tx v2 Nano Tx To change RF power 1 Enter the configuration menu LUA script select General Crossfire TX and Max Power 2 Pick the RF output ...

Page 29: ...bled it will now only switch between 50Hz and 4Hz mode Only enable it if you know what you are doing Note Forced Telemetry is not meant to be used in normal conditions The best practise is to not use it Transmitter LED status indicator The RGB LED on the transmitter gives you at any moment an indication of your link status Transmitter LED sequence Description Pulsing Ready trying to connect to rec...

Page 30: ...bootloader active or firmware upgrade running Green is flashing Diversity RX is in Find mode up to 1 min delay between flashing Double green blinking Authentication error Rebind your receiver more details Find mode is only available with the diversity receivers MyVTX With the new MyVTX menu you can set all your VTx s to the same channel band and output power without accessing all of them This is u...

Page 31: ... be found in the output map section for the receiver RC over MAVLink If you use MAVLink to connect to your FC you can send your RC data over the same connection Depending on the MAVLink version used in your fc you can send up to 12 channels by this MAV V2 or 8 MAV V1 used on Crossfire FW below 3 8 As there are some rumors around The rc data will not stop being send if the crossfire telemetry break...

Page 32: ...tatus display After power on the main screen shows the current state of the transmitter i e link status transmission power R C and head tracking input signal state Link Status State of the wireless link Connecting Running TX Power Output transmission power 10mW 25mW 100mW 500mW 1W 2W RC Input Radio R C PPM signal input status No signal PPM CRSF V1 V2 HT Input Head tracking PPM signal input status ...

Page 33: ... controller In normal use the GPS coordinates are continuously updated and the latest data is displayed on the Find Mode screen If the model loses power you can review the last known coordinates to locate your model Inactive Press Enter Active Enable disable the Find mode shows on board LiPo voltage Do NOT enable during flight Signal Receiver signal strength makes it possible to triangulate the lo...

Page 34: ...r will not enter the find mode and keeps running in the selected operation mode Once the receiver enters the find mode also a power saving mode will be activated This power saving mode will decrease the beacon signal interval over time It stays for 10 beacon signals on the same interval level and remains on the slowest once reached The interval levels are 1s 5s 10s 15s 30s and 60s This means it ca...

Page 35: ...35 ...

Page 36: ... there scenario landing in a tree Search and rescue The copter plane is lost now we ll start the S R mission It s important to get the link back to either get the latest GPS coordinates or have the ability to point into the direction based on the signal strength In some cases the link is not even lost Skip below and move to Link regained chapter Read the coordinates from your OLED and go to the pl...

Page 37: ... the signal strength from one direction works for emergencies Turn yourself slowly in a circle and try to figure out the direction the signal strength is the strongest Walk this direction and repeat this until you find the copter plane For this practice some exercise is recommended Disable find mode on the receiver If the receiver is in Find mode it can be cancelled by pressing the Bind button 3x ...

Page 38: ...serial datas are registered from the receiver the module will switch to this mode As soon as the Crossfire switches to 50Hz mode the transmission will be stopped MAVLink This mode is used to pass MAVLink messages back and forth Use this mode if you have a MAVLink FC connected to the receiver If Mavlink packages are detected by the Crossfire receiver the module will switch to this mode You can use ...

Page 39: ...ll replace the channel selected under destination This gives you the ability to map your headtracker channels from any channel of the Headtracker input to the RC link frame XX Source the channel number where the signal for this axis is incoming On FatShark 39 ...

Page 40: ... bis 12 RSSI LQ RSSI LQ Serial RX MAVLink RX CRSF RX PWM Ch 7 8 PWM Ch1 to 12 RSSI LQ RSSI LQ SBUS n i SBUS Serial TX MAVLink TX CRSF TX DSMX SmartAudio PWM Ch 8 Receiver pin Output type Diversity RX Nano Default value 1 PWM Ch1 bis 12 PPM RSSI LQ RSSI LQ CRSF TX PWM Ch 1 2 PWM Ch1 bis 12 PPM RSSI LQ RSSI LQ CRSF RX PWM Ch 2 3 PWM Ch1 to 12 RSSI LQ RSSI LQ SBUS n i SBUS Serial TX MAVLink TX CRSF T...

Page 41: ... same time to connect several devices at once Serial The bridge feature gives you the ability to pass any kind of serial uart data from any device connected to the receiver to any device connected to the transmitter If you selected Bridge TX on a capable pin the following pin will be set to Bridge Rx and the following to Bridge RTS if not used by any other Serial protocol Please connect your devic...

Page 42: ...u FC supports MAVLink V2 this includes up to 12 channels with V1 up to 8 channels PWM Ch X If you select CH 1 12 the Crossfire will output a standard 50Hz PWM signal that can be used for all servos and FC s without digital rc input PPM Sends up to 12 channels by PPM Only use it on old style flight controllers with no serial rc input DSMX DSMX is designed to use the Crossfire as a backup system for...

Page 43: ...to 8 or 12 channels Use the 8 channels setting whenever you can This ensures the best performance for your rc link RF Profile Lock the Crossfire to a fixed frequency or let it select it by the quality of the link Dynamic The Crossfire selects the RF profile due the internal algorithm based on the quality of the link It will switch between 150Hz on ideal conditions and 50Hz when the link is no long...

Page 44: ...eo feed Make sure your cables are shielded or twisted to avoid this issue in general If you disable it dynamic rf dynamic power and the telemetry will no longer work This means you Crossfire Tx will send with the maximum set up power level and switch to 50Hz mode The LUA scripts are not affected by this The Crossfire re enables the telemetry for the time the datas are sent and then turns it back o...

Page 45: ...quality valid packets TBS CROSSFIRE TX TSNR Downlink signal to noise ratio TBS CROSSFIRE TX ANT Sensor for debugging only TBS CROSSFIRE TX GPS GPS Coordinates TBS GPS FC Alt GPS Altitudes TBS GPS FC Sats GPS Satellites acquired TBS GPS FC Hdg Magnetic orientation TBS GPS FC RxBt Battery voltage TBS GPS FC Crossfire Rx Core Curr Current draw TBS GPS FC Crossfire Rx Core Capa Current consumption TBS...

Page 46: ... other voltage sensor in your system you can disable the Crossfire sensor in the settings under Receiver General Voltage Sensor Bst connection BST Blacksheep telemetry is a bus system used by TBS to connect your gear like the TBS GPS puck CORE PRO etc All devices are connected in parallel The BST bus needs to get clean 5v to power up the connected devices Power type BST 5V VBATT BEC 5V FC 5V TBS C...

Page 47: ... complete BST plug available on it In this case just connect SCL to SCL and SDA to SDA on all devices The Pinout of the plug in general Note even if the BST bus got the same labels as your non TBS GPS or compass they don t work on the BST bus 47 ...

Page 48: ...network Password enter the password for the network Connect manually connect to the network Only necessary when a new network is chosen under SSID Scan scans for WiFI networks Found networks can be chosen under SSID manual reconnect by Connect is required Forget WiFi erases all saved networks and there password Upgrade starts the self update for the WiFI firmware Disabled at the moment UDP MAVLink...

Page 49: ...his Now you can see the WiFI module in your Crossfire menu LUA script and Agent X Here you can find the whole process as video Connection to a WiFi hotspot Once your WiFI module is initiated you now can connect to your hotspot The easiest way is to connect it by the Web ui Connect the Crossfire Tx to your radio and power it up Search for a new WiFi network like TBS_XF_AP_xxxxxx Connect your pc pho...

Page 50: ...ire Tx to your radio and power it up Navigate in the Crossfire menu to WiFI General Hit Scan to search for available networks Under SSID you can select the found network Insert the password under Password Click on Connect to start the manual connection Done 50 ...

Page 51: ...ppears the module is successfully updated At the moment the self update check will result in your module is up to date message no matter which version you use Opentx setup for crossfire If you own a OpenTX radio you need to set up your model like this Internal RF off and External RF CRSF Note those settings need to be done or all models where you use your Crossfire Using CRSF will give you the low...

Page 52: ...e voice alerts will be triggered every time they are active What they mean SF1 when L02 is activ plays the selected track ones but not at the startup SF2 same as SF1 for the critical warning For the sounds you can create your own with a free TTS creator on the internet Model match in OpenTX and FreedomTx on Tango 2 Model match enables you to make sure that a specific receiver and drone with it onl...

Page 53: ...t you selected the right model in your radio Due to this you can use the same model in your radio with all your drones Model match is available as nightly build 2020 08 21 from TBS You can download the OpenTX version here In OpenTX your model number in the memory will be set as default Model Id when you create a new model If you want to use Multi Bind on a other radio with no Model Id option make ...

Page 54: ...Model Id Model Match in FreedomTx Tango 2 Model Id Receiver No in OpenTX 54 ...

Page 55: ...ng CRSf to communicate with the Crossfire ecosystem Select a free output pin capable for CRSF check the output map section for available outputs Set the Unify32 to CRSF by button or USB Evo and Unify32 HV Connect them Crossfire Tx to VTx Rx Crossfire Rx to Unify Tx Wiring example 55 ...

Page 56: ...ire Tx to VTx Rx SmartAudio pad Smart Audio or CRSF for the VTx Both protocols had their advantages and disadvantages SmartAudio Single wire connection Saves one PWM output useful if you got a wing and use the bst pins for bst CRSF OTA Updates upcoming Full y configurable by LUA Crossfire OLED FUSION etc CRSF readout let you use PITMode on a switch or navigate through the Unify Evo OSD without the...

Page 57: ...p just the drone with the Crossfire Rx and the Unify32 Change the Unify32 settings by the button Turn the transmitter back on Set the output map back to CRSF or SmartAudio Connection to an FC General wiring If you use SBus or any other protocol beside CRSF or MAVLink you only need to connect the receivers Tx line to your FC Use CRSF whenever possible to get the best experience with your Crossfire ...

Page 58: ...light and similar firmwares In the BetaFlight configurator navigate to the Configuration tab and select Serial based receiver and CRSF In the Ports tab enable Serial Rx for the UART where your receiver is connected 58 ...

Page 59: ...ing on the KISS Fc you are using connect the Crossfire by CRSF to the Fc s RC input port In the configurator enable CRSF as RC Type Any other FC Depending on your FC set the output map according to the protocol that it can use 59 ...

Page 60: ...o the FC Mavlink with MAV FC s If you use a FC with MAVLink like ArduPilot PX4 you can use the MAVLink capabilities of the Crossfire Connect a MAVLink capable output to the Telemetry port of your FC On PIX FC s it s mostly the TELEM1 port and set the Crossfire Rx output map to MAVLink Tx and Rx On the FC you need to configure the telemetry port Otherwise the Crossfire will not be able to receive t...

Page 61: ...s configuration with ArduPilot PX4 by Bluetooth As soon as the receiver receives valid MAVLink packages the Bluetooth module switches to MAVLink as well If you encounter issues you can check the module settings in the Transmitter General settings In Mission Planner QGroundControl or any other app set the Baud Rate of your pc s Bluetooth module to 57600baud Make sure your Crossfire RF profile is se...

Page 62: ...in the same WiFi network Straight connection to the Crossfire access point When you are connected you need to use the following settings Connection type UDP Port 8888 The port can be changed in the settings of the WiFI module if you need to With WiFi FW 1 17 you can enable or disable the MAVLink data To change this navigate to and set MAVLink to on Make sure your Crossfire is in RF mode dynamic or...

Page 63: ...ct your mobile device to the Crossfire Bluetooth module The connection speed needs be set to 57600baud Depending on the app you are using you might not need to be in 150Hz mode at the beginning WiFi Getting real time telemetry data from your Crossfire by WiFi works almost the same as with Bluetooth You can find the WiFI details here Depending on the app you are using you might not need to be in 15...

Page 64: ...yet supported by the WiFi firmware Settings in BetaFlight INav On the port where you got your extra MAVLink connection installed enable MAVLink with 57600Baud in the PORTS tab for that UART Note You need to cancel the loading parameter dialog in MissionPlanner etc as it will not get past this dialog The important telemetry data will be sent anyway 64 ...

Page 65: ... need to connect a second connection between the Crossfire Rx and the FC Note This will only work while your Crossfire is in the 150hz mode As soon as the link switches to 50Hz the Bluetooth module stops sending serial data Betaflight Inav setup Enable MSP for the UART and set the Baud Rate to57600 When you want to connect to the Betaflight Inav configurator select the Com port of your pc and set ...

Page 66: ...sor to a channel Keep in mind that the LQ will remain at 100 while the Crossfire is in 150Hz mode In the Crossfire receiver channel mapping assign LQ to an unused channel If you set it up by LUA you can assign it to channel 1 even when you use the 8 channel mode of the crossfire In BetaFlight set the assigned channel as RSSI Channel AUX1 channel 5 etc 66 ...

Page 67: ... BetaFlight can read the link information from the CRSf stream This will give you the RSSI reading in dBm 0 130 and the LQ reading similar to the TBS OSD 300 0 To use this new method you need to disable the RSSI channel setting in the receiver tab and activate the following elements in the OSD tab 67 ...

Page 68: ... use LQ as sensor by the channel output map menu or as OpenTx telemetry sensor it behaves like this 150Hz mode 100 50 4Hz mode 0 100 RSSI Relative signal strength indicator How loud the signal is that the receiver hears But this also includes noise The RSSI is exponential which results in a massive drop at the beginning and slows down the lower it gets In general double the range will result in a ...

Page 69: ...umbers mean the Crossfire signal is louder than the noise negative Numbers mean the noise is louder than the Crossfire Warning levels Sensor Prewarning Critical RSSI 30 100dBm 20 106dBm LQ 70 BF 1 70 60 BF 1 60 RSSI LQ 30 20 SNR 4dB 0dB What should i use in my OSD or radio The easiest way to set up your OSD or radio warning is by using LQ It is linear which makes it easier to monitor for most of t...

Page 70: ...ur transmitter The available color codes can be found here Factory reset If you experience a strange behavior with your Crossfire a factory reset can help solve them The process is the same for all transmitters and receivers Power up your device Navigate in to the transmitter or the receiver menu Under General you can find the Factory reset option When you started it follow the instructions on you...

Page 71: ...tores a specific golden firmware inside which can be restored by the following steps Hold the bind button Power up the receiver The led on the rx starts to flash rapidly Release the button Push and hold the button again The led will start to blink in a double patter As soon as the led switches to rapid flashing again you can release the button When the pattern changes back to slow single blinking ...

Page 72: ...with the Crossfire updates As an example FW 4 05 will expire on 01 06 2021 Just send If you want to just send your FLARM track to other pilots and the FLARM capable ground stations no license is needed Just the TBS GPS connected by BSt to the Crossfire Rx Receive If you want to receive the position of other pilots you need a license There are two licenses available Buddy See other Crossfire pilots...

Page 73: ...r serial number Activation of a license When you receive your email with the code you need to get the old TBS Agent Agent X is in development for this After the installation Connect the Crossfire diversity rx via USB with your Pc Open the Agent Ignore the message from the Agent Device not recognised Update now Navigate to the License tab Enter the license in the desired field and hit enter Now you...

Page 74: ...osition to other pilots as well Off No FLARM data will be send or received Pulse Just send out your position Buddy Send your position and show Crossfire pilots only available with active license Aviation Send your position and show Crossfire pilots and airplanes and helicopters only available with active license Flarm Track Off On Send your data to the ground stations If activated you can be seen ...

Page 75: ...lane type got there own symbol so you know what is spotted Arrow Crossfire pilots Airplane manned Airplane Helicopter manned Helicopters Flarm in action We made a video showing you how the FLARM integration of the TBS Crossfire works FLARM Showcase 75 ...

Page 76: ...Student and 8 Ch or 12 Ch Does the transmitter forget the receiver when I bind a new receiver No The receiver stores the serial number of the transmitter Everything is based on this So you can bind as many receivers as you want What happens if I have more than one receiver running at time We recommend to run only one receiver at time but if you like to you can run more than one receiver at time As...

Reviews: