.3.
ࡉࢀ࡚࠸ࡿⅭࠊ୍⤌❧ࡢ㝿࠺ࡲࡃ⤌ࡅࡀฟ᮶࡞࠸ሙྜࡣㄝ᫂᭩
㏻ࡾࡢᡭ㡰࡛⤌❧࡚ࡽࢀ࡚࠸ࡿ☜ㄆࡋ࡚ࡃࡔࡉ࠸ࠋ
ᮏㄝ᫂᭩㏻ࡾ⤌ࡅࢆ⾜ࢃ࡞ࡗࡓሙྜࠊ
DEX210v2
ࡢࣃ࣮ࢶࢆ◚ᦆ
ࡍࡿᜍࢀࡀ࠶ࡾࡲࡍࠋ
୍ࠊఱࡽࡢ⌮⏤࡛
DEX210v2
ࢆ㏉ရࡉࢀࡿሙྜࡣ⤌❧ࢆጞࡵ࡞࠸
࡛ࡃࡔࡉ࠸ࠋ
DEX210v2
ࡣࡑࡢ㒊ཪࡣ୍㒊࡛ࡶ⤌❧࡚ࡽࢀ࡚࠸ࡿ㏉
㔠࣭ࡣ୍ษᛂࡌࡽࢀࡲࡏࢇࡢ࡛ࡈὀពࡃࡔࡉ࠸ࠋ
ᵜ䈤᰾Җᴹ䈖㓶Ⲵ㓴㻵о䈳ṑᮉᆖˈᛘਟ➗䈤᰾ҖⲴᮉᆖˈᶕᆼᡀᴰ
䘲ਸᛘⲴ䖖փ䇮ᇊDŽᡁԜᐼᵋᛘ㜭ཏ䈳ṑࠪҾᛘⲴ㔍֣䇮ᇊˈᡰ
ԕ൘ᔰ㓴㻵ࡽˈ䈧࣑ᗵݸ䈖䈫䈤᰾ҖⲴ㓴㻵о䈳ṑᮉᆖDŽᡰᴹⲴ
Team
Durango
䜭ᱟԕ亦㓗Ⲵ⭏ӗḷ߶࣐ᐕࡦᡀⲴˈᡰԕˈᖃᛘਁ⧠൘㓴㻵кᴹ
ԫօ䰞仈Ⲵᰦىˈ䈧ᛘṨሩᛘⲴ䈤᰾Җᇩˈ⺞ᇊᛘᱟԕ↓⺞Ⲵ㓴㻵ᯩ
ᔿᶕ䘋㹼㓴㻵DŽ
㤕ᱟԕ䈤᰾ҖᮉᆖԕཆⲴᯩᔿᶕ࣐ᐕᡆ㓴㻵ˈᛘⲴ
DEX210v2
ਟ㜭Պഐ䭉
䈟Ⲵ㓴㻵ᯩᔿ㘼ሬ㠤нᗵ㾱ⲴᦏՔDŽ
㤕ᛘഐѪḀӋ䴰≲㘼䴰㾱䘰䘈ᛘⲴ
DEX210v2
ˈࡉ䈧यᴹԫօ㓴㻵ࣘDŽ
ᡰᴹⲴ
Team Durango
Ⲵ䍙আ୶൷нሩᐢ㓴㻵֯⭘Ⲵӗ૱䍏䎧ᴤᦒᡆ䘰䘈
䍓ԫDŽ
Before you begin Bevor Sie anfangen
ࡣࡌࡵ
㓴㻵ࡽ䈤᰾
Contained in your DEX210v2 box are different parts bags. Each bag
is marked with a number. Within each bag are all the parts required to
complete a build-stage of the kit. As noted in ‘Before you begin’ (above),
you must ensure that you only open one bag at a time, following the
correct sequence of assembly.
Before starting each build-stage, check that you have the right quantity
and size of items for the build-stage. To assist you with the assembly of
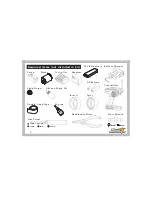
your DEX210v2, we have included full-size images of all the hardware
parts laid out, so that you can place items on top of the images to check
they are the correct size/length. Other items, such as those found on the
mould tree, are also shown, but are not full-size.
This manual contains detailed step-by-step instructions to show you how
to assemble and set-up your new DEX210v2 for optimum performance.
We want you to get the most out of your new racing machine, so we
suggest that you read this manual through, from cover to cover, before
beginning assembly. All Team Durango products are manufactured to
WKHKLJKHVWSRVVLEOHVWDQGDUGVVRVKRXOG\RX¿QGDQ\SDUWVGLI¿FXOWWR
assemble, please check that you are assembling them correctly.
If you don’t follow these instructions exactly, you may damage parts of
your DEX210v2.
If, for any reason, you decide that you do not want your DEX210v2,
you
must not begin assembly.
Your DEX210v2 cannot be returned to
your Team Durango dealer for a refund or exchange if it has been fully or
partially assembled.
Diese Bauanleitung beinhaltet detallierte Step by Step Anweisungen,
die Ihnen zeigen, wie Sie Ihren neuen DEX210v2 zusammenbauen und
einstellen müssen, um die optimale Leistung zu erreichen. Wir möchten,
dass Sie das Maximum aus Ihrer neuen Renn-Maschine herausholen
können und bitten Sie, diese Bauanleitung vorn bis hinten durchzulesen,
bevor Sie mit dem Zusammenbau beginnen. Alle Team Durango Produkte
werden in den höchstmöglichen Standards produziert. Sollten Sie ein
VFKZLHULJ]XPRQWLHUHQGHV%DXWHLO¿QGHQSUIHQ6LHELWWHREHVVLFKXP
das richtige Teil handelt und ob Sie es richtig montiert haben.
Wenn Sie Ihr Fahrzeug nicht nach der Bauanleitung zusammenbauen,
könnten Sie Ihren DEX210v2 beschädigen.
Wenn Sie aus bestimmten Gründen Ihren DEX210v2 nicht haben wollen,
müssen Sie ihn nicht zusammenbauen. Ihr DEX kann nicht von Ihrem
Team Durango Händler zurück genommen werden, wenn das Fahrzeug
ganz, oder auch teilweise montiert wurde.
ࡇࡢ࣐ࢽ࡛ࣗࣝࡣ
DEX210v2
ࡢ⤌❧࡚ᚲせ࡞ㄝ᫂ࢆࢫࢸࢵࣉࣂࢫ
ࢸࢵࣉ࡛⾜࠸ࠊ᭦᭱㧗ࡢࣃࣇ࢛࣮࣐ࣥࢫࢆᘬࡁฟࡍ⤌❧᪉ἲࢆグ㍕ࡋ
࡚࠸ࡲࡍࠋᮏ〇ရࡣࡇࢀࡲ࡛ࡢ࣮ࣞࢩࣥࢢ࣐ࢩࣥࡣ୍⥺ࢆ⏬ࡍࡃ᪂
ࡋ࠸࣐ࢩ࡛ࣥࡍࡢ࡛ࠊ⤌❧๓ᮏ࣐ࢽࣗࣝࢆ࣮࣌ࢪㄞࡲࢀࡿࢆ࠾
⸀ࡵࡋࡲࡍࠋ
Team Durango
ࡢ࡚ࡢ࣐ࢩࣥࡣ㧗࠸ရ㉁⟶⌮ࡢඖ〇㐀
Assembly Zusammenbau
⤌❧࡚๓
㓴㻵
Summary of Contents for DEX210v2
Page 1: ...DEX210 V2_Manual_Cover_Front_Final_Outlined ai...
Page 9: ...9 Assembly Instructions...
Page 12: ...12 1 1 CS M3x6mm 704004x3 704004 704004 704004 A3...
Page 18: ...18 1 1 1 1 330353 25mm 4mm BH M2 5x4mm 705029x4 705029 705029 330353 330363 1 X2 B4...
Page 30: ...30 1 1 BH M3x10mm 705005x3 705005 705005 320270 3 320270 1 F2...
Page 31: ...31 1 1 BH M3x8mm 705002x2 705002 705002 320270 2 F2...
Page 37: ...37 1 1 Front Left Camber Link Front Right Camber Link Steering Link Steering Link G2...
Page 38: ...38 1 1 Rear Right Camber Link RM Rear Left Camber Link RM G3...
Page 39: ...39 1 1 Rear Right Camber Link MM Rear Left Camber Link MM G3...
Page 47: ...47 1 1 390298 320128 2 320128 3 320128 3 I2...
Page 49: ...49 1 1 701004 390001 390001 SETSCREW M3x3mm 701004x1 I4...
Page 50: ...50 1 1 390085 402031 390085 I5 Cut along cut line...
Page 51: ...51 1 1 390085 390085 Cut along cut line I5 402031...
Page 52: ...52...
Page 53: ...53...
Page 54: ...54...
Page 55: ...55...
Page 56: ...56 Notes...
Page 57: ...57 Notes...
Page 58: ...58 Exploded View...
Page 69: ...69 Final Assembly 390085 402031 480003 390085 390085 320126 3 320126 3 390085...
Page 70: ...70 Final Assembly 390085 390085 390085 320126 3 320126 3 390085 402031 480003...
Page 76: ...DEX210 V2_Manual_Cover_Back_Final_Outlined ai...


