background image

Copies  of  the  I/B.  Please  reproduce  them  without  any 
changes  except  under  special  instruction  from  Team 
International  BELGIUM.  The  pages  must  be  reproduced 

and folded in order to obtain a booklet A5 (+/- 148.5 mm 
width x 210 mm height). When folding, make sure you keep 
the good numbering when you turn the pages of the I/B. 

Don’t change the page numbering. Keep the language 

integrity. 


23 


TKG COG 1001

- 180914 


Assembly page 23/59 


Fax +32 2 359 95 50 


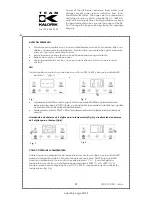
Appuyez sur le bouton marche/arrêt. L’écran LED montrera la température (par ex. 210

0

C) 

(Fig.2), et le témoin lumineux de température bleu 

s’allumera et indiquera que l’appareil 

préchauffe.  


Vous pouvez appuyer sur la touche “TEMP” ou “Timer” pour que l’écran montre la température ou 

le temps de cuisson. 


L’écran montre un numéro de 3 

chiffres pour la température (Fig.3) ou un numéro de 2 chiffres 

pour le temps de cuisson (Fig.4). 

 
REGLAGE DE LA TEMPERATURE 


Si vous voulez adapter le réglage de la température de cuisson, assurez-

vous que l’écran LED 

montre la 

température (appuyez sur la touche “TEMP” si nécessaire). Vous pouvez appuyer sur 

la touche “+” ou “

-

“ afin de régler la température de cuisson désirée (230

0

C au maximum, 

120

0

C au minimum). Réglez d’abord une température de 210

0

C à 220

0

C et après vous pouvez 

régler une différente température (plus basse ou plus haute) selon les aliments que vous désirez 
griller (Fig. 5, 6). 


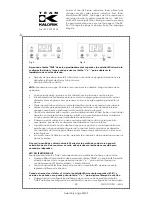
Si vous appuyez sur la touche “TEMP” pendant environ 5 secondes, l’écran LED retournera au 

réglage 

initial, et alors vous pouvez appuyer sur la touche “+”ou “

-

“ afin de régler la 

température de cuisson désirée. 


Après environ 3 à 5 minutes la lumière verte s’éteindra indiquant que votre appareil est 
préchauffé et prêt à l’emploi. 


Ouvrez le grill de contact. 

ATTENTION: Utilisez toujours la poignée. Pendant l'utilisation, les plaques deviennent chaudes. 

Faites attention de ne pas vous brûler.  


Mettez le sandwich, la viande ou autres aliments sur la plaque inférieure. 

Le revêtement antiadhésif permet de cuisiner sans ajout de graisse ou huile. Lors de la cuisson 

d’aliments pauvres en graisse tels que du poisson ou des légumes, vous pouvez légèrement 
graisser les plaques. Par contre pour cuire de la viande ou des aliments marinés, il n’est pas 

nécessaire d

’ajouter de matière grasse.


Fermez le grill de contact. Le témoin lumineux de température vert s’allumera de 

nouveau. 


Faites cuire 

pendant environ 3 à 8 minutes jusqu’à ce que le témoin lumineux de 

température s’éteigne de nouveau ou jusqu’à ce que les ali

ments soient bruns dorés 

selon vos goûts. 

Fig. 3 

Fig. 4 

Fig. 5 

Fig. 6 

Summary of Contents for TKG COG 1001

Page 1: ...th x 210 mm height When folding make sure you keep the good numbering when you turn the pages of the I B Don t change the page numbering Keep the language integrity Front cover page first page Assembly page 1 59 Fax 32 2 359 95 50 Contact grill Kontaktgrill Grille viande Parrilla de Contacto Grill kontaktowy Contactgrill Kontaktní gril Kontaktný gril TKG COG 1001 VG COG 3001 230V 50Hz 2000W I B Ve...

Page 2: ...1 Plateau collecteur de graisse 2 Poignée 3 Couvercle SUS 4 Corps supérieur 5 Plaques gril avec revêtement antiadhésif 6 Corps inférieur Base SP 1 Bandeja de aceite 2 Manija 3 Cubierta SUS 4 Caja superior 5 Platos de cocina antiadherentes 6 Base inferior de la vivienda PL 1 Pojemnik na spływający tłuszcz 2 Uchwyt z termoizolacją 3 Pokrywa 4 Obudowa górnej płyty grzejnejj 5 Płyty grzejne z powłoką ...

Page 3: ...der die Zeit zu erhöhen 7 An Aus Schalter 8 Taste um dieTemperaturoderZeitzu verringern FR 1 Ecran LED montre la température ou le temps 2 TEMP régulateur de température 0C 3 Power témoin lumineux de fonctionnement rouge 4 TIMER minuterie pour régler le temps de cuisson en minutes 5 Ready témoin lumineux de température bleu 6 Bouton pour augmenter la température ou le temps de cuisson 7 Interrupte...

Page 4: ...uitcontrolelampje 4 TIMER tijdregelaar in minuten 5 Ready blauw temperatuur controlelampje 6 knop om de temperatuur of tijd te verhogen 7 Aan uitschakelaar 8 knop om de temperatuur of tijd te verminderen SK 1 LED Displej zobrazuje teplotu alebo čas 2 TEMP voľba teploty 0C 3 Power Kontrolka zapnutia červená 4 TIMER časovač voľba doby varenia v min 5 Pripravenosť svetlo modrá 6 tlačidlo zvyšuje tepl...

Page 5: ...d the risks involved Children shall not play with the appliance Cleaning and user maintenance shall not be made by children unless they are older than 8 years and supervised Never leave the appliance and its cord unsupervised and within reach of children less than 8 years old or irresponsible persons when it is plugged into the wall or when it is cooling down Check that your mains voltage correspo...

Page 6: ... it Stand the appliance on a table or flat surface Make sure the appliance has cooled down before cleaning and storing it Make sure the cord never comes into contact with the hot parts of the appliance The temperature of the accessible surfaces may be very high when the appliance is in use Make sure not to touch these hot parts of the appliance Make sure the appliance never comes into contact with...

Page 7: ...repairs in order to avoid all danger In case of need you should return the appliance to this electrician SPECIFIC FUNCTIONS Memory The device records the latest grilling temperature and time settings so when grilling greater quantities of food of the same type you do not have to set the parameters anew each time Default settings are restored on switching the appliance off Automatic switch off If y...

Page 8: ...USE Close the Grill Toaster and plug it into a 220 240V AC outlet you will notice that the red power light will go on and the LED display will show Fig 1 By pressing the Power On Off button you will notice that the LED display will show the temperature number e g 2100C Fig 2 and the blue ready light will go on indicating that the Grill Toaster has begun preheating You can press TEMP or Timer butto...

Page 9: ... this time if you want to cook more foods you do not need to close Grill Toaster to pre heat again you can directly put the foods fill the lower cooking plate to making more foods The Grill Toaster was designed with a unique handle and hinge that allows the cover to adjust to the thickness of the food You can easily grill anything from a thinly sliced potato to a thick sirloin steak with even resu...

Page 10: ... with any abrasive scouring pad or steel wool as this will damage the finish Remove and empty the drip tray after each use and wash the tray in warm soapy water Avoid the use of scouring pads or harsh detergents as they may damage the surface Rinse and dry thoroughly with a clean soft cloth and replace PROTECTION OF THE ENVIRONMENT DIRECTIVE 2012 19 EU In order to preserve our environment and prot...

Page 11: ...rden sofern diese Personen beaufsichtigt oder über den sicheren Gebrauch des Geräts unterrichtet wurden und die damit verbundenen Gefahren verstanden haben Kinder dürfen nicht mit dem Gerät spielen Reinigung und Benutzer Wartung dürfen nicht durch Kinder durchgeführt werden es sei denn sie sind älter als 8 Jahre und beaufsichtigt Lassen Sie Ihr Gerät und sein Netzkabel nie unbeaufsichtigt und in R...

Page 12: ...rät nicht im Freien und bewahren Sie es an einem trockenen Platz auf Benutzen Sie nur Zubehör welches vom Lieferanten empfohlen wurde Anderes Zubehör stellt eine Gefahr für den Benutzer dar und das Gerät könnte dadurch beschädigt werden Ziehen Sie niemals an der Anschlussleitung um das Gerät zu bewegen Achten Sie darauf dass zufälligerweise die Anschlussleitung nicht irgendwo hängen bleibt und die...

Page 13: ...ecker aus der Steckdose wenn das Gerät nicht benutzt wird da das Gerät keinen An Aus Schalter besitzt Bereiten Sie nur Nahrungsmittel zu die zum Backen und zum Verzehr geeignet sind Ihr Gerät darf niemals über eine externe Zeitschaltuhr oder irgendein anderes separates Fernbedienungssystem eingeschaltet werden Achtung Wenn das Symbol auf einer bestimmten Fläche des Gerätes angebracht wurde ist die...

Page 14: ... dass Sie vergessen das Gerät abzuschalten Intelligente Scharniere Der Kontaktgrill ist entworfen mit einem einzigartigen Handgriff und einem Scharnier das dem Deckel ermöglicht sich an die Dicke der Nahrungsmittel anzupassen Sie können alle Nahrungsmittel leicht und gleichmäβig grillen von feingeschnittenen Kartoffeln bis einem dicken Lendensteak Antihaftbeschichtung Die Grillplatten sind ausgest...

Page 15: ...eitschaftsleuchte leuchtet auf und zeigt an dass der Kontaktgrill funktioniert und aufheizt Sie können auf die Taste TEMP oder Timer drücken um die Temperaturanzeige oder Garzeitanzeige zu wählen dreistellige Nummernanzeige für die Temperatur Abb 3 und zweistellige Nummernanzeige für die Garzeit Abb 4 REGELUNG DER TEMPERATUR Falls Sie die Gartemperatureinstellung ändern wollen bitte wählen Sie die...

Page 16: ...Verwenden Sie dazu einen Holzspatel oder einen Spatel aus Plastik bzw Küchenzangen Falls Sie noch mehr Nahrungsmittel grillen wollen brauchen Sie den Kontaktgrill nicht zu schlieβen um erneut vorzuwärmen Sie können das Grillgut direkt auf die untere Grillfläche legen Der Kontaktgrill ist ausgestattet mit einem einzigartigen Handgriff und Scharnier das dem Deckel ermöglicht sich an die Dicke der Na...

Page 17: ... Topfreiniger oder mit feuchtem Küchenpapier um die Nahrungsreste anzufeuchten Verwenden Sie keine harten oder kratzenden Gegenstände Niemals mit metallenen Gegenständen reinigen oder Schleif und Scheuermittel verwenden da ansonsten die Antihaftbeschichtung der Backplatten beschädigt werden kann Benutzen Sie keine spitzen oder metallischen Gegenstände um das Grillgut wegzunehmen da ansonsten die A...

Page 18: ...Produkt den Anforderungen der VO 1275 2008 EG entspricht Unser Produkt verfügt zwar nicht über eine Funktion zur Minimierung des Verbrauchs welche laut VO 1275 2008 EG das Produkt nach Beendigung der Hauptfunktion in den Aus oder Bereitschaftszustand versetzen soll aber dies ist aus Sicht des Gebrauchswertes nicht möglich da dies die Hauptfunktion des Produktes so stark beeinträchtigen würde dass ...

Page 19: ...isation en toute sécurité et sur les risques encourus Les enfants ne doivent surtout pas jouer avec l appareil Le nettoyage et la maintenance ne doivent pas être effectués par des enfants à moins qu ils aient plus de 8 ans et qu ils soient supervisés Ne laissez jamais votre appareil et son câble d alimentation sans surveillance et à la portée des enfants de moins de 8 ans ou des personnes non resp...

Page 20: ...ur l utilisateur et risque d endommager l appareil Ne déplacez jamais l appareil en tirant sur le câble Veillez à ce que le cordon d alimentation ne puisse être accidentellement accroché et ce afin d éviter toute chute de l appareil Evitez d enrouler le cordon autour de l appareil et ne le tordez pas Posez cet appareil sur une table ou un support suffisamment stable pour éviter sa chute Veuillez l...

Page 21: ...d un autre système de commande à distance séparé Note Lorsque le symbole est apposé sur une surface particulière il accentue la mise en garde et signifie ATTENTION cette surface peut devenir très chaude pendant l utilisation Le symbole est toujours apposé sur la surface dont la température est la plus élevée cependant les températures des autres surfaces métalliques ou non peuvent aussi devenir tr...

Page 22: ...inement jusqu à un bifteck dans l aloyau épais Revêtement antiadhésif Le revêtement antiadhésif sur les plaques de cuisson permet de cuisiner sans ajout de graisse ou huile La graisse qui goutte des aliments quand ils sont grillés s écoule de la surface de la plaque de cuisson dans un récipient spécial Lors de la cuisson d aliments pauvres en graisse tels que du poisson ou des légumes vous pouvez ...

Page 23: ...u minimum Réglez d abord une température de 2100C à 2200C et après vous pouvez régler une différente température plus basse ou plus haute selon les aliments que vous désirez griller Fig 5 6 Si vous appuyez sur la touche TEMP pendant environ 5 secondes l écran LED retournera au réglage initial et alors vous pouvez appuyer sur la touche ou afin de régler la température de cuisson désirée Après envir...

Page 24: ...r le bouton marche arrêt afin d allumer l appareil UTILISATION DE LA MINUTERIE Vous pouvez appuyer sur le bouton Timer afin de sélectionner l affichage du temps de cuisson Si vous voulez utiliser la minuterie vous devez appuyer sur le bouton TIMER pour que l écran LED affiche le temps de cuisson et vous pouvez appuyer sur la touche ou afin de régler le temps de cuisson désiré 30 minutes au maximum...

Page 25: ...vant de replacer le collecteur de graisse PROTECTION DE L ENVIRONNEMENT DIRECTIVE 2012 19 UE Afin de préserver notre environnement et notre santé l élimination en fin de vie des appareils électriques et électroniques doit se faire selon des règles bien précises et nécessite l implication de chacun qu il soit fournisseur ou utilisateur C est pour cette raison que votre appareil tel que le signale l...

Page 26: ...s riesgos involucrados Los niños no deben jugar con el aparato La limpieza y mantenimiento del aparato no debe ser hecho por niños a menos que sean mayores de 8 años y estén supervisados No deje de vigilar su aparato y el cable y no lo deje nunca a cargo de niños menores de 8 años o de personas no responsables cuando está enchufado a la toma de corriente o se está enfriando Antes de usar el dispos...

Page 27: ...el aparato sobre una mesa o superficie plana Asegúrese de que el aparato se haya enfriado antes de limpiarlo y almacenarlo Asegúrese de que el cable nunca entre en contacto con las partes calientes del aparato La temperatura de las superficies accesibles puede ser muy alta cuando el dispositivo está en uso Asegúrese de no tocar estas partes calientes del aparato Asegúrese de que el electrodoméstic...

Page 28: ...a el dispositivo con este servicio FUNCIONES ESPECÍFICAS Memoria El aparato guarda la última temperatura de cocción y el último tiempo de cocción por lo que no tiene que ajustar estos ajustes cada vez que quiera asar grandes cantidades de alimentos del mismo tipo La configuración predeterminada se restablece cuando apaga la unidad Apagado automático Si no usa la parrilla de contacto durante 30 min...

Page 29: ...ar USO Cierre la parilla de contacto y conéctela a una CA de 220 240V verá que la pantalla LED mostrará Fig 1 Al presionar el botón Encender Apagar notará que la pantalla LED mostrará el número de temperatura por ejemplo 2100C Fig 2 y la luz azul de listo se encenderá indicando que la parrilla de contacto ya ha comenzado el precalentamiento Puede presionar el botón TEMP o Timer para seleccionar mo...

Page 30: ... aparato con una espátula de madera o plástico No use objetos metálicos ni arañazos ya que pueden dañar la capa antiadherente de las placas Si desea asar más alimentos no debe cerrar la parrilla de contacto y precalentarla nuevamente puede asar los alimentos directamente en la placa inferior La parrilla de contacto ha sido diseñada con un mango único y una bisagra única que permite que la tapa se ...

Page 31: ...eden dañar el recubrimiento antiadherente de las placas Limpie la parte exterior de la unidad con un paño suave si es necesario con un detergente suave No use lana de acero o estropajos Retire y vacíe la trampa de grasa después de cada uso y lave con agua caliente y jabón No use estropajos o estropajos agresivos Enjuague bien y seque completamente con un paño limpio y suave antes de volver a coloc...

Page 32: ...otyczących bezpiecznego użytkowania urządzenia i związanych z tym niebezpieczeństw Dzieci nie powinny bawić się tym urządzeniem Czyszczenie i konserwacja przez użytkownika nie powinny być wykonywane przez dzieci chyba że mają one więcej niż 8 lat i są pod nadzorem Nie zostawiaj włączonego urządzenia wraz z przewodem bez nadzoru trzymaj z dala od dzieci poniżej 8 roku życia i osób niepowołanych kie...

Page 33: ...czne dla użytkownika Mogą one również wpłynąć na wadliwe działanie urządzenia lub jego uszkodzenie Nigdy nie ciągnij nie podnoś itp urządzenia za kabel ani nie wyłączaj wtyczki z sieci w ten sposób Nie owijaj kabla wokół urządzenia nie zginaj go nie skręcaj Ustaw urządzenie na płaskiej i stabilnej podstawie w pobliżu gniazda sieciowego Zanim przystąpisz do czyszczenia urządzenia upewnij się że ost...

Page 34: ... Wykwalifikowany elektryk Osoba wskazana przez dział sprzedaży producenta lub importera lub każda osoba posiadająca niezbędne kwalifikacje umożliwiające dokonywanie tego typu napraw bez stwarzania zagrożenia W każdym przypadku urządzenie należy przekazywać tym osobom SZCZEGÓLNE FUNKCJE URZĄDZENIA Pamięć ostatnich ustawień Urządzenie zapamiętuje ostatnio stosowane ustawienia temperatury i czasu gri...

Page 35: ...ia produktów żywnościowych Przetrzyj powierzchnię płyt grzewczych wilgotną gąbką albo ściereczką zwilżoną w gorącej wodzie Wytrzyj do sucha ściereczką albo papierowym ręcznikiem Rozprowadź na powierzchni płyt grzewczych delikatną warstewkę jadalnej oliwy JAK UŻYWAĆ GRILLA Zamknij pokrywę urządzenia i podłącz przewód do gniazdka o właściwym napięciu sieciowym 220 240V Zapali się czerwona dioda kont...

Page 36: ...zas działania urządzenia powierzchnia płyt może być bardzo gorąca Zachowaj ostrożność aby się nie poparzyć Połóż produkty przeznaczone do grillowania na dolnej płycie Specjalna zapobiegająca przywieraniu powierzchnia płyt pozwala na uniknięcie używania tłuszczu w czasie pieczenia Możesz użyć małej ilości tłuszczu w przypadku pieczenia produktów o małej jego zawartości np ryby czy warzywa Zamknij G...

Page 37: ...R można wybrać co będzie się wyświetlać na wyświetlaczu Gdy odliczanie dobiegnie końca urządzenie zasygnalizuje to delikatnym sygnałem dźwiękowym a na wyświetlaczu pojawi się niebieska dioda ready zgaśnie a urządzenie automatycznie się wyłączy Aby uruchomić je ponownie należy przycisnąć Power ON OFF CZYSZCZENIE I KONSERWACJA Zawsze przed czyszczeniem wyłącz urządzenie z sieci zasilającej i pozosta...

Page 38: ...ikające z ustawy przejęła w imieniu przedsiębiorcy Organizacja Odzysku Gospodarstwo domowe pełni istotną rolę w przyczynianiu się do ponownego użycia i odzysku w tym recyklingu zużytego sprzętu elektrycznego Przestrzeganie zasad selektywnej zbiórki sprzętu ma zapewnić właściwy poziom ochrony zdrowia ludzkiego i środowiska naturalnego Na prośbę Klienta instrukcja obsługi jest również dostępna w for...

Page 39: ...gaan Kinderen mogen in geen geval met het toestel spelen Schoonmaak en onderhoud mogen niet worden uitgevoerd door kinderen tenzij ze 8 jaar of ouder zijn en onder toezicht staan Laat uw toestel en zijn snoer nooit zonder toezicht en binnen het bereik van kinderen jonger dan 8 jaar of van ontoerekeningsvatbare personen wanneer het onder spanning staat of wanneer het aan het afkoelen is Controleer ...

Page 40: ...e reinigen of op te bergen Zorg dat het snoer niet in aanraking komt met de warme onderdelen van het toestel Wanneer het toestel in werking is kunnen toegankelijke delen ervan een zeer hoge temperatuur bereiken Raak deze warme onderdelen niet aan Zorg ervoor dat de warme onderdelen van het toestel tijdens het gebruik niet in aanraking komen met gemakkelijk ontvlambare materialen zoals gordijnen ee...

Page 41: ...uur en tijdsinstelling op in het geheugen zodat u deze parameters niet steeds opnieuw moet invoeren wanneer u grote hoeveelheden van hetzelfde soort voedsel wilt grillen De standaardinstellingen worden hersteld wanneer u het toestel uitschakelt Automatische uitschakeling Als u de contactgrill niet gebruikt gedurende 30 minuten schakelt de contactgrill zich automatisch uit om energie te besparen en...

Page 42: ...e laten functioneren Maak de bakplaten schoon door ze met een spons of doek met warm water schoon te vegen Droog ze af met een doek of keukenpapier Bestrijk de bakplaten met een beetje kookolie of spuit er een kookoliespray antikleef bakspray op GEBRUIK Sluit de contactgrill en steek de stekker enkel in een stopcontact van 220 240 volt wisselstroom Het rode aan uitcontrolelampje gaat aan en versch...

Page 43: ...plaat De speciale antiaanbaklaag van de bakplaten maakt het mogelijk van het gebruik van vet of olie af te zien Voor voedingsmiddelen met een laag vetgehalte zoals groenten en vis kunt u de grillplaten lichtjes invetten Voor vlees en gemarineerde voedingsmiddelen is dat daarentegen niet nodig Sluit de contactgrill Het groene temperatuurcontrolelampje gaat opnieuw aan Bak ongeveer 3 tot 8 minuten t...

Page 44: ...t gebruiken moet u op de aan uitknop drukken om hem opnieuw aan te schakelen REINIGING Trek de stekker uit het stopcontact en laat het toestel afkoelen vooraleer u het reinigt Het is gemakkelijker de grillplaten te reinigen wanneer ze nog lauwwarm zijn U hoeft de contactgrill niet te demonteren voor de reiniging Dompel het toestel nooit onder in water of enige andere vloeistof Steek het nooit in e...

Page 45: ...bij dat ons product voldoet aan de vereisten van richtlijn 1275 2008 EU Ons product beschikt dan wel niet over een functie om het stroomverbruik tot een minimum te beperken die volgens richtlijn 1275 2008 EU het product na het beëindigen van de hoofdfunctie in de uit stand of stand bystand slaapstand zou moeten zetten maar dit is praktisch onmogelijk want dit zou de hoofdfunctie van het product de...

Page 46: ...BELGIUM The pages must be reproduced and folded in order to obtain a booklet A5 148 5 mm width x 210 mm height When folding make sure you keep the good numbering when you turn the pages of the I B Don t change the page numbering Keep the language integrity 46 TKG COG 1001 180914 Assembly page 46 59 Fax 32 2 359 95 50 ...

Page 47: ...esmú nikdy používať toto zariadenie ak nie sú pod dohľadom osoby zodpovednej za ich bezpečnosť alebo ak predtým nedostali pokyny týkajúce sa bezpečného používania zariadenia Na deti je potrebné dôsledne dohliadať aby nepoužívali toto zariadenie ako hračku Čistenie a údržbu prístroja nesmú vykonávať deti jedine ak dosiahli 8 rokov a sú pod dozorom dospelej osoby Nikdy nenechávajte spotrebič jeho el...

Page 48: ...ča výrobca Môže predstavovať nebezpečenstvo pre používateľa a riziko poškodenia spotrebiča Zariadenie nikdy nepremiestňujte ťahaním za kábel Ubezpečte sa že kábel sa žiadnym spôsobom nemôže niekde zachytiť Neomotávajte kábel okolo zariadenia ani ho nezohýbajte Postavte zariadenie na stôl alebo na rovný povrch Prv než budete prístroj čistiť alebo ho uskladníte skontrolujte či je prístroj ochladený ...

Page 49: ...ie výrobcu alebo dovozca alebo akákoľvek osoba ktorá je kvalifikovaná schválená a kompetentná na vykonávanie takýchto opráv s cieľom predchádzania akýmkoľvek nebezpečenstvám V každom prípade by ste mali vrátiť zariadenie takémuto elektrikárovi ŠPECIFICKÉ FUNKCIE Pamäť Prístroj zaznamenáva posledné nastavenie teploty grilovania a času takže pri grilovaní väčšieho množstva potravín rovnakého typu ne...

Page 50: ... Vysušte papierovými utierkami alebo utierkou Zľahka potrite platne trochou oleja POUŽITIE Zatvorte gril a zapojte prístroj do zásuvky 220 240V AC červená kontrolka napájania sa rozsvieti a LED display zobrazí obr 1 Tlačidlom zap vyp sa rozsvieti LED displej a teplota napr 210 C obr 2 a modré svetlo pohotovosti prístroja čo znamená že prístroj sa predhrieva Môžete stlačiť tlačidlo Teplota alebo tl...

Page 51: ...u 30 minút gril sa automaticky vypne pre úsporu energie a zvýšenie bezpečnosti v prípade že ho zabudnete vypnúť Pre opätovné použitie musíte stlačiť tlačidlo zap vyp AKO POUŽIŤ ČASOVAČ Stlačte tlačidlo časovaču pre nastavenie doby varenia Po stlačení tlačidla sa displej rozsvieti a pomocou a nastavte želanú dobu max 30 minút a min 1 minúta po nastavení času displej začne odpočítavať Ak nastavíte č...

Page 52: ...nálnym odpadom Používateľ má právo priniesť výrobok na zberné miesto komunálneho odpadu ktoré vykonáva recykláciu odpadu prostredníctvom opätovného použitia recyklácie alebo použitia na iné účely v súlade so smernicou Návod na použitie je dostupný aj v elektronickej verzií stačí si ho vyžiadať u autorizovaného servisu pozri záručný list ErP Prehlásenie Smernica 1275 2008 EC My Team Kalorik Group S...

Page 53: ...jem nehrají Čištění a údržbu uživatele nesmí dělat děti pokud nejsou starší 8 let a jsou pod dohledem Nikdy neopouštějte spotřebič ani jeho kabel bez dozoru a v dosahu dětí mladších 8 let nebo nezodpovědných osob pokud jsou zapojeny do zdi nebo při ochlazování Zkontrolujte zda napětí v elektrické síti shoduje s napětím uvedeným na zařízení Nikdy nenechávejte bez dozoru když se používá Z času na ča...

Page 54: ...n Dávejte pozor na to aby šňůra nepřišla do kontaktu s teplými částmi přístroje Nedotýkejte se teplých částí přístroje používejte držáky Dávejte pozor na to aby během procesu pečení nepřišli teplé části přístroje do styku s lehce vznětlivými materiály jako závěsy ubrusy atd Nebezpečí ohně Dávejte pozor na to aby se nezoškrabala vrchní vrstva v opačném případě by se mohly dostat malé částice povrch...

Page 55: ...at parametry po každé na nově Výchozí nastavení se obnoví po vypnutí přístroje Automatické vypnutí Pokud nepoužíváte gril po dobu 30 minut gril se automaticky vypne pro úsporu energie a zvýšení bezpečnosti v případě že ho zapomenete vypnout Inteligentní panty Gril byl navržen s jedinečným držákem na uchopení a panty aby se kryt vrchní část přístroje přizpůsobili tloušťce potravin Můžete snadno gri...

Page 56: ...ředehřívá Můžete stisknout tlačítko Teplota nebo tlačítka časovač pro volbu zobrazení teploty nebo doby vaření 3 místné číslo na displeji pro teplotu Obr 3 a 2 místné číslo po dobu obr 4 JAK NASTAVIT TEPLOTU Chcete li upravit teplotu vaření potvrďte LED displej pro teplotu nebo ne pokud ne je třeba stisknout tlačítko Temp pro teplotu pokud ano můžete stisknout tlačítko nebo čímž nastavíte teplotu ...

Page 57: ...ko zap vyp JAK POUŽÍT ČASOVAČ Stiskněte tlačítko časovači pro nastavení doby vaření Po stisknutí tlačítka se displej rozsvítí a pomocí a nastavte požadovanou dobu max 30 minut a min 1 minuta Po nastavení času displej začne odpočítávat Pokud nastavíte čas do 1 minuty displej zobrazuje odpočítávání sekund a během této doby nemůžete stisknout nebo tlačítko pro změnu času Chcete li upravit dobu vaření...

Page 58: ...říděným komunálním odpadem Uživatel má právo přinést výrobek na sběrné místo komunálního odpadu které provádí recyklaci odpadu prostřednictvím opětovného použití recyklace nebo použití k jiným účelům v souladu se směrnicí Návod k použití je dostupný iv elektronické verzí stačí si ho vyžádat u autorizovaného servisu viz záruční list ErP Prohlášení Směrnice 1275 2008 EC My Team Kalorik Group SA NV t...

Page 59: ...rder to obtain a booklet A5 148 5 mm width x 210 mm height When folding make sure you keep the good numbering when you turn the pages of the I B Don t change the page numbering Keep the language integrity 59 TKG COG 1001 180914 Assembly page 59 59 Fax 32 2 359 95 50 TKG COG 1001 English 5 Deutsch 11 Français 19 Español 26 Polski 32 Nederlands 39 Slovenský 47 Čeština 53 ...

Reviews: