background image

146

145

i

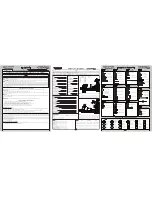
DETAIL ICON REFERENCE KEY

HARDWARE

Cap Head

Flat Head 1

Flat Head 2

Button Head

Set

Ball Bearings 1

Ball Bearings 2

Pins

Washers

Shims

Retaining Clips

Nuts (Lock/Plain)

INTRO

Intro to the 8IGHT-E 2.0

 Manual

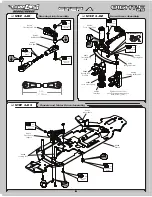
STEP I-01

q

Body Clip (A8200)

2-56 x 1/4" (A6232)

2-56 x 1/2" (A6254)

4-40 x 1/2" (A6204)

4-40 x 3/8" (A6206)

4-40 x 5/8" (A6221)

5-40 x 7/8" w/ 5/8" Shoulder (A4414)

4-40 x 1/4" (A6234)

4-40 x 1/2" (A6256)

5-40 x 3/8" (A6277)

5-40 x 1/2" (A6278)

2-56 x 1/4" (A6255)

5-40 x 3/4" (A6279)

600-0157

5-40 x 20mm (A6281)

5-40 x 1" (A6280)

5-40 x 3/8" (A6270)

5-40 x 1/2" (A6271)

5-40 x 3/4" (A6272)

5-40 x 5/8" (A6275)

5-40 x 7/8" (A6273)

5-40 x 1-7/8" (A6273)

8-32 x 3/8" (A6264)

8-32 x 1/2" (A6262)

4mm x 12mm (A6259)

 F 5-40 x 1/8" (A6228)

C 4-40 x 1/8" (A6227)

C 5-40 x 3/16" (A6299)

C 8-32 x 1/8" (A6298)

F 5-40 x 1/8" (A6297)

F 8-32 x 1/8" (A6296)

O10-32 x 3/8" (A6295)

5-40 x 22mm (A6045)

6x10x3mm (A6946)

5x11x4mm (A6947)

F 5x11x4mm (A6948)

5x10x4mm (A6949)

1/2” x 3/4" (A6953)

8x14x4mm (A6945)

5x13x4mm (A6949)

Ball Stud (A6215)

#4 x .030" (A6350)

.250 x .094 x .020" (A9166)

#5-40 (A6302)

3 x 8mm (A9106)

3 x 12mm (A3500)

#4-40 (Mini) (A6306)

#8-32 (A6311)

2.5 x14mm (A3518)

2.5 x 12.37mm (A3518)

3 x 17mm (A3518)

2.5 x 12.8mm (A3518)

4 x 66mm (A6500)

3.5 x 53mm (A6503)

650-0052

650-0053

650-0054

650-0053

650-0054

5x7x.2mm (A6356)

6x11x.2mm (A3501)

14x17x.1mm (A4452)

14x17x.25mm (A4452)

5mm E-clip (A6109)

5-40 x 1/2" (A6240)

8-32 x 3/4" (A6263)

Front: 

Standard 

Smart 

Spring Wire Dia: 

Qty of Springs: 

Ramp Plate: 

Grease: 

Diff Fluid: 

Center: 

Standard 

Smart 

Spring Wire Dia: 
Qty of Springs: 
Ramp Plate: 

Grease: 
Diff Fluid: 

Differentials

Notes:

600-0162


Thank you for selecting the 

8IGHT-E 2.0

 as your new racing buggy. The 

8IGHT-E 2.0

 has already distinguished itself as a top caliber racing chassis, and 

as you will see, we have made every effort to produce a vehicle that is not only the most competitive but also easy to maintain. The simple step-by-step 

assembly sequence and easily followed instructions and drawings combined with Team Losi Racing's world famous quality fitting parts will make using 

the 8 a most enjoyable experience.


Please take a moment to read through the following instructions. This will familiarize you with the various parts, assembly tips and descriptions as 

well as the tools needed. Taking an extra moment before using your vehicle will help you understand the dynamics of the 8IGHT-E 2.0 and setup tips to 

ensure the best possible experience.

Good luck and good racing,


Team Losi Racing

Welcome Team Losi Racing 

8IGHT-E 2.0

 Owner!

NOTICE

All instructions, warranties and other collateral documents are subject to change at the sole discretion of Horizon Hobby, Inc.  For up-to-date prod-

uct literature, visit http://www.horizonhobby.com and click on the support tab for this product.

Safety Precautions and  Warnings

Read and follow all instructions and safety precautions before use. Improper use can result in fire, serious injury and damage to property.

Components 

Some electronic components can become hot while in use. Do not touch parts until cool. 

Use only with compatible components. Should any compatibility questions exist please refer to the product instructions, the component instructions 

or contact Horizon Hobby, Inc. 

Batteries

Always follow the manufacturer’s instructions when using and disposing of any batteries. Mishandling of Li-Po batteries can result in fire causing  

serious injury and damage.

Smal Parts

This kit includes small parts and should not be left unattended near children as choking and serious injury could result.

Safe Operating Recommendations

•  

Inspect your model before every run to make certain it is track worthy.

•  

Be aware of any other radio frequency user who may present an interference problem.

•  

Always be courteous and respectful of other users of your selected driving area.

• 

Choose an area clear of obstacles and large enough to safely accommodate your driving activity.

•  

Make certain this area is clear of friends and spectators prior to running your vehicle.

•  

Be aware of other activities in the vicinity of your path that could cause potential conflict.

IMPORTANT SAFETY NOTES:

• 

 Select an area for assembly that is away from the reach of small children. 

Some parts in this vehicle are small and can be swallowed by children, 

causing choking and possible internal injury; PLEASE USE CAUTION! 

• 

 The shock fluid and greases supplied should be kept out of children’s reach.

 They are not intended for human consumption!

• 

 Exercise care when using any hand tools, sharp instruments, or power tools during construction.

• 

 Carefully read all manufacturer’s warnings and cautions 

for any chemicals, glues, or paints that may be used for assembly and operating purposes.

Meaning of Special Language

WARNING: 

Procedures, which if not properly followed, create the probability of property damage, collateral damage, and serious injury OR 

create a high probability of superficial injury.

WARNING: 

Read the ENTIRE instruction manual to become familiar with the features of the product before operating. Failure to operate the 

product correctly can result in damage to the product, personal property and cause serious injury. 

This is a sophisticated hobby product and NOT a toy.  It must be operated with caution and common sense and requires some basic mechanical abil-

ity.  Failure to operate this Product in a safe and responsible manner could result in injury or damage to the product or other property.  This product 

is not intended for use by children without direct adult supervision. Do not attempt disassembly, use with incompatible components or augment 

product in any way without the approval of Horizon Hobby, Inc.  This manual contains instructions for safety, operation and maintenance. It is es-

sential to read and follow all the instructions and warnings in the manual, prior to assembly, setup or use, in order to operate correctly and avoid 

damage or serious injury.

GLUE

Apply CA Glue

Pay Special

Attention

CUT

Cut/Trim

Ensure Free

Movement

Ensure Free

Rotation

Ensure Proper

Orientation

Push Firm

Tighten

L

R

L

R

Assemble 

Other

Side the Same

L

Side 
Shown

x2

Repeat/Build

Multiple

Screw Partially

DO NOT

Over-Tighten/

Snug Tight

1

These numbers are used to identify the critical order in which assembly must occur. *Note: They will not call out every stage of the assembly process.

Apply Losi-Lok

GREASE

Apply High 

Pressure Black

Grease

Degrease with 

Motor Spray

OIL

Fill With

Silicone Oil

Pre-Tap

LOSI-LOK

Register your Losi Product Online:

Register your 8IGHT-E 2.0 now and be the first to find out about the latest options parts, product updates and more. Log on to www.LOSI.com 

and follow the product registration link to stay connected.

Summary of Contents for 8IGHT-E 2.0

Page 1: ...3mm 56 25 wt Losi Green 3 1 lbs 106mm 2 B 2 Inside Losi 2000 wt 1700Kv 45 15 4S 5000mAh LiPo Recommended 20 6 0V High 3 Normal 4 0 See shock length See shock length 1 8 SCALE 4WD COMPETITION ELECTRIC...

Page 2: ...when using and disposing of any batteries Mishandling of Li Po batteries can result in fire causing serious injury and damage Smal Parts This kit includes small parts and should not be left unattended...

Page 3: ...y depending on accessories used All measurements taken at ride height 32mm Overall Chassis Length 16 35 415mm Wheelbase 12 71 12 87 323 327mm Front Track Width 12 13 308mm Overall Length w Tires 19 5...

Page 4: ...x 1 5 40 x 1 2 A6721 x 4 L 5 40 x 1 4 A6302 x 3 5 40 x 7 8 A6045 x 1 Maintenance Tip 8 32 x 3 8 A6264 x 1 A9168 Steering Servo Arm A4413 Front Chassis Support A4408 Steering Post A4404 Chassis A4462 M...

Page 5: ...op Plate Assembly STEP A 04 q Completed Steering Assembly STEP A 05 q LOSI LOK LOSI LOK 5 40 x 1 2 A6271 x 1 5 40 x 3 8 A6270 x 1 5 40 x 1 2 A6278 x 2 6x10x3mm A6946 x 4 A4413 Front Chassis Brace A442...

Page 6: ...1 1 2 3 4 2 3 2 5 x 12 80mm A3518 x 1 Solid 4 3x12mm A3500 x 4 6x11x0 2mm A3501 x 2 6x11x0 2mm A3501 x 2 Fill with 5000 wt oil just above the planetary gear Tighten the diff screws in this order A3505...

Page 7: ...6945 x 1 C 8 32 x 1 8 A6298 x 1 3 x 17mm A3518 x 1 Solid 2 5 x 12 4mm A3518 x 1 Solid F 8 32 x 1 8 A6296 x 1 1 2 3 4 5 6 To prevent fine dust from entering the gearbox apply a thin bead of grease alon...

Page 8: ...295 x 1 C 5 40 x 3 16 A6299 x 2 8 32 x 3 4 A6263 x 2 5 40 x 3 4 A6272 x 4 4 x 65mm A6500 x 2 Solid 5 A4431 Front Inner Hinge Pin Cap A1701 Front Arm Bushing A1709 Left Spindle Carrier A6501 Hinge Pin...

Page 9: ...e end of the wire is flush with the ball as pictured above 94 25 3 71 A1750 Sway Bar 2 3mm A1750 Sway Bar Ball A5438 Shock Standoff A1714 Front Shock Tower A6055 6 8mm Flanged Suspension Ball A6542 4m...

Page 10: ...m x 14mm A3518 x 1 Solid 1 2 5 40 x 1 4 A6302 x 1 5 40 x 5 8 A6275 x 1 3 A3537 Grease Boot A6542 Steering Turnbuckle A6050 Steering Ball A6046 Steering Rod End A6050 Steering Ball A3526 Driveshaft Fro...

Page 11: ...8 Front Clip Assembly STEP B 12 q Completed Front Assembly STEP B 13 q STEP B 8 32 x 1 2 A6262 x 4 5 40 x 3 4 A6272 x 2 5 40 x 3 4 A6279 x 2 1 2 3 4 A4422 Front Bumper A4453 Front Bulkhead Spacer...

Page 12: ...8 x 1 2 5 x 12 80mm A3518 x 1 Solid 6x11x0 2mm A3501 x 2 6x11x0 2mm A3501 x 2 3x12mm A3500 x 4 A3562 45T Plastic Spur Gear A3505 O ring A3502 Sun Gear A3506 Center Outdrive A3505 Diff Seal A3502 Sun G...

Page 13: ...LOK LOSI LOK LOSI LOK 5 40 x 1 2 A6271 x 4 8 32 x 1 2 A6264 x 1 4mm x 12mm A6259 x 2 4 Countersink A6351 x 1 Setscrew A3575 x 1 1 8 Scale Brushless Motor Not Included A9199 Motor Adapter A4462 Diff T...

Page 14: ...11 STEP C Center Differential Installation STEP C 06 q Completed Center Diff Assembly STEP C 07 q 8 32 x 1 2 A6262 x 4 8 32 x 3 8 A6264 x 2 8 Countersink A6351 x 4 A4462 Center Diff Standoff Plate...

Page 15: ...948 x 1 2 5 x 12 80mm A3518 x 1 Solid 3x12mm A3500 x 4 1 2 3 4 6x11x0 2mm A3501 x 2 6x11x0 2mm A3501 x 2 A3505 Diff Seal A3502 Planetary Axle A3502 Planetary Gear A3502 Sun Gear A3505 O ring A3510 Rea...

Page 16: ...1 1 2 3 4 5 6 7 5 14x17x0 10mm A4452 x 3 14x17x0 25mm A4452 x 2 14x17x0 10mm A4452 x 1 A4451 Bearing Insert LR A4450 Rear Bulkhead Cover A4451 Bearing Insert RR A3508 Pinion Gear A4450 Rear Bulkhead...

Page 17: ...x 2 Solid 5 40 x 1 8 A6297 x 2 A1749 3 Toe 3 Anti Squat Pivot Brace A4431 Rear Outer Pivot Brace Cap A4431 Rear Inner Pivot Brace Cap A1745 Rear Pivot Brace A4453 Hub Spacer 050 A6503 3 5mm Hinge Pin...

Page 18: ...q STEP D 5 40 x 3 4 A6279 x 2 5 40 x 1 2 A6278 x 2 5 40 x 3 4 A6279 x 4 L 5 40 x 1 4 A6302 x 2 L 8 32 x 11 32 A6311 x 2 5 40 x 1 2 A6278 x 3 A4435 Right Wing Mount A4435 Wing Mount Brace A4435 Left Wi...

Page 19: ...A6302 x 2 5 40 x 1 A6280 x 1 5 40 x 3 4 A6279 x 1 1 2 5 40 x 1 4 A6302 x 2 3 4 F 5 40 x 1 8 A6297 x 1 2 5mm x 14mm A3518 x 1 Solid A6056 6 8mm Suspension Ball A6544 4mm Rear Turnbuckle A6542 Rod End A...

Page 20: ...Completed Rear Assembly STEP D 13 q STEP D 8 32 x 1 2 A6262 x 4 5 40 x 1 2 A6240 x 2 L 5 40 x 1 4 A6302 x 2 Caution Ensure that the driveshaft is inserted into the slot of the center outdrive while i...

Page 21: ...he air bubbles escape from the oil Once all the air bubbles are out of the oil gently place the Shock Bladder onto the shock as shown Some oil should bleed from the shock Screw the Shock Cap onto the...

Page 22: ...E 03 q x2 x2 Front Rear 5 40 x 20mm A6281 x 2 L 5 40 x 1 4 A6302 x 2 C 4 40 x 1 8 A6227 x 1 A5458 Green Rear Spring A5451 Silver Front Spring A5435 Spring Cup A5426 Shock Boot A5435 Shock Mount Bushin...

Page 23: ...STEP E 04 q Completed Shock Assembly STEP E 05 q STEP E 5 40 x 20mm A6281 x 2 L 5 40 x 1 4 A6302 x 2 C 4 40 x 1 8 A6227 x 1 A5435 Shock Mount Bushing Tip Ensure the open end of the shock cup is facing...

Page 24: ...Servo Horn JR All DZ9100T S Needs Spacer No 23T Airtronics Sanwa 94357Z 94358Z 94649Z 94360Z 94452Z 94758Z 94737Z 94738Z Yes 23T 94102Z 94112Z Yes Hitec All No 24T Futaba All S9102 DOES NOT FIT No 25T...

Page 25: ...Receiver Antenna Tube Assembly STEP F 03 q Radio Tray Installation STEP F 04 q STEP F Body Clip A8200 x 1 8 32 x 3 8 A6264 x 2 A4403 Antenna Cap A8313 Name Plate A4460 Receiver Cover A4402 Antenna Tu...

Page 26: ...rough Clips on Bottom 1 8 Scale Brushless ESC Not Included A4461 Battery Tray Speed Control Lead to Receiver A4463 Battery Strap Supplied with Servo not included Ensure the servo gear is centered befo...

Page 27: ...y Tray Installation STEP F 07 q Completed Radio Tray and Battery Installation STEP F 08 q 8 32 x 3 8 A6264 x 3 5 40 x 1 2 A6271 x 1 8 Countersink A6351 x 2 Speed Controller Lead Wire Connect to Channe...

Page 28: ...25 STEP G Tire Installation STEP G 01 q Wing Installation STEP G 02 q LOSI LOK LOSI LOK Body Clip A8200 x 2 1 2 A3531 Wheel Hexes A3531 Wheel Hexes A8130 Wing Button A8130 Rear Wing...

Page 29: ...MEANT TO BE PAINTED FROM THE INSIDE Apply paint to the inside of the Body Remove the masking tape for the next color and continue Try to use darker colors first If you use a dark color after a light...

Page 30: ...ll shorten the length increasing negative camber Rotating the tie rods towards the back of the car will lengthen them increasing negative camber Set the front tires to have 1 degree of negative camber...

Page 31: ...ep the buggy flatter with less roll and increase high speed steering A short front camber link will roll more and make the vehicle more aggressive Too short of a front link may make the vehicle feel t...

Page 32: ...tooth pinion LOSA3753 If you are running on a very large sweeping track a 16 tooth pinion LOSA3756 is recommended See gear chart below for other Kv rated motors and their recommended gearing 1300 1700...

Page 33: ...of purchase cannot provide warranty support or repair Once assembly setup or use of the Product has been started you must contact Horizon directly This will enable Horizon to better answer your quest...

Page 34: ...ance Horizon Hobby SAS 14 Rue Gustave Eiffel Zone d Activit du R veil Matin 91230 Montgeron 33 0 1 60 47 44 70 Instructions for Disposal of WEEE by Users in the European Union This product must not be...

Reviews: