Page 6
1
2
3
5
4
8
6
7
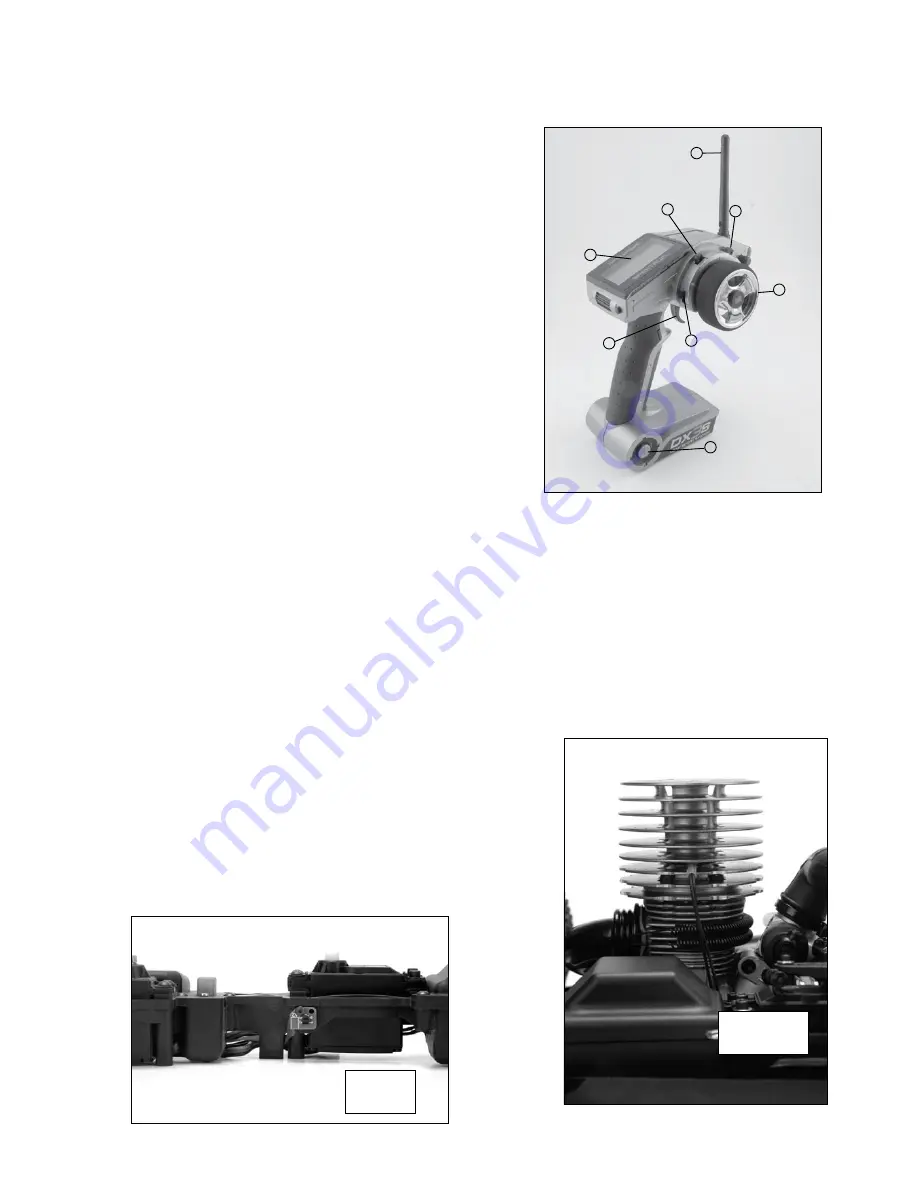
About the Radio
The Spektrum DX3S radio installed in the 8IGHT-T 2.0 RTR is a professional level system with more than the usual
features you may find useful. Be sure to read through the included radio manual for complete instructions. The
following is a simple guide referring to items that are commonly used and/or needed to run your model.
1. Power Switch - Turns your transmitter ON and OFF
2. Steering Wheel - Controls the steering of your model
3. Steering Trim Tab - Allows you to fine-tune the neutral
position of the steering
4. Throttle Trigger - Pull back for throttle and push forward
for brakes
5. Throttle Trim Tab - Allows you to set the idle/brake of
the model
6. Transmitter Display - Digital readout shows battery voltage,
temperature, rpm/speed and functions/settings
7. Transmitter Antenna - Transmits signal to the receiver in
the model
8. AUX-Auxiliary which is not used on the 8IGHT-T 2.0 RTR
Radio Operation
It is important that you familiarize yourself with the radio system, as
this is your direct link to the model.
•
Never run your model with low receiver or transmitter batteries.
•
Always fold the antenna to the upright position before running
your model.
•
Never leave the power on or the batteries will not last long.
•
Always turn the transmitter ON before turning the model ON.
•
When finished running, always turn the model OFF before the transmitter.
•
For best operation, it will be necessary to keep the “trims” adjusted for both the steering and throttle as noted
on the following pages.
Steering Trim
: The model should go straight without turning the steering wheel. If not, tap the trim lever found
just above and to the right of the steering wheel in the direction needed for the model to go straight. Each tap of
the trim button will be accompanied by an audible tone indicating a change has been made. It may take several
taps to get the correct trim setting.
Throttle Trim
: The model should idle without the tires rotating when the trigger is at its neutral position. If
not, tap the trim lever found just above and to the left of the steering wheel to reposition the throttle servo
and close the carburetor and apply more brake. Note that additional braking force is applied when you push
the trigger forward.
Telemetry Sensors
•
The battery power of the receiver pack will automatically register on
the readout screen on the radio.
•
The engine temperature sensor is installed around the head
just above the head bolts as seen in the photo. The temperature
sensor needs to be always mounted in this location for accurate
temperature readings.
•
The RPM/Speed Sensor (SPM1452) is mounted directly in the side of
the radio tray near the center differential.
Temperature
Sensor
RPM
Sensor


