115
83
9
79
14
8
5
79
78
83
2
8
26
q
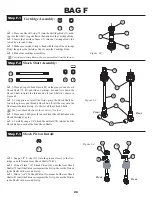
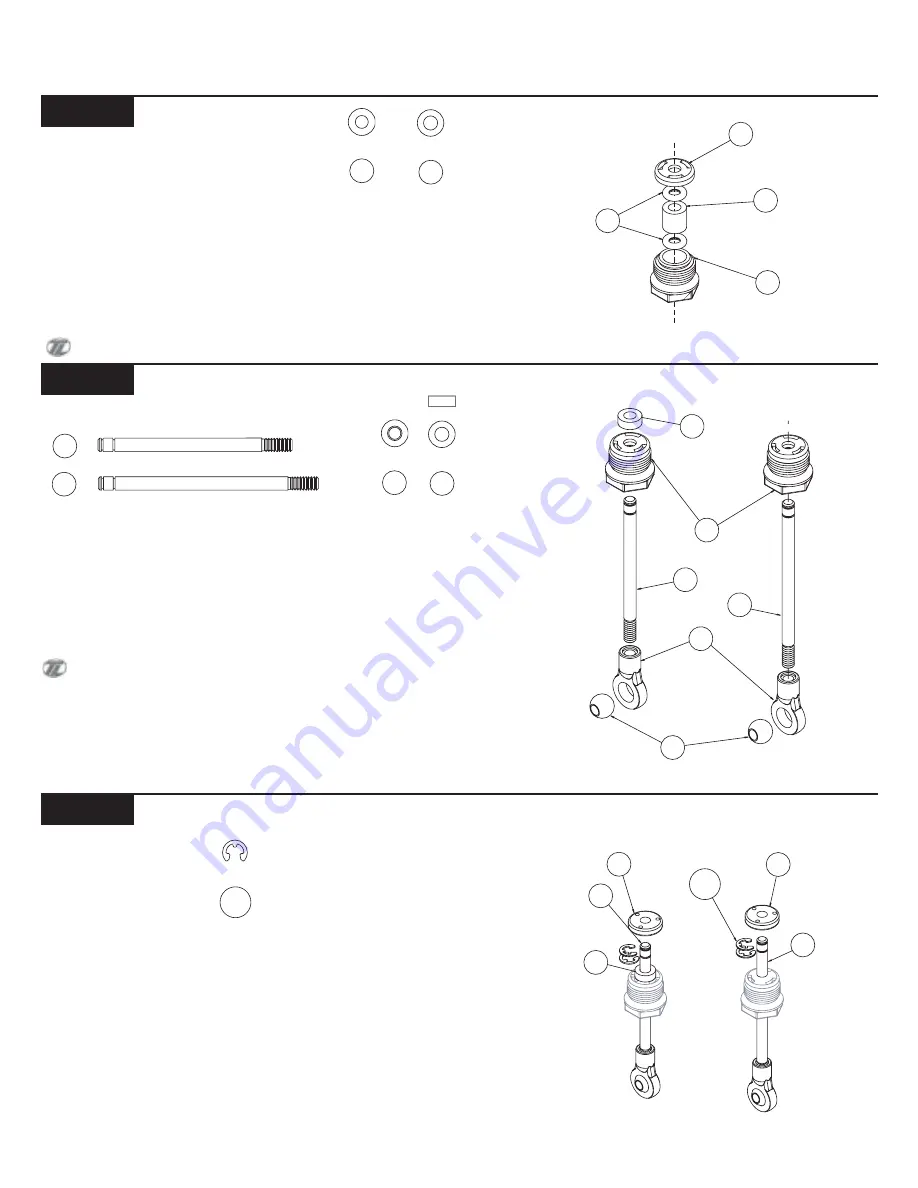
1. Place one Shock O-ring (73) into the Cartridge Body (5), mak-
ing sure that the O-ring sits flat in the bottom of the Cartridge Body.
q
2. Insert the Cartridge Spacer (7) into the Cartridge Body fol-
lowed by a second O-ring.
q
3. Make sure second O-ring is flush with the top of the Cartridge
Body, then press the Cartridge Cap (6) onto the Cartridge Body.
q
4. Make four cartridge assemblies.
Cartridges in some kits may be pre-assembled from the factory.
Figure 63
Figure 64
BAG F
q
1. Place a drop of Shock Fluid (189) on the grooved end of each
Shock Shaft (79, 83) and slide a Cartridge, hex end first, down the
Shock Shaft towards the threads on all four Shafts as shown in
Figure 62.
q
2. Using pliers or small Vise Grips, grasp the Shock Shaft be-
tween the grooves and thread a Shock End (2) all the way onto the
Shaft until the threads stop. Do this for all four Shock Shafts.
The front Shock Shafts are the shorter of the four.
q
3. Place one 0.090 Spacer (8) on each front Shock Shaft above the
Shock Cartridge Cap (6).
q
4. Carefully snap a 1/4" Shock Mount Ball (78) into each of the
Shock Ends on each of the four Shock Shafts.
q
1. Snap a 1/8" E-clip (115) into the groove closest to the Car-
tridge on both front and rear Shock Shafts (79,83).
q
2. Slide a "black", #57 Shock Piston (14), onto the front Shock
Shafts (79) until the Piston rests against the E-clip. Secure the Pistons
to the Shafts with a second E-clip.
q
3. Slide a "red" #56 Shock Piston (9) onto each of the rear Shock
Shafts (83) until the Piston rests against the E-clip. Secure the Pistons
to the Shafts with a second E-clip.
Front
Rear
Step F-1
Cartridge Assembly:
Step F-2
Shock Shaft Assembly:
Step F-3
Shock Piston Install:
5
7
6
73
Figure 62
73
7
115
79
Front
Rear
78
8
83

