background image

58

59

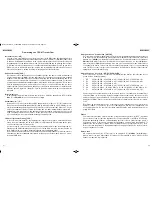
Technische Daten / Technical data / Caractéristiques / 

Características técnicas / Technische gegevens

Empfängerempfindlichkeit / Receiver Sensitivity /

FM : 1.6µV / 1.2 KHz;

Sensibilité du récepteur / Sensibilidad Receptor /

20 dB ( S+N+D)/N

Ontvangergevoeligheid 

AM : 2.4µV / 60%;

20 dB ( S+N+D)/N

Zwischenfrequenzen / Intermediate frequencies /

1. ZF/IF 10.695 MHz

Fréquences Intermedie / Frecuencia intermedia /

2. ZF/IF 455 KHz

Middenfrequenties

Squelch Empfindlichkeit / Squelch Sensitivity /

1.0 µV - 2.0 mV

Sensibilité du Squelch / Sensibilidad Squelch / 
Squelch gevoeligheid

NF-Ausgangsleistung /Audio Output Power /

1.9 W / 8 Ohm 

Puissance de sortie audio / Potencia Salida Audio /

( 10% THD )

LF-uitgangsvermogen

Sendeleistung / TX output power / Puissance d’emission / 

FM max. 4 W / 50 Ohm

Potencia de Salida / Zendvermogen

AM max. 1 W / 50 Ohm

hp: AM max. 4 W / 50 Ohm

Hub / Deviation / Déviation / Desviasión / 

max. 2 KHz / FM

Balayage de fréquence / Frequentieverschuiving

Modulationsgrad / Modulation Degree

85 % max. AM

Degré de modulation / Grado de modulación /
Modulatiegraad

Frequenztoleranz / Frequency tolerance /

max.   600 Hz

Tolérance de fréquence / tolerancia de frecuencia / 
Frequentietolerantie 

Ober-/Nebenwellenunterdrückung / 

4 x 10   W

Harmonic / spurious suppression /

2.5 x 10   W

Réjection des (non) harmoniques /
Supresión de los armónicos / 
Onderdrukking van storingen

Stromaufnahme / Current consumption /

FM: 1100 mA / TX

Consommation / Intensidad absorbida /

AM: 600 mA / TX, 150 mA / RX

Stroomverbruik

hp: AM: 1800 mA / TX

Betriebsspannung / Power Supply Voltage /

max. 12 V / 24 V nom. 

Alimentation / Alimentación / Voedingsspanning

Abmessungen / dimensions / dimensions /

188 mm x 150 mm x 56 mm

Dimensión / Afmetingen

Gewicht / weight / Poids / Peso / Gewicht 

1154 gr.

<

_

+

_

-9

<

_

-9

TEAM TruckerCom

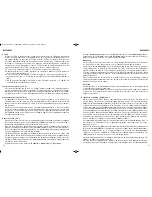
Kanal - Frequenz ( MHz ) / Channel - Frequency ( MHz ) / Canaux - Fréquence ( MHz ) / 

Canal - Frecuencia ( MHz ) / Kanaal - Frequentie ( MHz ) 

01 - 26.965
02 - 26.975
03 - 26.985
04 - 27.005
05 - 27.015
06 - 27.025
07 - 27.035
08 - 27.055
09 - 27.065
10 - 27.075
11 - 27.085
12 - 27.105
13 - 27.115
14 - 27.125
15 - 27.135
16 - 27.155
17 - 27.165
18 - 27.175
19 - 27.185
20 - 27.205
21 - 27.215
22 - 27.225
23 - 26.255
24 - 27.235
25 - 27.245
26 - 27.265
27 - 27.275
28 - 27.285
29 - 27.295
30 - 27.305
31 - 27.315
32 - 27.325
33 - 27.335
34 - 27.345
35 - 27.355
36 - 27.365
37 - 27.375
38 - 27.385
39 - 27.395
40 - 27.405

41 - 26.565
42 - 26.575
43 - 26.585
44 - 26.595
45 - 26.605
46 - 26.615
47 - 26.625
48 - 26.635
49 - 26.645
50 - 26.655
51 - 26.665
52 - 26.675
53 - 26.685
54 - 26.695
55 - 26.705
56 - 26.715
57 - 26.725
58 - 26.735
59 - 26.745
60 - 26.755
61 - 26.765
62 - 26.775
63 - 26.785
64 - 26.795
65 - 26.805
66 - 26.815
67 - 26.825
68 - 26.835
69 - 26.845
70 - 26.855
71 - 26.865
72 - 26.875
73 - 26.885
74 - 26.895
75 - 26.905
76 - 26.915
77 - 26.925
78 - 26.935
79 - 26.945
80 - 26.955

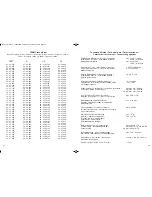
01 - 27.60125
02 - 27.61125
03 - 27.62125
04 - 27.63125
05 - 27.64125
06 - 27.65125
07 - 27.66125
08 - 27.67125
09 - 27.68125
10 - 27.69125
11 - 27.70125
12 - 27.71125
13 - 27.72125
14 - 27.73125
15 - 27.74125
16 - 27.75125
17 - 27.76125
18 - 27.77125
19 - 27.78125
20 - 27.79125
21 - 27.80125
22 - 27.81125
23 - 26.82125
24 - 27.83125
25 - 27.84125
26 - 27.85125
27 - 27.86125
28 - 27.87125
29 - 27.88125
30 - 27.89125
31 - 27.90125
32 - 27.91125
33 - 27.92125
34 - 27.93125
35 - 27.94125
36 - 27.95125
37 - 27.96125
38 - 27.97125
39 - 27.98125
40 - 27.99125

D

UK

CEPT

01 - 26.960
02 - 26.970
03 - 26.980
04 - 27.000
05 - 27.010
06 - 27.020
07 - 27.030
08 - 27.050
09 - 27.060
10 - 27.070
11 - 27.080
12 - 27.100
13 - 27.110
14 - 27.120
15 - 27.130
16 - 27.150
17 - 27.160
18 - 27.170
19 - 27.180
20 - 27.200
21 - 27.210
22 - 27.220
23 - 26.250
24 - 27.230
25 - 27.240
26 - 27.260
27 - 27.270
28 - 27.280
29 - 27.290
30 - 27.300
31 - 27.310
32 - 27.320
33 - 27.330
34 - 27.340
35 - 27.350
36 - 27.360
37 - 27.370
38 - 27.380
39 - 27.390
40 - 27.400

PL

manual3_TruckerCom_V1:RoadCOM manual.qxd  8/24/2015  8:44 AM  Page 58

Summary of Contents for TruckerCom

Page 1: ...Bedienungsanleitung Operating Instruction Manual de Instrucción Manuale d istruzioni Mode d emploi Handleiding Full Multi Norm TruckerCom ...

Page 2: ...N OFF 8 Regolazione Squelch Squelch automatico ASQ 9 Interruttore a rotazione per selezione canale CH 10 Presa microfono a 6 Pin GDCH standard 11 CTCSS 12 Interruttore selezione modulazione AM FM 13 Interruttore on off funzione VOX 14 Modalità di scansione Tutti Gruppo SB Saltare SK 15 Tasto scansione canali SC 16 Tasto selezione retroillumi nazione LCD LCD 17 Tasto richiamata ultimo canale LCR 18...

Page 3: ...ng dürfen nur eine Länge von max 4 5 Metern haben Antennenanschluss Der PL Stecker Typ PL259 des Antennenkabels Koaxialkabel wird mit der Buchse 22 an der Geräterückseite verbunden Für eine einwandfreie Verbindung muss der Überwurf des Steckers gut festgedreht werden Ebenso ist auf eine ordentliche Verbindung des Antennen kabels mit dem Antennenfuß zu achten Nicht einwandfreie Verbindungen können ...

Page 4: ...erfolgt die Anzeige des Kanals mit den großen Ziffern und dessen zugehörige Frequenz mit den kleinen Ziffern Während des Sendens kann kein anderer Kanal eingestellt werden Es kann nur auf übereinstimmenden Kanalnummern und Modulationsarten mit der Gegen station Funkbetrieb aufgenommen werden Montage des Gerätes im Fahrzeug Das Gerät kann entweder mit dem beiliegenden Montagebügel unter dem Armatur...

Page 5: ...r verschiedenen Normen in den einzelnen Ländern sehen Sie in den Gerätepass Der Benutzer ist für die richtige Einstellung der gülti gen Norm im jeweiligen Land eigenverantwortlich Senden Zum Senden wird die im Mikrofon 1 eingebaute Sendetaste 4 PTT gedrückt und für die Dauer der Durchsage gehalten Das Sendekontrollsymbol in der LCD Anzeige TX erscheint Die Balkenanzeige unten in der LCD Anzeige ze...

Page 6: ...ise unter die Einschaltschwelle abfällt bleibt das Gerät weiter auf Sendung Vorrangkanal 9 19 CH9 19 Das Gerät verfügt in allen Versionen über die Vorrangkanäle 9 und 19 Durch einmaliges Drücken der Vorrangskanaltaste 20 CH9 19 wird der Kanal 9 eingestellt Um Kanal 19 als Vorrangskanal einzustellen muss die Vorrangskanaltaste zwei Mal gedrückt werden Im aktiven Zustand wird die Vorrangskanalnummer...

Page 7: ...rechender Sicherheitsabstand zur Antenne eingehalten werden Allgemeine Hinweise Das Gerät ist vor Feuchtigkeit und Staub zu schützen Das Gerät niemals an Orten aufbe wahren die einer starken Erhitzung und oder direkter Sonneneinstrahlung ausgesetzt sein könnten Zur Gehäusereinigung ein weiches fusselfreies Tuch verwenden Zur Reinigung niemals Lösungsmittel verwenden Service Das Gerät darf nicht ge...

Page 8: ...259 plug of the aerial cable coax is connected to the SO239 socket 22 on the rear panel Make sure that all plugs are firmly tightened and properly soldered Unsatisfactory connections can damage the radio and will reduce the range of operation The antenna should be matched with the radio otherwise a part of the transmit power will be reflected at the antenna and will not be radiated This causes als...

Page 9: ...own at the LC dis play 6 and the LCD backlight is illuminated Adjust the receiver sound with the volume con trol to the desired level All settings are stored and will be recalled after turning the radio off and on again as long as the power supply is not disrupted Squelch ASQ The white noise which occurs always on free channels can be suppressed by the squelch function By turning the squelch contr...

Page 10: ...election press the LCR key 17 shortly The CTCSS symbol stops blinking English English Last channel recall LCR Press the LCR key 17 LCR shortly to recall the prior channel and modulation selection The actual channel and modulation type will be stored temporarily in a register If you push the LCR key 17 LCR once again the unit will skip back to the previously selected chan nel and modulation type st...

Page 11: ...hortly The symbol VOX will appe ar in the LCD For successful transmission the voice has to exceed and maintain a certain volume level If the volume level drops below the threshold the radio remains in transmission mode for a short period VOX delay time before it switches to receive mode During transmission the symbol TX will appear in the LCD In VOX mode the PTT key is still active To deactivate t...

Page 12: ...etálica con ductora de la carrocería del coche Existen otras posibilidades para fijar la antena en el coche sin necesidad de taladrar la carro cería como por ejemplo montando la antena en el canalillo en el maletero o utilizando la antena con base magnética o antena de cristal Para el buen funcionamiento de la estación de base le recomendamos una antena estacio naria de techo Para prevenir interfe...

Page 13: ...en sen tido contrario de las agujas del reloj y siempre sin activar el interruptor interno El dispositivo se enciende con el control del volumen 7 Vol Off girando en el sentido de las agujas del reloj Los símbolos aparecen en el indicador LC 6 y la luz posterior LCD se encenderá Si se encien de después de que se haya producido una interrupción de la alimentación la unidad sólo fun ciona en el cana...

Page 14: ...or pudiéndose escuchar así la señal transmitida Por defecto no hay ningún código CTCSS asignado a un canal Para asignar un código a un canal siga las siguientes instrucciones 1 Seleccione el FM canal al que se va asignar un código CTCSS 2 Mantenga pulsada la tecla LCR hasta que el símbolo CTCSS empiece a parpadear en el display 3 Asigne uno de los 39 códigos CTCSS disponibles 0 39 0 ningún código ...

Page 15: ...ado y pulse el botón SC 15 brevemente Para activar el exploración de canal pulse el botón SC 15 SC brevemente Función VOX La función VOX es un control activado por la voz del transmisor lo que significa que al hablar a través del micrófono el transmisor pasa automáticamente a modo transmisión no siendo necesario pulsar PTT para transmitir Para prevenir cualquier transmisión no deseada al TruckerCo...

Page 16: ...producto químico Revisión No se puede abrir el aparato ni realizar reparaciones o ajustes posteriores ya que cada modificación o intervención no autorizada dará como resultado la cancelación del permiso de explotación y la pérdida de garantía No utilizarlo si parece que no funciona bien En este caso desconectar inmediatamente el equipo de la fuente de alimentación DC En caso de encontrarse algún d...

Page 17: ...ssa a terra Tutti I cavi alimentazione collegati compreso il cavo antenna non devono essere di lung hezza superiore ai 3m Connessione volante Prima di premere il tasto di trasmissione dev essere stabilita un adeguata connessione volante La spina PL259 del cavo coassiale è collegato alla presa SO239 22 sul pannello posteriore Assicurarsi che tutti i connettori siano fermamente chiusi e correttament...

Page 18: ...ra stazione CB gli stessi dovranno essere impostati sul medesimo canale Installazione sull auto Quando si vuole fissare la radio sulla vostra auto potete fissarla sotto il cruscotto con l aiu to della staffa di montaggio inclusa o inserirla in un alloggiamento autoradio utilizzando il telaio incluso Dovrete sempre montare il transceiver dove gli interruttori sono facilmente accessibili Altri impor...

Page 19: ... tasto sul pan nello frontale tranne il tasto Up Down 2 3 o il tasto PTT 4 sul microfono o semplicemen te girare il selettore rotatorio canale 9 CH Poi il simbolo SC scompare dal display e il canale attuale sarà quello in essere prima della disattivazione della funzione di scansione Retroilluminazione schermo LCD LCD modalità semplice Premendo brevemente il tasto della retroilluminazione del displ...

Page 20: ...a volta per un breve periodo di circa 2 secondi fino a ricevere un altro tono di avviso che segnalerà la disattivazione Nello stesso momento sparirà il simbolo dal Display Funzione Vox La funzione VOX è un controllo di attivazione vocale della radio Ciò significa che parlando nel microfono il ricetrasmettitore si commuterà automaticamente nel modo trasmissione Così diventa inutile mantenere premut...

Page 21: ... doit avoir le contact le mieux possible à une surface bien conduc tible de la carrosserie En dehors de la montage fixe de l antenne mobile qui demande la perçage d un trou dans la carrosserie de votre voiture il y a des autres possibilités pour l installation par exemple l u tilisation d une antenne de gouttière ou une antenne de fenêtre d auto la montage à un sup port sur le coffre ou la montage...

Page 22: ...lt Il est recommandé d utiliser une borne pas coupée automatiquement avec le contact sinon les dernières ajustements ne resteront pas emmagasinés quand l appareil et la voiture soient état hors service Pour l utilisation en station fixe branchez votre appareil sur une alimentation régulée 13 2 V 2 5 A L alimentation régulée doit être qualifiée pour le service à un émetteur récepteur sinon on risqu...

Page 23: ...émission 4 en même temps avec la touche de la tonalité 5 SIGNAL le signal d appel sera émis et est seulement perceptible chez l autre station qui doit se trouver sur le même canal avec la même modulation CTCSS La fonction CTCSS Continuous Tone Coded Squelch System qui est seulement disponible dans FM permet une sélection ciblée de certaines radios portatives sur une fréquence d é mission donnée Si...

Page 24: ...émission 4 PTT et la touche de la tonalité 5 ou tournez le sélecteur rotatif de canaux 9 Verrouillage du clavier Pressez et tenez la touche de contro de deux canaux 18 DW pour au moins 2 secondes jusqu à ce qu un deuxième ton de confirmation et l arrivée du symbole de clé à l afficheur indiquent le verrouillage du clavier Dans cet état l appareil ne réagit pas à la pression sur n im porte quelle t...

Page 25: ...isé et autorisé INHOUD Het opzetten van de TEAM TruckerCom Installeren van een CB antenne 50 Antenne aansluiting 50 Installatie in de auto 50 51 Microfoon DM 915S 51 Spanning bron 51 De werking van TEAM TruckerCom Inschakelen Vol Off 52 Ruisonderdrukking ASQ 52 Bevestigingstoon 52 Kanaalkeuze p q 52 LCD achtergrondverlichting LCD 52 Omschakelen van de modulatie AM FM 53 Omschakelen van de versies ...

Page 26: ...u makkelijk bij de bediening kunt Andere belangrijke punten voor een goede bevestiging van het apparaat geen beperking van het gezichtveld Goed bereik van de bedieningselementen Een goede lucht circulatie om oververhitting van het apparaat te verhinderen Let erop dat het LC display 6 alleen onder een bepaalde hoek goed zichtbaar is Ook het zonlicht zorgt voor een slecht afleesbaar scherm Het is aa...

Page 27: ...het wisselen van de mode AM en FM wordt nu ook de achtergrondkleur gewisseld Voor het omschakelen naar de standaard achtergrond verlichting voor beide modes drukt u 3 secon den op de LCD toets Omschakelen van de modulatie AM FM De TruckerCom kan in de modulatie AM en FM werken Bij bepaalde instellingen werkt het alleen in de mode FM Als het apparaat op het kanaal ook de mode AM accepteerd kunt u o...

Page 28: ...de Alle Kanalen wordt niet in het display gemarkeerd Het mode blokkering wordt aan gegeven door de symbool SB en de mode Overslaan door de symbool SK Om de modus te schakelen houdt u de toets SC 14 SC voor drie seconden Blokkering Met deze functie kunt u de zoek functie tot 10 opeenvolgende kanalen beperken dit maakt het mogelijk om in deze kanaal groep een bezet kanaal zo snel mogelijk te vinden ...

Page 29: ...t 4 PTT op zenden worden omgeschakeld Voor het deactieveren van de VOX funktie drukt u op de toets voor het actieveren van de spraak stuurfunctie 13 Externe luidspreker aansluiting De TruckerCom is op achterzijde uitgerust met een 3 5 mm jack aansluiting 24 om een externe luidspreker van 4 8 ohm impedantie aan te sluiten Bij 4 ohm zal de belasting van de luidspreker 4watt bedragen Wanneer de exter...

Page 30: ...nal Frequenz MHz Channel Frequency MHz Canaux Fréquence MHz Canal Frecuencia MHz Kanaal Frequentie MHz 01 26 965 02 26 975 03 26 985 04 27 005 05 27 015 06 27 025 07 27 035 08 27 055 09 27 065 10 27 075 11 27 085 12 27 105 13 27 115 14 27 125 15 27 135 16 27 155 17 27 165 18 27 175 19 27 185 20 27 205 21 27 215 22 27 225 23 26 255 24 27 235 25 27 245 26 27 265 27 27 275 28 27 285 29 27 295 30 27 3...

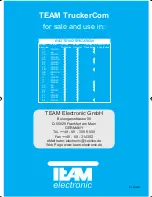
Page 31: ... online de Web Page www team electronic de Länder Version Vertrieb Betrieb Anmelde Gebührenfrei Countries Distribution Operation Registration Chargefree AT FMN EI AT hp CH FMN EI CZ FMN EC DE FMN DE DK FMN EC ES FMN EI FR FMN EI FIN FMN EI GB FMN UK GR hp IT FMN EI IT FMN EI LT FMN EI LU hp NO hp NL FMN EI PT hp PL FMN EI PL FMN PL SE FMN EI R TTE NOTIFICATION V1 08 2015 ...

Reviews: