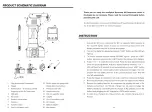
Product Schematic Diagram
6
5
10
4
3
LCD
2
1
11
7
8
UNIT
9
12
13
14
15
16
1.High-pressure Air compressor
10. Bulit-in digital tire gauge with
2.Trigger
preset auto-stop function
3.Safety switch - to avoid accidental
11. Pressure hose with
triggering of the air compressor
thread connector
4. LED light
12.12V car cigarette lighter
5. Air nozzle
adapter
6. Pressure hose holder
13. One li-ion battery pack
7. Fastener
14. AC charger
8. Adapter holder
15. Balloon adapter
9. One Li-ion battery pack
16. Ball adaper
Thank you for using the Intelligent Auto- stop Air Compressor which is
developed by our company. Please read the manual thoroughly before
operating this unit.
The Air Compressor can be used to inflate tires of household car, life bouy, ball
etc. It can also be used as a tire pressure gauge.
Instruction
1.Roll out the 12V cord, connected the 12V car cigarette lighter adapter to the
cigarette lighter socket in your car. Insert the pressure hose with thread
connector into the air nozzle and tighten.
2.Turn on the digital tire gauge by pressing “UNIT” button and the LCD will light up.
3.To choose desired pressure format PSI, BAR,,kg/cm2
,
press the “UNIT” button
firmly scintillation 4 times, lock for setting format. Each press of the
“UNIT” button cycles through the pressure format.
4.Press “+”or “-” to check the pre-set level. Press for slow adjustment,long press for
quick adjustment.Adjust to desired level by pressing “+”or “-” . LCD will flash for 4
seconds to set automatically or press “UNIT” button for immediately set. Unlock
safety switch and press the trigger, the compressor will now inflate your tire to the
pre-set pressure level. And will shut off automatically.
5.Press the trigger of compressor can stop or start the compressor halfway.
6.Removed the thread connector from the tire after the object is fully
inflated.
7.Remove the battery from the air compressor by gripping the end of the battery and
pulling it out. The AC charger can be used to charge the battery directly by
connecting the AC charger to AC charger port on the battery and plugging the AC
charger to a 120V power source.
8.It need to be charged for 4 hours before use,normal charging time is 4
hours.
1/2
Summary of Contents for T-PRO LS4029
Page 4: ......


